
Sandra Fox
Graphics Designer and Photographer
The Best Methods for Dealing with Upset Customers - RMagazine. As a restaurateur, you strive for the very best in every aspect of your business – from customer service, quality of the food, hygiene and cleanliness and more – but regardless of how much effort you put in to making your restaurant the best it can be, there are inevitably going to be times when something doesn’t go right, and customers reserve the right to get upset about it.

Most of these situations are beyond your control. Human errors happen to the best of servers, Internet connections can be temperamental (causing the POS systems to go offline), and chefs can occasionally undercook a steak. It is how we deal with these situations that make all of the difference, and here are some of the best methods for dealing with upset customers: Upset customers in restaurant = Opportunity to impress Take the time to listen to what the problem is and take the appropriate actions to deal with the situation. Apologizing is Key Deal with the issue as a quickly as possible Put it right. The Restaurant Front of House Equipment Checklist - RMagazine.
In order for your restaurant to run smoothly during every service, the right equipment has to be in store and on hand so that your servers can deliver the best possible service to your customers without running around like headless chickens trying to find something that should take them a matter of seconds to find.

It is incredible how much time can be saved over the course of a year, simply by keeping your restaurant stocked with the right equipment, and ensuring that all of your staff knows how and where to find the equipment they need to do their job to the best of their abilities. With that in mind, we’ve put together a Front of House equipment checklist for restaurateurs to follow. Tick these off as you get them stocked up, and there will be no reason why your restaurant shouldn’t run like clockwork, and create the best possible dining experience for your guests.
On the Tables: Flatware – This includes knives, forks and spoons. At your Service Stations: Useful extras: NPR World News. Mashable. Post-Processing Tips for Beginners. Selective Colorization. Text and images Copyright (C) 2002 Eric R.
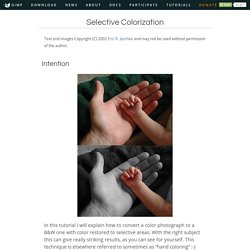
Jeschke and may not be used without permission of the author. Intention In this tutorial I will explain how to convert a color photograph to a B&W one with color restored to selective areas. With the right subject this can give really striking results, as you can see for yourself. This technique is elsewhere referred to sometimes as “hand coloring” :-) The basic technique is to duplicate the color photograph, convert the duplicate to B&W, and paste it as a new layer on top of the color image. Giving credit where credit is due: I did not come up with this method. The Procedure Here is the original example image, loaded into GIMP. Step 1 Duplicate the image (Ctrl+D). In this example, I tried the channel mixer, but ended up in this case preferring a simple conversion to grayscale (Image → Mode → Grayscale), then back to RGB.
Step 2 Open the Layers dialog (Ctrl+L). Step 3 Go to the B&W image and select all, then copy (Ctrl+A then Ctrl+C). Step 4 Step 5 ). Focus Stacking. Learn Photoshop Elements 11. Community Translation Episode available in 0 languages Available Translations: Join the Community Translation Project Thanks for your interest in translating this episode!

To get started, please join the Community Translation Project. Please Confirm Your Interest Thanks for your interest in adding translations to this episode! An error occurred while processing your request. Another translator has already started to translate this episode. Thanks for Participating! This episode has been assigned to you and you can expect an e-mail shortly containing all the information you need to get started.
About This Episode In this movie, author Jan Kabili discusses using layers in the Editor workspace in Photoshop Elements. Presented By Produced By. Adding Quick Frames, Effects and Textures. Share this Episode Please select a language: Autoplay End of Video Show End Screen Default Quality Adjust your embed size below, then copy and paste the embed code above.

Community Translation Episode available in 4 languages Available Translations: Beginners guide to photoshop elements - Bing Vidéos. Sandy.