
New Technology, Science News, The Future Now. Page corner bookmarks. This project comes to you at the request of Twitterer @GCcapitalM.
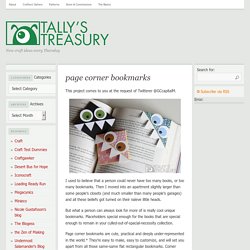
I used to believe that a person could never have too many books, or too many bookmarks. Then I moved into an apartment slightly larger than some people’s closets (and much smaller than many people’s garages) and all these beliefs got turned on their naïeve little heads. But what a person can always look for more of is really cool unique bookmarks. Placeholders special enough for the books that are special enough to remain in your culled-out-of-spacial-necessity collection. Page corner bookmarks are cute, practical and deeply under-represented in the world.* They’re easy to make, easy to customize, and will set you apart from all those same-same flat rectangular bookmarks.
If you like this tutorial, here are a couple others that might be up your alley. For the monster-loving adults in the room, try some googly-eyed paper monster wine charms. What you’ll need: Putting it all together: 1) Follow steps 2 and 3 from above. No Sew Shirt! How to Make Book Earrings (with pictures) The Hipster Home » Blog Archive » How to Make a Tiny Terrarium in a Light Bulb.
Ahoy there Hipster Homers!

I’m Julie and I’m the very first guest blogger on this fine site. Today’s project involves breaking stuff, plants, found objects, and miniatures. Fun, right? Let’s get started! We’re going to go through the steps to create your very own little terrarium. Dos and Don’ts: Do use sand or small pebbles; these are good because water drains through them easily. How To: You’ll need a few tools to make a tiny terrarium but nothing complicated to get started. Needle-nose pliersScissorsLong tweezers or chopsticksFlathead screwdriverGlasses or goggles Let’s start with the light bulb. We will be removing the inside parts of the lightbulb. First, remove the metal tip from the bottom of the bulb. Then, when enough of the sides are raised to get a good grip on them, hold one of the sides with your pliers and yank out the metal tip.
Next remove the black glass. Now you will be able to see the interior parts of the light bulb. Pull out any remaining wires with the pliers. Crafting MacGyver: Circular Logic. How To Make a String Tree Wall Mural Home Hacks. Recycled glove chipmunk.
Origami For Everyone. Tiny Polaroid Magnets. Hi there!

It’s felt like forever since I’ve last blogged, and has felt like an eternity since I’ve done anything crafty and nifty. Since my morning sickness has gone into full speed (yes, we’re expecting our third this fall!) I haven’t felt like myself. But nothing like inspiration to wake one out of a reverie — or nightmare, in my constantly sick state. I came across these DIY Pantone chip magnets on How About Orange and wanted to do something similar. You will need: Cardboard (mine was the backing of a sketchbook — much thicker than the back of a regular spiral bound notebook) or 2-3 sheets of white cardstock or poster board spray-mounted together to use as a sturdy backing to the magnetsOpaque white marker (necessary only if your cardboard is not white) Craft knife Metal straight edge/ruler Clear packing tape or frisk film. Step 1: Download a Photoshop file of the Polaroid frames below. Step 2: Print out photos onto photo paper. Step 4: Trim out photos with craft knife. 487 Comments.
Bendy Straw Shrimp Tutorial. Hello Class!
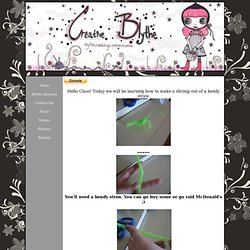
Today we will be learning how to make a shrimp out of a bendy straw. You'll need a bendy straw. You can go buy some or go raid McDonald's ;) Cut straight up the straw. You need to cut the straw so there are three pieces. Fold the skinniest piece Start out with the folded piece on top and take one of the other pieces and wrap it under the folded piece Pull the wrapped piece over and through Pull tight. Angel Dust Poem.