
The next generation of 3D content creation. MODOPEDIA. ModoShortcuts. Floating WindowsHide/LockModelingNavigationViewportCameraPopupsSelectionSnappingToolsWorkplane Floating Windows top Hide/Lock Viewport Camera Modelling Popups Selection Snapping Tools.
Curve Tool. ActionCenters. Symetry Tool. Brian Vowles - 3D Artist. Modo Advanced: Drone Ship. Nautilus shell 3D model process. Tip: Subsurface Scattering for a Skin Shader. Furry trees a quick tutorial. Here's a quick tutorial in building furry trees.I though to do a tricky one a Rowan tree.
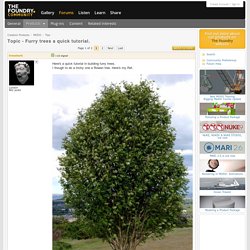
Here's my Ref. and a close up of the leaves. You can just cut out photos but I usually paint as it makes a cleaner map with no unwanted lighting. So first I make a simple stencil in P.shop. Then I duplicate it into a spray of leaves and add branches. Next paint colour. You can derive any other maps you want such as bump etc. Off in to Modo. Next you can pull around you points until it roughly matches the shape of your chosen tree.If any rows of polys get too stretched add another loop the aim is to get the poly's roughly the same size.Here it is after a bit of pulling around. Make a material for the shape, and add a shader with the Indirect Illum type set to Monte Carlo.Drag it above the base shader as below. Then add you fur layer.
In the Furshape Tab zero everything out. Your render preview should show this sort of exciting image. Then I add my stencil image. Which looks like: Professional CG Tutorials for VFX & Animation. Building a tree with replicators. London 862 posts Here's a quick overview as to how I used replication to make a complex tree.The first thing is to decide where you want the replicator to take over.Below you can see the green polys, these are points at which the branches are the same diameter.It is important to keep this constant as your branches will start at this size so that they will fit exactly.These green polys are in a separate mesh layer and will make the source points.The trunk is built to fit.
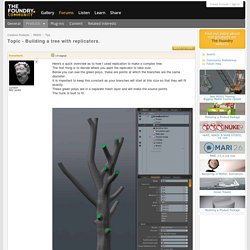
Next I make my prototype branch. You can see the ring of highlighted points they come from one ofthe same polys the same polys as the sourcepoints so that the fit is assured.Note the positioning of this first loop it is centered on the origin and then dropped a small bit downon the Y axis so we don't get a gap. There's nothing for it to build the rest of the branch the hard way! Not too bad though this only took an hour to build and another hour to UV. Mesh Fusion modelling in Modo 901. In this part 1 of making 508 I go through the process of making a mesh fusion mesh, with modelling individual objects for slicing, subtracting, intersecting and adding.

Modo 901 is a game changer with every aspect of the VFX timeline deeply embedded within a very good-looking package. The ease and robustness allowed within Modo 901 makes modelling very intricate models a breeze. There are few tricks i have used in “embracing” the mesh with new objects that allow contouring over the hard to duplicate shapes. The entire meshing process took me 4 hours, which with traditional modelling methods would have taken 2 days, if not more! The Mesh Fusion Process has three basic methods involved with creating a shape – right clicking and dragging over a shape to invoke the three commands in Item mode ( number 6 on the keyboard) Union Subtraction Intersection I have also included a Mesh Fusion model with the download named “Hamlet”, these models are available for you to use in any way you like! Lowpoly trees and Rock displacement. Group Masks.
Although Group Masks are covered relatively well in the modo documentation, often users are still confused as to what they are, and to what the differences are with hitting "m" on polygons, vs creating a mask by itself.
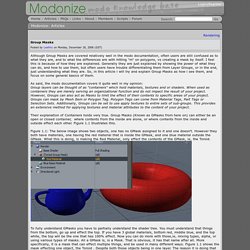
I feel this is because of how they are explained. Generally they are just explained by showing the power of what they can do, and how to use them, but often users have trouble differentiating them from Layer Groups, or in the end, just understanding what they are. So, in this article i will try and explain Group Masks as how i see them, and focus on some general basics of them. As said, the modo documentation covers it quite well in my opinion: Group layers can be thought of as "containers" which hold materials, textures and or shaders. Their explanation of Containers holds very true. Figure 1.1: The below image shows two objects, one has no GMask assigned to it and one doesn't. To fully understand GMasks you have to partially understand the shader tree.