
La coiffure est complète - De jolies tresses bohèmes pour la plage - Photos Beauté. 18-Résultat - Je veux une tresse épi (ou fishtail braid) - Photos Beauté. 5. La tresse boho - Tresses: 6 coiffures faciles à réaliserGalerie de photos - Famille. 5.
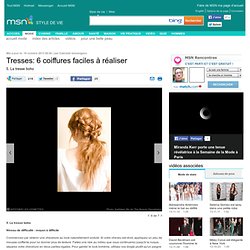
La tresse boho Niveau de difficulté : moyen à difficile Commencez par obtenir une chevelure au look naturellement ondulé. Si votre cheveu est droit, appliquez un peu de mousse coiffante pour lui donner plus de texture. Faites une raie au milieu que vous continuerez jusqu'à la nuque, séparez votre chevelure en deux parties égales. Lire aussi: En vidéo: Chignon-Tresse épi de blé à la française. Coiffure facile : 25 coiffures do it yourself. Pourquoi on aime ?
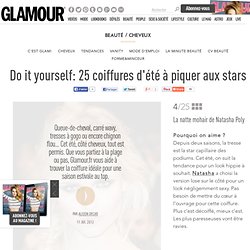
Depuis deux saisons, la tresse est la star capillaire des podiums. Cet été, on suit la tendance pour un look hippie à souhait. Natasha a choisi la version lose sur le côté pour un look négligemment sexy. Pas besoin de mettre du cœur à l’ouvrage pour cette coiffure. Plus c’est décoiffé, mieux c’est. Tresse néerlandaise. Mince alors, un blog coiffure sans une seule "dutch braid" ?
Il est plus que temps d'ajouter la tresse néerlandaise à cette encyclopédie, d'autant plus qu'elle sera nécessaire pour réaliser le défi coiffure de Claire ... (Attention, ne faites pas comme moi qui croyait que la "dutch braid" signifiait "tresse allemande"!) Pour comprendre le principe, commencez par natter vos cheveux comme vous le faites habituellement. Normalement, vous obtenez quelque chose qui ressemble à la photo de gauche : C'est-à-dire que vos chevrons vont vers le bas (vous les voyez, ces "V" qui descendent ?)
Réalisation d'une natte néerlandaise (simple) : Au lieu de croiser chacun des trois brins de votre natte l'un par-dessus l'autre, vous allez faire l'inverse, et les croiser les uns EN DESSOUS des autres, et ainsi obtenir une natte dont les chevrons vont vers le haut (comme la photo de droite). Bar à coiffures à paris. Hair and Make-up by Steph. Hair Tutorial. Lottie-Moss-thumbnail-e1332347087618. Charlotte-Moss-mariage-Kate-Moss. Coiffure-raie-zigzag. Long dégradé lissé avec mèche sur le côté Jean-Claude Biguine. Long ondulé wavy du défilé Altuzarra. Long ondulé wavy du défilé J Mendel. Chignon sur mesure, bar à chignon paris - Mode Beauté. Hair tutorials. Partial French Braid with Cascading Hair ~ Tutorialalso known as the "Waterfall Braid" Fashion. I’m not the originator of this hair style but I’ve gotten so many requests for it, I thought I’d give it a go for you.
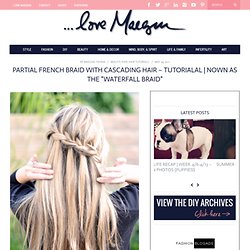
I don’t know what it’s called either so I haven’t researched it and/or found any other tutorials for it …thus, this is my version of it, and I’ve dubbed it the Partial French Braid w/ Cascading Hair. The photos I’ve seen online show the braid a little more straight across the back of the head and mine sort of braids at an angle, similar to my side/low french braid up-do. I’m sure this is 100% easier to do on someone else’s hair than your own but it goes pretty quickly once you get the hang of it …I mean, it’s my shortest hair video tutorial to date. That’s gotta mean something, right Enjoy. Note: Apologies in advance for the yelling of “NOOOO” towards the end, where I momentarily fear I’m going to lose my entire braid and have to start over. Have Fun! Find all my Hair Tutorials Here.
How+To+Style+a+Braided+Bun.jpg (Image JPEG, 600x1220 pixels) - Redimensionnée (61. No-heat curls tutorial. First, get ready for bed by putting your husband's ratty t-shirt on, removing all makeup, and applying your nightly eye cream.
That actually has nothing to do with the hair tutorial, I just thought I'd preface my appearance in these photos. Please excuse. Hair needs to be damp. I use root boost and thickening gel to give my hair some texture since it is very fine and has a hard time holding curl. Secure an elastic headband around the top of your head. Then fold small sections up, over, and through the headband like this. Once you have made it around the perimeter of your head, it should look like this. I usually sleep on mine to ensure my hair is completely dry by morning.
Oooo lala. Finally, take the headband off, shake your hair out, and you are left with beautiful curls without any damage from heat. Hair tutorial. We haven't done a hair tutorial in ages!

So, my friend (and hair genius) Caroline, photographer Jamie Beck and I decided to come together to whip up this gorgeous mermaid tail. It's perfect for those lazy summer day (or date nights) when you want to surprise and awe people with your hair. I absolutely love it--in fact, it might be my favorite hair tutorial yet.
How gorgeous is that braid, above?! Here are Caroline's steps, if you'd like to try it out... 1. 2-4. 5-6. 7. 8. (Optional step: You can remove the two separate rubber bands at the end, and just use one to combine the two tails together. The Beauty Department - Hair. Recently I realized that we’ve never really had a specific chat about hair serums.

There are so many different formulas from silicone-based, to alcohol free, to natural, to curl enhancing, etc… All of them promise to deliver mega shine on the driest, dullest hair. But there’s more to it than that.