
DIY: 5 Strand Braided T-Shirt Headband Tutorial. ¡Estilo puro! Crea tu propia lámpara con tabs de latas. Nada mejor que decorar tus ambientes tú mismo y sobre todo si para hacerlo utilizas materiales reciclados.
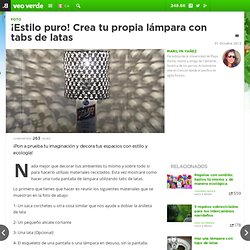
Esta vez mostraré como hacer una ruda pantalla de lámpara utilizando tabs de latas. Lo primero que tienes que hacer es reunir los siguientes materiales que se muestran en la foto de abajo: 1- Un saca corchetes u otra cosa similar que nos ayude a doblar la anilleta de lata. Felt Balls - Martha Stewart Kids' Crafts. Woven Rag Rug. Thank you for all the great feedback for liking my Braided Rag Rug.
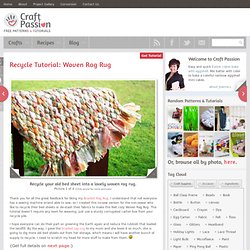
I understand that not everyone has a sewing machine or/and able to sew, so I created this no-sew version for the non-sewer who like to recycle their bed sheets or de-stash their fabrics to make this feet cozy Woven Rag Rug. This tutorial doesn’t require any loom for weaving; just use a sturdy corrugated carton box from your recycle pile. I hope everyone can do their part on greening the Earth again and reduce the rubbish that loaded the landfill. By the way, I gave the braided rag rug to my mum and she loves it so much, she is going to dig more old bed sheets out from her storage, which means I will have another bunch of supply to recycle.
Recycle Tutorial – Making Of T-Shirt Yarn. Another tutorial to help save our Mother Earth by turning unwanted items into something useful.
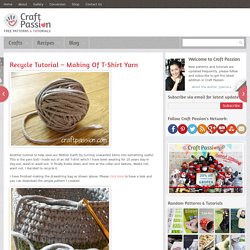
This is the yarn ball I made out of an old T-shirt which I have been wearing for 10 years day-in day-out, wash-in wash-out. It finally broke down and tore at the collar and sleeves. Waste not, want not, I decided to recycle it. I have finished making the drawstring bag as shown above. Please click here to have a look and you can download the simple pattern I created. Bias Quilt Binding: Explore Three Ways to Do It! On Craftsy. If you don’t want mitered corners or if your quilt is finished with a curved edge, bias quilt binding is ideal for its ability to gently stretch around the edges of your project.

Bias binding looks especially nice with fabric that’s printed with stripes and plaids. Fabric Basket. Thanks for those of you who asked for a tutorial on the fabric basket project I updated yesterday!
This is gonna be my second tutorial on my this blog. If anything isn't clear, feel free to leave me a comment and ask me for help. Remember that all seam allowances are 1/4" throughout the process, and seam allowances are included in all the fabric pieces used in this tutorial. Bag Tutorials Archives. DIY felt projects for the weekend. A list of cute felt tutorials from around the internet...Felt-covered tape measure at Poppy Lane, aboveMini teacup pin cushion by Tasket Basket Crafts, aboveFelt business card holders at Smila's WorldFelt waffle cone by Hannah HoosierFelt floral wall mural by Mariana Leung at Design SpongeFelt bows at Sew GorgeousFelt rosettes at Mrs.

Priss (Images from Poppy Lane and Tasket Basket Crafts ) Patrones/patterns. DIY against the machine. Me dan ataques crafter o crafterataques...

Alguien deja un comentario en el Facebook diciendo algo así como "¡Qué machine! " y mi cabeza con su lógica pasa de Antonio Machín > Máquina total 5 > Rage against the machine > ¿Rage against the machine? Tutorials. Hola there!
Here you can find an organized list of all my tutorials, projects and printables. I want to point out that I am no sewing expert and have no formal education in either sewing or English (Spanish is my native language) So I might not always use the correct terminology or best technique, I am always learning too!
It might not always be perfect, but it’s sure a lot of fun! All of my tutorials and printables for personal use only, if you want to sell items made with these tutorials please purchase a Limited Production License. If you blog them, please do not share the complete post and share a link crediting back to the post and DO NOT link directly to downloads, please read my Site Policy and Contact me if you have questions, hope you all enjoy! MOO MiniCard Holder in 3 Minutes.
Fold it, sew it together. Finished! Material: Kunstfilz, Bänder entworfen von traum-räume manufakt Material: Felt, Ribbons designed by smila´s world . Diese kostenlose Anleitung ist nur für den p rivaten Gebrauch. Woven Ribbon Lampshade – Tutorial – Hands Occupied. Sometimes, you’re out walking the dogs and find a couple of perfectly good lampshades in the trash, and you have no choice but to take their existence as a sign you need some new lampshades.

Even if you aren’t lucky enough to find craftable trash lying around, this project can be done with any wire-framed lampshade in need of a makeover. Supplies lots of ribbon, in 2 contrasting colors an old lampshade with a wire frame scissors liquid stitch/fabric glue lots of straight pins Directions Using whatever means necessary, strip your lampshade down to its wire frame.
Since I literally found my lampshade in an alley, and since even non-alley lampshades get dusty over time, I advise you to take this opportunity to throw away the probably-gross fabric removed from the shade and clean off your workspace. Cut a piece of ribbon long enough to wrap tightly around your lampshade plus two inches. Wrap the ribbon around the outside of the shade. How To Make A T-Shirt Fabric Flower: Tutorial Time! For my birthday two summers ago, I got a lovely little gift card to Anthropologie, and treated myself to two hair clips that looked like these: They were a bit pricey, as Anthro stuff tends to be-- $15 apiece, and after months of wearing them and pondering them and KNOWING I could make them myself somehow, I finally took some time to actually dissect the flower (not LITERALLY, but close!
I poked and prodded that thing until I was SURE it'd fall apart!) , and I came up with a reasonably similar version. This tutorial is going to share that process with you, so you can make a flower that looks like THIS: Pretty close, right?