
Heatsink, BGA, 27.4K/W, 14 x 14 x 10mm, Adhesive Foil, Conductive Foil Mount.
SD Cards. Monitors. GPS. RFID / NFC. AIS. Www.elinux.org/images/1/1b/RPiThermalTest-8-20-2012.pdf. RPi VerifiedPeripherals. Back to the Hub.
Hardware & Peripherals: Hardware and Hardware History. Low-level Peripherals and Expansion Boards. Screens, Cases and Other Peripherals. A note about this page: For USB devices, please specify if they required a powered hub Notes 19-Apr-2012: Now that the Model B board is shipping, details added should relate to this board and the default Debian distribution unless stated otherwise. (A) - Relates to model A production board (B) - Relates to model B production board (!) Discuss: If you are adding to a product list it would help clarity if entries are kept/added in alphabetical order. Power Usage Notes Model B Hardware Revisions and USB Power limitsHardware Revision 1.0 The original Model B board had current limiting polyfuses which limited the power output of each USB port to approximately 100 mA. Linux Driver Issues Shortly after the Raspberry Pi was released it was confirmed that there were a number of issues with the Linux USB driver for the SMSC95xx chip.
Powered USB Hubs. Azeez's Notes: Building a Raspberry Pi Cluster - Part 2. The Grand Finale In a previous post on Building a Raspberry Pi Cluster, I wrote about how we built a cluster using several Raspberry Pis.

This cluster was used for hosting the WSO2Con App. In this post we will take a look at the finishing touches & some interesting information from WSO2Con 2013. The project was unveiled at WSO2Con 2013, London & was an instant hit. The team received many kudos from participants. RPi SD cards. SD cards The SD card is a key part of the Raspberry Pi; it provides the initial storage for the Operating System and files.
Storage can be extended through many types of USB connected peripherals. When the Raspberry Pi is 'switched on', i.e. connected to a power supply, a special piece of code called the bootloader is executed, which reads more special code from the SD card that is used to start up the Raspberry Pi. If there is no SD card inserted, it will not start. Do NOT push in or pull out an SD card while the Raspberry Pi is connected to the power, as this is likely to corrupt the SD card data (you might get away with it, but it is best not to). The SD card must be formatted, or written to, in a special way that means the Raspberry Pi can read the data it needs to start properly. One advantage to using an SD card like this is that you can have several SD cards, each with a different operating system, or a different purpose. Which SD card?
SD cards come in a range of storage sizes. BASH Shell: How To Redirect stderr To stdout ( redirect stderr to a File )
Configuration. Cheat Sheet - Physical Computing with Raspberry Pi. Basic GPIO Access Setup Raspberry Pi GPIO pin layout.
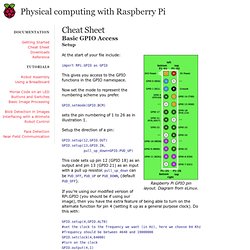
Diagram from eLinux. At the start of your file include: import RPi.GPIO as GPIO This gives you access to the GPIO functions in the GPIO namespace. Now set the mode to represent the numbering scheme you prefer. GPIO.setmode(GPIO.BCM) sets the pin numbering of 1 to 26 as in illustration 1. Setup the direction of a pin: GPIO.setup(12,GPIO.OUT) GPIO.setup(13,GPIO.IN, pull_up_down=GPIO.PUD_UP) This code sets up pin 12 (GPIO 18) as an output and pin 13 (GPIO 21) as an input with a pull up resistor. pull_up_down can be PUD_OFF, PUD_UP or PUD_DOWN, (default PUD_OFF). If you’re using our modified version of RPi.GPIO (you should be if using our image), then you have the extra feature of being able to turn on the alternate function for pin 4 (setting it up as a general purpose clock).
Reading/Writing With your pins set up in the proper direction: Using I2C to control servos, LEDs and use PWM.