
SD Formatter 4.0 for Windows Download. You ("Licensee") are granted a license for the Software defined in this End User License Agreement ("Agreement") on condition that you agree to the terms and conditions of this Agreement.

If Licensee does not agree to the terms and conditions of this Agreement, promptly return the Software to SD Card Association (SDA). Article 1 License Licensee is granted the right to use the software, including the information provided from this downloading site, users manuals, and any other media provided to Licensee (collectively "Software"), but all applicable rights to patents, copyrights, trademarks and trade secrets in the Software are not transferred to Licensee. Article 2 Use by a Third Party Licensee may not use, copy, modify, transfer or allow any third party, whether free of charge or not, to use, copy or modify the Software, except as expressly provided for in this Agreement. Article 3 Restrictions on Copying the Software. Utiliser la Raspberry en mode Kiosk.
Le mode kiosk (ou borne) consiste à dédier l’affichage graphique à l’usage exclusif d’une application, et de plus sans faire apparaître les habituels éléments du bureau graphique (panel, icones,...).

Parmi les exemples les plus couramment rencontrés : les distributeurs de billets, les affichages d’horaires dans les (aéro)gares,... Plusieurs aspects sont à prendre en compte pour configurer la Raspberry de cette manière, et nous allons les détailler. Scénario et contexte. Dashboard domotique avec températures - MagdiBlog. Quand j’ai débuté le projet PiHomeDashscreen il y a un peu plus de deux ans (déjà ?!?)

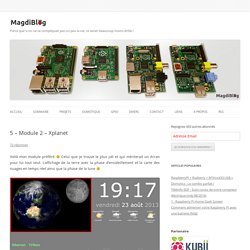
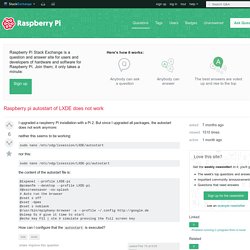
, j’avais déjà en tête de le relier, un jour, à un système domotique. En effet, ce type d’écran d’information domestique ne présente de réel intérêt que si les données affichées sont utiles au quotidien. Quoi de plus pertinent que des informations concernant la maison, les températures intérieures et extérieures, la consommation électrique, l’état de l’alarme anti intrusion, la vidéo-surveillance etc… ? XplanetClouds: Daily Free Cloud Map. Linux commands - Raspberry Pi Documentation. 5 - Module 2 - Xplanet - MagdiBlog. Voilà mon module préféré.
How-To: Add WiFi To The Raspberry Pi. As you may know the Raspberry Pi can only access your home network using a network cable.
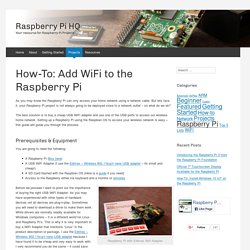
But lets face it, your Raspberry Pi project is not always going to be deployed close to a network outlet – so what do we do? The best solution is to buy a cheap USB WiFi adapter and use one of the USB ports to access our wireless home network. Setting up a Raspberry Pi using the Raspbian OS to access your wireless network is easy – this guide will guide you through the process. R-Pi configuration file. How to edit the boot configuration file for Raspberry Pi While booting up, the Raspberry Pi reads some configuration parameters from the SD card.
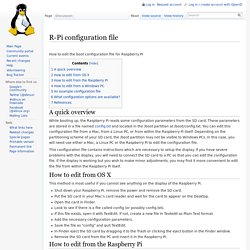
These parameters are stored in a file named config.txt and located in the /boot partition at /boot/config.txt. You can edit this configuration file from a Mac, from a Linux PC, or from within the Raspberry Pi itself. Kiosk - Raspberry pi autostart of LXDE does not work. Experienced the same issue.
Here are my findings: RPi Powered USB Hubs. A number of low-cost powered USB hubs are known to have caused problems.
RPiconfig. As the Raspberry Pi doesn't have a conventional BIOS, the various system configuration parameters that would normally be kept and set using the BIOS are now stored in a text file named "config.txt".
The Raspberry Pi config.txt file is read by the GPU before the ARM core is initialized. This file is an optional file on the boot partition. It would normally be accessible as /boot/config.txt from Linux, but from Windows (or OS X) it would be seen as a file in the accessible part of the card. To edit the configuration file, see the instructions at R-Pi_ConfigurationFile. You can get your current active settings with the following commands: Création d’un utilisateur pour le Raspberry-Pi. Ça va faire du bruit chez les framboise314 : comment configurer le son sur le Raspberry Pi.
Certains lecteurs du blog se sont manifestés pour dire qu’ils n’avaient pas de son sur leur Raspberry Pi.
Richard (Tilalo) m’a envoyé ce mail : Salut François, J’ai lu sur ton blog que des utilisateurs n'(avaient pas de son. En cherchant sur les forum, j’ai trouvé ça : à Tilalo pour cette info, et pour les anglophobes, vous trouverez ci-dessous la traduction de l’article en question, ainsi que celle de qui liste les différents problèmes rencontrés sur le Raspberry Pi. Ça va faire du bruit chez les framboise314 : comment configurer le son sur le Raspberry Pi.
Ssh. Cette page présente les usages les plus courants de SSH et sa configuration de base. Voir sur SSH Avancé pour les autres usages. Running Graphical Apps from Putty SSH - Raspberry Pi Wiki. This is the procedure for running X11 applications through an SSH tunnel. I use PuTTY SSH client to connect to Raspbian, and I miss the graphical interface. Prerequisites: PuTTY SSH client on my laptop RaspberryPi with Raspbian installed Xming from I connect to the RPi with PuTTY SSH as usual, but in addition, set up X11 forwarding: Xming X Server for Windows - Official Website. Xming is the leading X Window System Server for Microsoft Windows®. It is fully featured, lean, fast, simple to install and because it is standalone native Windows, easily made portable (not needing a machine-specific installation or access to the Windows registry). Casting Python integers into signed 32-bit equivalent. When implementing bit-twiddling routines in C/C++, one frequently takes for granted the implicit convertibility between signed and unsigned values of the same bit pattern and bitwidth.
For example, 0xFFFFFFFF, when cast to a signed 32-bit integer will return -1. In Python however, all integers are signed and when a positive integer exceeds the maximum possible 32-bit signed value, 2147483647, it is automatically promoted to a long, e.g. 2147483648L. The following routine will take any integer value up to 0xFFFFFFFF, treat it like it had the unsigned 32-bit integer bit pattern and return the equivalent signed twos-complement integer value much like the corresponding cast in C would. Raspberry Pi I2C (Python) I2C Installation for Raspberry Pi – Step by Step Guide. This is a step by step guide on installation I2C driver for the Raspberry Pi. It is for the Raspbian image. Raspberry Pi Starter Kits Make sure your Raspberry Pi is connected to the internet when installing the drivers. The new Raspbian distro already have the I2C driver installed but they are disabled by default.
RPi Beginners. Back to the Hub Getting Started: Buying Guide - for advice on buying the Raspberry Pi. Replace Firmware on PandaBoard Hardware - MATLAB & Simulink - MathWorks France. You can replace the firmware on the PandaBoard hardware (the "board") using the following process. To run Simulink® models, you must replace the original firmware with the distribution provided by the Support Package Installer. Before replacing the firmware, install the support package for PandaBoard. After replacing the firmware, you can run a Simulink model on the PandaBoard hardware. The following steps provide an overview of the firmware replacement process: Support Package Installer locates a firmware image on your host computer or downloads new one.Support Package Installer uses the host computer to write the firmware image to a microSD or SD memory card.You transfer the microSD or SD memory card to the PandaBoard hardware.Support Package Installer applies the IP settings you choose to the firmware on the PandaBoard hardware.
Support Package Installer does not use the PandaBoard hardware to write the firmware image to the memory card. Enregistrer des objets dans des fichiers - Python. Dans beaucoup de langages de haut niveau, on peut enregistrer ses objets dans un fichier. Python ne fait pas exception. Grâce au module pickle que nous allons découvrir, on peut enregistrer n'importe quel objet et le récupérer par la suite, au prochain lancement du programme, par exemple. Raspberry pi loves Sensors and LEDs. Make sure the tools are installed... to test if the tool are installed run the following command..sudo i2cdetect -y 0 this will scan all devices connected to the I2C bus. it should look like the pic below. if you see that i2ctools are not installed run the following comand sudo apt-get install i2c-tools also install sudo apt-get install python-smbus sudo apt-get install python-pip sudo pip install rpi.gpio.
Send Raspberry Pi Data to COSM. COSM (used to be Pachube) helps connect little devices like the raspberry pi to the internet. You will need to do the following to use COSM.Setup a AccountCreate a FeedSave the API_KEYSave the FEED ID You will need to create a COSM account. Click on the blue "Get Started" circle to create a new account. It's your typical e-mail/password followed by password verification. You will need to check your e-mail and click the verification link. Click the blue plus to add a feed. Select Arduino Give your new feed a title and tags. Wiki:linux:python:smbus:doc [wiki.erazor-zone.de] Raspbmc Nightly Builds Available Here! Write plugins for XBMC.
XBMC includes support for writing Add-Ons written in Python. Plugins, unlike scripts, do not generally provide new functionality to XBMC, instead they provide an easy way to present content listings in XBMC through the native GUI interface. Content is usually online audio and video streams like YouTube, Vimeo or podcasts, or pictures from websites such as Flickr or Picasa. Please feel free to add samples of simple plugin functions. Add anything at all no matter how basic, if it is not already here add it! Someone will more than likely benefit from it. Xbmc doesn't save my language. Install a webserver on Raspberry Pi. Raspberry Pi Support from Simulink - Hardware Support - MathWorks France.
Credit-card sized, low-cost, single-board computer with audio and video input/output, designed for teaching You can design and run Simulink® models as standalone applications on a Raspberry Pi™—a tiny, low-cost, single-board computer with audio and video input/output designed for teaching. Arduino Support from Simulink - Hardware Support - MathWorks France. R-Pi Hub. Self-oscillating circuit for 5V power supply - UK Vintage Radio Repair and Restoration Discussion Forum. I'm trying to make a circuit using the components of a CFL (HV transistors, ferrite core, HV diodes, HV capacitors, etc) in order to obtain a 5V source to supply a TTL-made timer for a microwave oven. All circuit I have checked use two ferrite cores. I think it is posible to do it using just one core.
I need some help with the cicuit configuration (for the self oscilating circuit) and how many turns (approx.) should I coil in the ferrite core. The 5V circuit will demand 500mA. Protocole I.P. ; calculs de sous-réseaux. File Exchange Pick of the Week. Installer un serveur Linux/Nginx/SQlite/PHP (LESP) Raspberry Pi Home Server – Etape 11 : installer Nginx avec support PHP, CGI et SCGI. Une station météo Raspberry Pi avec une interface web. Crontab : exécuter une commande régulièrement. Highcharts - Interactive JavaScript charts for your webpage. Crontab : exécuter une commande régulièrement. R-Pi Troubleshooting.