
How to Add Patterns to Clothing in Photoshop. Martín De Pasquale on Behance. How To Make Realistic Shadows in Photoshop [Technique That You Probably Don't Know] How to use saturation masks to extract complex objects - RAWexchange. There are plenty of functions for masking in Photoshop, and each of them is useful in its own way.
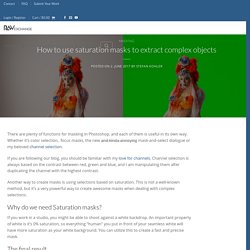
Whether it’s color selection, focus masks, the new and kinda annoying mask-and-select dialogue or my beloved channel selection. If you are following our blog, you should be familiar with my love for channels. Channel selection is always based on the contrast between red, green and blue, and I am manipulating them after duplicating the channel with the highest contrast. Another way to create masks is using selections based on saturation. This is not a well-known method, but it’s a very powerful way to create awesome masks when dealing with complex selections. Why do we need Saturation masks? If you work in a studio, you might be able to shoot against a white backdrop. The final result I decided to use an image of our Ophelia Overdose stock package. The background here is not 100% white and the costume is not easy to mask out. Let’s see the masked out image in front of a green background. IAMC Video Library.
Clay Kaytis is a director and animator, making his film directing debut for Rovio Animation with The Angry Birds Movie, based on the number one app of all time.

Before Rovio, Kaytis developed his talent as a film maker at Walt Disney Animation Studios, starting as an intern in the Talent Development Program in 1994. Kaytis animated on hand-drawn films including Pocahontas, The Hunchback of Notre Dame, Hercules, Mulan, Tarzan, Fantasia 2000, The Emperor’s New Groove and Treasure Planet. In 2004, Kaytis transitioned to CG animation to animate on Chicken Little and Meet the Robinsons. He was quickly promoted to Supervising Animator on Rhino, the hamster, in Bolt. For his work developing Rhino for the screen, Kaytis was awarded a U.S. During his career at Disney, Kaytis was fortunate to work with legendary animators and film makers including John Lasseter, Glen Keane, Eric Goldberg and Ken Duncan. Compositing With Saturation Maps in Photoshop - Match Saturation. The 47 best Photoshop plugins. In this article we've lined up some of the best Photoshop plugins available for Adobe Creative Cloud's photo editing giant.
Photoshop is an amazing tool – capable of producing sublime images, high-quality video and very passable renders for 3D art. All this power offers a world of possibilities – but occasionally it's worth adding a few optional extras to get the most out of your investment. There's a plethora of plugins available for PS users, but we've selected the best of those that you can download and use straight away. Publisher: Filter ForgePrice: $149-$399 (now with 80% discount $29 - $79)Good for: Photographers, photo editors, graphic designers, 3D artists Currently in version 6.0, Filter Forge offers 11 thousands of filter effects and textures, covering almost every application you can imagine.
54 free Photoshop actions. Adobe's flagship image-editing software Photoshop has a powerful programming language built-in that allows you to record tasks as an 'action' and replay the steps to complete the task automatically.
Photoshop Tutorials. The Amazing Power of Frequency Separation Retouching in Photoshop. How to Create Facial Hair in Photoshop. Photoshop CS4 - Displacement Map Tutorial. Matching Color Between Images. Easy Blending Technique For Color Matching Digital Backgrounds and Props - Photoshop Tutorial. PHOTOSHOP TUTORIAL: Add a Pain Free Tattoo.mov.
Portrait Effect in Photoshop (PSD Box) Mastering Dodging and Burning with 4 Techniques (Photoshop Tutorial) The 35 best Photoshop plugins. Eye Sharpening - Photoshop Tutorial - 416 Studios. With this tutorial you can create amazing, bright eyes within minutes.

First retouch, adjust levels and do all necessary colour corrections on your image. With a Lasso Tool (L) select the eyes (hold Shift key to add to selection). Hit Ctrl+J to copy selection to a new layer. You can copy the whole layer instead of selecting eyes but applying the filter to the large area like this may take a while on slower computers. Use Smart Sharpen filter on the eyes, the choice of right settings will depend on the size of your file.
Add a layer mask to the sharpened layer, then using a white soft brush on 50% bring back paint only iris’ and pupils to expose the sharpened eyes. Using levels brighten the whole picture and then copy mask from previous layer to select only eyes by holding Alt while dragging the sharpened mask (“layer 1” in the pic) onto the “levels 2” layer. Reduce opacity of the colour layer to make the eyes look more natural. And voilà, the image is ready. 50 Portrait Retouching Tutorials To Take Your Photoshop Skills To A New Level. Email Is it something that often happens to you?
You just sit and keep on looking through your photos on the computer screen trying to take a closer look at your full-size pictures. And then it occurs to you that they didn’t really suck that much during the actual shoot? Of course, what you see during the shoot with your eyes and what you get after the photo session is not the same thing. But do not let your despair take possession of you! Photoshop is capable of making slightly imperfect photo into an awesome shot. 1. 2. 3. 4. 5. 6. 7.