
DIY SCUBA / NEOPRENE MINI SKIRT. 8th January 2014 I’ve been feeling the scuba trend for quite a few seasons now, and recently got my hands on some blush pink wetsuit/ne0prene fabric and knew it would make a great skirt.

I experimented with this process and made the template from scratch, so it needed a bit of tweaking here and there, but I found neoprene to be a really simple fabric to work with, particularly given you don’t need to sew any hems, and it was stretchy enough to not have to put in a zip, yay! Pin It Pin It Wearing: Gap Tee, DIY Skirt, Zara Heels, Dylan Kain Bag You need: at least 2 metres ( 2.5 yards) of scuba/neoprene fabric around 0.5cm thick (1/4 of an inch)craft papera pencilsuper sharp scissorspinsa sewing machinematching needle and thread How to: 1.
Mermaid Seashell Bikini Top Swimsuit by FireflyPath. American flag brazilian bikini bottom stars and by senoAccessory. My Laced Up Collar Sleeves. DIY. Supplies: Old tshirt or jersey cotton.
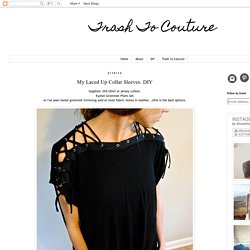
Eyelet Grommet Pliers Set or I've seen metal grommet trimming sold at most fabric stores in leather... (this is the best option). Here is another fun tshirt recycle I designed and quite easy. It is a nice way to create a unique shirt without showing too much skin (just enough). I used an old large t shirt I had in my scrap trunk...it had one sleeve for some reason. Top stitch it along the edges...trimmed any excess from the ending side (do this on front and back). I used jersey string (you can use ribbon) to lace it up starting at the shoulder and ending to the sleeve. DIY Edgy grommet leggings. Trash To Couture. P.S. – I Made This… How to Make a Bear‐Shaped Cellphone Case: 7 Steps. 46 Ideas For DIY Jewelry You'll Actually Want To Wear. Judah Method - Bleaching Experemnet on the Behance Network.
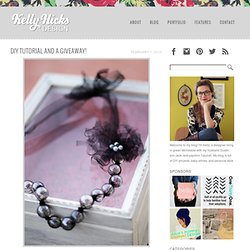
10 T-Shirt Scarf Tutorials. She's Crafty: DIY Multi-Chain & Ribbon Necklace. Due to the resounding success of her last She’s Crafty, my friend Pandora from Accessory Source is back with another lovely necklace DIY tutorial that would make a fantastic christmas present for a friend or relative!

She says: When it comes to jewelry, I favor big and bold pieces. And while I tend to wear mostly gold, lately I’ve become obsessed with mixing metals like silver and gunmetal (and throwing in some bling for good measure!). My multi-chain necklace has become a staple in my wardrobe because it incorporates it all. Here’s a quick 10 step tutorial on how to make your own bulky bauble. You will need the following tools: ScissorsRulerPliers (optional)Ribbon-1 yardTwo jump rings (the size of a nickel).
Supplies I chose a mix of metals in various colors and sizes and a few strands with rhinestones. All of my materials were purchased at Toho Shoji. Cut your first strand of chain to 12 inches Step 1: Cut your first strand 12 inches long. DIY Shift Dress. DIY TUTORIAL and a giveaway! Happy Monday everyone!
P.S.- I made this... Watermark Tee. Hello U-Create readers!

I am so excited to be guest posting here today. It just so happens to be my first guest post and I'm still a little shocked that it's here at Ucreate, one of my favorite blogs! A little bit about me.. I'm from a little town called Keller, Texas. I'm a junior at Texas A&M University (whoop!). I'm working on my education degree and expect to be an elementary school teacher in just two short years. DIY of the Month: Braided T-shirt Bracelet. How To: Give your old t-shirts a second life.

Sorry dust rag pile! Photos: kirsten for we heart this I love using simple materials to make something fun and innovative. The supplies for this bracelet DIY are really basic, so there’s a REALLY good chance you own all of them already. DIY Wrap Bracelet - Honestly WTF - StumbleUpon. You should all know by now that we are all about stacking bracelets on our wrists.

The more, the better. In fact . . . the most, the best! With that being said, we’ll show you how to master a version of the ever so popular wrap bracelet. It’s so simple and addicting, you’ll soon be churning out these wristlets with your eyes closed. Clearly this arm party train isn’t stopping and it’s about time you get on board! You’ll need (for a double wrapped bracelet) :* Lengths will vary depending on the size of your wrist (see comments for suggestions).
Fold the length of leather cording in half to form a loop. Place the ball chain along the leather cording with the end of the chain meeting the end of the wrap. Continue wrapping while checking it for fit around the wrist. When you have reached the end of the ball chain wrap the linen cording around the leather strands 2-3 more times. Thread the hex nut through the strands and tie a second knot.