
Tutorial: How to Equalize Textures in Photoshop. Isn’t it a beautiful concept to make textures using DSLR cameras?
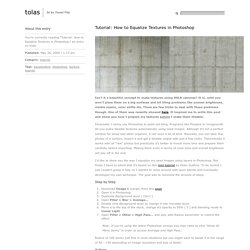
It is, until you won’t place them on a big surfaces and hit tiling problems like uneven brightness, visible seams, color shifts etc. There are few tricks to deal with these problems though. One of them was recently showed here. It inspired me to write this post and show you how I prepare my textures before I make them tileable. Personally I rarely use Photoshop to paint out tiling. I’d like to show you the way I equalize my seed images using layers in Photoshop. V-Ray Render Optimization. Intro This tutorial attempts to cover the process of optimizing your V-Ray render settings to get the best possible render quality and fastest render time for a given scene.
There's often a lot of confusion surrounding V-Ray's sampling methods and what 'ideal' settings are. 35Tutorials'''' KeyShot tips(Step By Step)"'' Lighting and rendering an interior by Patric Verstraete. Lighting For the global light in the scene, I used three light sources: V-Ray Dome Light with the HDRI map (VizPeople_non_commercial_hdr_v1_07) , a dome light filled with soft blue, and a VRaySun.
You can see the parameters below. I did this as I needed to have full control over the shadows, so I settled for a combined workflow – VRayDome Light + VRay sun for precise shadow control, and a soft blue light coming from the Dome light for a slightly warmer tone, this wasn't lighting anything but it gave the scene a warmer feeling. The lighting setup I searched for a long time time to find the appropriate HDRI. The HDRI setup. Creating crisp arch-viz scenes by Alexandre Jarek. Create a ring of fire with FumeFX by Matteo Migliorini.
Vray Dirt Tutorial. A quick tutorial on adding dirt to specific materials in Vray.
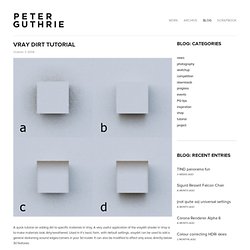
A very useful application of the vraydirt shader in Vray is to make materials look dirty/weathered. Used in it's basic form, with default settings, vraydirt can be used to add a general darkening around edges/corners in your 3d model. It can also be modified to affect only areas directly below 3d features. CG Education. Dirty Rusty Decaled Painted Worn MetalBy Neil BlevinsCreated On: Dec 6th 2013Updated On: Mar 27th 2014In this tutorial, I'm giving away a Dirty Rusty Decaled Painted Worn Metal material.
It's great for robots, fighting suits, military vehicles, factories, buildings, etc. It's especially made to be thrown onto a model that has thousands of objects, and without the need to make time consuming UVs for those objects. So check out the tutorial below and see how to go about using it. Oh, and feel free to read my How Do I Shade / Texture Stuff? : Shading Pipeline Overview lesson for more info on the techniques I'm using to make this material. This material can be grabbed by getting the Soulburn MaterialAssetPack Free. Needed Plugins and Scripts To use this material, you'll need the following plugins and scripts: Tunnel - search Instructables. La photographie sous l'angle juridique. FAQ questions / réponses pour bien utiliser la GoPro. Pourquoi une FAQ ?
J’ai décidé de regrouper ici toutes les questions qui reviennent le plus souvent en commentaires ou emails sur mon blog. Des questions parfois simples, parfois plus complexes, mais où souvent on ne trouve pas de réponse claire, j’ai essayé d’en compiler un maximum ici, et tiendrai la liste à jour en fonction des questions, sinon les commentaires sont là aussi pour ça s’il y a des questions précises. Quick Start Tutorials - RealFlow 2014 Documentation - Next Limit support site. In this section you will find a series of beginner tutorials to support your first steps with RealFlow.
Maybe even experienced long-time users will find a few tips for their daily work. All relevant topics are covered: Hybrido fluidsParticle-based (SPH) fluidsMeshingRigid and soft body dynamics (“Caronte”)RealWaveDaemons Some of the tutorials also combine different technologies, e.g. Motion Blur in Post using 3d Studio Max & After Effects. RealFlow 2014 Documentation - RealFlow 2014 Documentation - Next Limit support site. Welcome to the Phoenix FD help index (starting page) This help index as well as all files accompanying it is copyright (C) 2005-2013 by Chaos Software Ltd.
All rights reserved. No part of the Phoenix FD documentation can be reproduced without explicit permission from Chaos Software Ltd. V-Ray and the V-Ray logo are registered trademarks of Chaos Software Ltd. in Bulgaria and/or other countries. Microsoft, Windows and Windows NT are either registered trademarks or trademarks of Microsoft Corporation in the United States and/or other countries. Autodesk, 3D Studio, 3D Studio MAX, 3D Studio VIZ, 3ds Max and Discreet are either registered trademarks or trademarks of Autodesk, Inc. Installation PDF guide Introduction Registered Components Parameters and Control. Advanced Tutorial. RealFlow Tutorials. Créer des ralentis extrêmes sur vos vidéos sans plugins sur After Effects. Aujourd'hui nous allons nous intéresser aux effets temporels inclus avec After Effects, afin de créer des ralentis extrêmes sur nos vidéos.
Tutoriel : Modéliser pour l’impression 3D (astuces et conseils) Publié par : Tatiana / 10 janvier 2014 Modéliser pour l’impression 3D est un exercice un peu particulier : d’un objet virtuel, sur votre écran, vous arriverez à un objet en volume bien réel, avec les contraintes de solidité, d’équilibre et de conception qui vont de pair. Voici quelques astuces pour mieux concevoir votre pièce pour l’impression 3D selon vos logiciels. Une surface n’est pas forcément une paroi. Maxwell Materials - Maxwell Render V3 documentation - Next Limit support site.
Dan Abrams, Working with material "Types" vs the advanced material editor In Maxwell V3 we introduced the concept of material Types, which use a reduced set of intuitive parameters that greatly simplify and speed up the material creation process.
These are the current simplified Types available: How to Clean up Your Photo Backgrounds in Photoshop. In retouching you see this quite frequently, whether you’re using seamless paper, vinyl, a fabric hanging or a purpose built infinity cove, it’s going to get dirty. You have a couple of options, one is to check out some reviews on Amazon for handheld vacuum cleaners and have your assistant scoot around with it between shots. The other more sensible option, which we’ll cover here, is to solve it in post, in this case using Adobe Photoshop.
It isn’t difficult of course to clone out the odd scuff mark, but when you have hundreds of dirt marks or creases you need a slightly more heavy duty solution, and simply blurring can bring its own problems. In this case I’ve already tidied up the floor, now it’s time to clean up the background. Image copyright: Simon Newlyn. Evermotion Tutorial - Juice with Vray and 3dsmax. Evermotion simple Light Rig in Vray - Part 1. Evermotion simple Light Rig in Vray - Part 2. COLIMO manual workflow. Motiva Colimo 1.0! and 3dmax basic tutorial. V-Ray Render Elements – Rendering and Compositing in Photoshop. << Back to Tutorials Rendering out into elements is a fantastic way of having more control over your images and animations in post production. There are however few tutorials that show how to do this from start to finish in an efficient way. This tutorial will guide you through the entire process from start to finish of rendering a scene into various passes, and how to composite it back together in Photoshop.
This can also be applied to After Effects or any other compositing program if you are creating an animation. In this tutorial we will: Set up the scene in 3ds Max to render out various elements.Composite them back together using photoshop.Add specular bloom to bright areas to enhance realism. Mpositing the Velocity Pass from 3ds Max using After Effects. << Back to Tutorials Modern 3d packages have the capability to add motion blur as a post effect using a compositing program.
This is done by rendering out a velocity pass, and using the colour information stored within it to add a certain amount of blur in a certain direction. Rendering a Fly-Through Animation with V-Ray and Backburner using GI. << Back to Tutorials V-Ray is an incredibly powerful rendering engine, but with it comes long render times – especially when rendering animations.
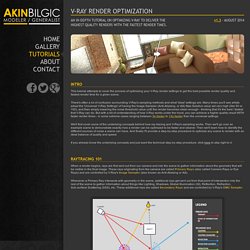
This guide is written to help you minimise the waiting time by using network rendering in 3ds Max. This guide can also be applied to non-network rendering by simply unticking the “net render” box in the common tab of render settings. Astuce Windows 8.1: comment allonger la durée des notifications? Les notifications de Windows 8.1, pourtant si pratiques, ne sont visibles que pendant quelques secondes. $WINDOWS.BT c'est quoi ???? : Administration / programmation. V-Ray DMC Sampler. Introduction In this tutorial I will focuse on giving you the basic technical background of DMC sampler, but before we go into any technical details about DMC sampler, we will go over alternative sampler integrated in VRay, Adaptive Subdivision sampler. I won't be mentioning fixed sampler technique since it's pretty straight forward and in case you don't know how Fixed sampler works, it will be easy to figure out from gained knowledge.
Adaptive Subdivision sampling is a technique used in almost every other biased render engine on market. It's relatively old technique and behaves very good in most of the cases. Tim's Online Portfolio. Tutorials - Power Lines. {E}vermotion - Nox. How to: Create an LOD system (Viewport Interactive) in 3ds max. If you ever wonder how to create an LOD system that updates in real-time then this tutorial is for you. You may familiar with the Render time LOD system but this time, we will create a viewport interactive lod system with the help of Flight Studio Utility thanks to the Autodesk Master Louis.
In this tutorial, you will be learning how to set up lod nodes in Flight Studio and complete the system with the help of some simple lines of Maxscript code. Here is the little demo of what we are going to create. Let’s get started. Step 1 Here, I have three versions of the human skull geometry in the scene and I named them according to their detail levels as High_res, Mid_res and Low_res. Step 2 Select and align all the skull geometries at the top of each other with the help of Align tool (Alt+A).Click here to learn more about Align Tool. Step 3 Now, go to Utilities panel and click on Flight Studio utility and click on Modify Hierarchy / Attributes to launch the Flight Studio Hierarchy dialog. Step 4. Tutorials - Creating stairs.
33 petits trucs qui pourraient changer votre vie - Niaiser.com. 70.6K Flares. Foire Aux Questions Xk3Y - Emulateurs de lecteurs ( ODDE ) MAJ 02 Septembre 2013 - Ajout image de restauration en v 2.01.04Voir l'article en news pour le changelog- Ajout firmware 2.01.04Voir l'article en news pour le changelog- Mise à jour fichier CFG avec fonction KeepAlive.
Making of Saint Benedict Chapel. 2009 Pritzker Architecture Prize Laureate – Peter Zumthor, is among my favorite architects. I especially like his work on Thermal Bath Vals, and must admit I wasn’t so familiar with his work on Saint Benedict Chapel until Federico Spoltore showcased his 3d recreation of it on the forums… and what a recreation it is!!! I’m sure you’ll learn a new thing or two after reading this. Enjoy! The Saint Benedict Chapel, located in Sumvitg, Switzerlad, is the work of Pritzker Prize 2009 Laureate – Architect Peter Zumthor. I have a sane obsession for sacred buildings because I believe that this type of architecture is pure in meaning, concept and function. I felt attracted by this chapel in many ways, because of its austere simplicity, the manner in which materials coexist and its artisan and elegant construction. VRayEnvironmentFog Tutorial.
Maxwell Render - Next Limit support site. En pratique. Particle Effects in 3ds Max Tutorial. Comprendre et utiliser les accus lithium-polymère "lipo" 99 Life Hacks That Could Make Your Life Easier - Seriously. A.E.N.R. stage recuperation de points permis a points nord pas-de-calais. Tutoriels pour iPhone 4. Embarquer.