
Passengers on a little spaceship: paper star lantern tutorial. I suppose it isn't exactly the right time of year for stars and lanterns, but I've got a paper folding fascination at the moment and so was drawn to a project I had wanted to do back in Autumn.
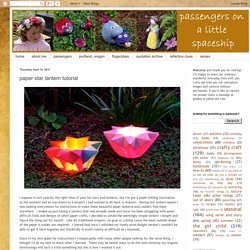
During last lantern season I was looking everywhere for instructions to make these beautiful paper lanterns and couldn't find them anywhere. I ended up purchasing a lantern that was already made and since I've been struggling with some difficult folds and designs of other paper crafts, I decided to unfold the seemingly simple lantern I bought and figure the thing out for myself. Like all traditional origami, no glue or cutting (once the basic outside shape of the paper is made) are required. I feared that once I unfolded my lovely store-bought version I wouldn't be able to get it back together but thankfully it wasn't nearly as difficult as I assumed.
Begin with a 12" square of paper to end up with a lantern that is about 7" across when complete. Cut off the four marked corners of the paper. Diy polymer clay beads. I first spotted these unique beads on Etsy.
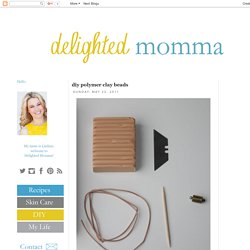
I alllllmost purchased a necklace and a pair of earrings that were handcrafted with polymer clay..but $35 + $7 for shipping....seemed a little steep. So I bookmarked the page (along with a hundred others) and forgot all about it. I recently discovered a new amazing blog called Hurmur. I am a little obsessed with all her amazing creations and jewelry inspiration. She did a post on polymer clay and it totally inspired me to recreate my own version. What you need:Polymer clay block.Razor bladeCord. Knead the clay until it is soft and pliable. Roll however many balls you wish to use. Using the razor blade, slice off little pieces until you are satisfied with the shape.
Poke a hole in the center with the toothpick. Put them on a baking tray and bake at 275 degrees for 15 minutes. Attach metal closure on one end. This entire little project only cost about $5...and I still have enough clay for many more creations! DIY Braided Clay Bracelet. Yes I am obsessed with polymer clay.
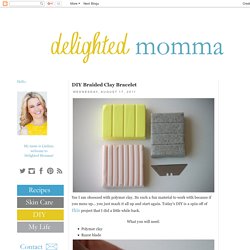
Its such a fun material to work with because if you mess up... you just mash it all up and start again. Today's DIY is a spin off of this project that I did a little while back. Knead the clay with your hands to soften it up. Using the palm of your hand roll out three long tubes. Mash the top of the tubes together and begin braiding. Using your own wrist as a guide determine how long you want to make your bracelet. Tingimento de Couro [Archive] - The Knife Network Forums : Knife Making Discussions.