
Les noms des stations de Métro prises au pied de la lettre. Au milieu des années 90, le photographe Janol Apin a mis en scène les noms des stations du métro Parisien avec humour et imagination.
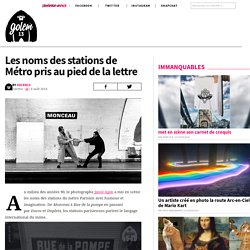
De Monceau à Rue de la pompe en passant par Duroc et Dupleix, les stations parisiennes parlent le langage international du mime. 25 Websites To Have Fun With Your photos. There’re some really great sites out there that allows you to add effects to your photo by using their existing effect-templates. Here’s a collection of 25 Sites To Have Fun With Your Photos. 1.) PhotoFunia One of the hottest site with tons of creative backgrounds to play around with. Now comes in 9 different languages. 2.) TrickedOutTimeline - Create the coolest Facebook Timelines, Cover Photos and Profile Photos, and wow your friends! Grey Expectations. Nadia Wicker - W&B. Create a Realistic Panoramic Matte Painting in Photoshop.
Matte paintings are images commonly used in the film industry to create the illusion of an environment that would otherwise be too expensive or impossible to build.
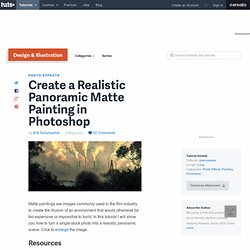
In this tutorial I will show you how to turn a single stock photo into a realistic panoramic scene. Click to enlarge the image. Resources The following images were used during the production of this image. Free pro Photography Lessons for Beginners with certificate. 10 Portrait Photography Tips And The Fun You Can Have With It. Portrait Photography isn’t meant to be boring.

It’s supposed to be fun, creative, and exciting. 5 Stunning Photography Tips - Portrait StumbleUpon. 6EmailShare Why portrait photography?
It’s simple. One, because photography is a powerful medium and two, because taking photos of people means immortalizing a part of them, which time will eventually take. Portrait photography Lighting tips - Portrait photography lighting set-up. The main portrait photography light’s purpose is to give shape and to convey information.

Much has been written about the main light, so I won’t get into that here. Let’s get on to the other, lesser know lights use in the three light set-up. * note how bright the background is. Construire un stenope. Autoportraits au sténopé sténopé sur film 120, tirage contact © robert colognoli - 2003 Comment construire un appareil ?
Le boîtier Le boîtier ne sert qu’à présenter une surface sensible dans le champ illuminé par le sténopé. Une simple boîte fera très bien l’affaire. Toute amélioration ne sert qu’à en faciliter l’utilisation. Cette liberté de conception du boîtier permet de choisir n’importe quelle dimension, en surface et en rapport des côtés, depuis le 24x36 et même moins, jusqu’à des formats qui ne sont limités que par ceux des surfaces sensibles. Dark and Eerie Photo Manipulation Scene. Dark and Eerie Photo Manipulation SceneReviewed by Michael Vincent Manalo on May 14Rating: Preview of Final Results.

Finger pen optical illusion by Ray Massey. Unsupported browser. A Brilliant Beginner's Guide to Architectural Photography. Architecture is serious business.

Millions are spent each year on new development projects as architects try to make their artistic vision into reality and create something structural, practical and functional that will be a lasting legacy of their work. However, wherever you are in the world, architecture is present, for living, for working, and for entertainment. Hopefully, these tips will help you capture some of that beauty with your photographs. Where to begin? The range of architectural photographic possibilities is almost endless, the chance to capture some of the world's most significant monuments and tourist attractions at one end, whilst at the other end of the scale, the chance to capture someone's humble home or living space.
Location and Approach The first thing to do is consider the location and type of building that you want to photograph. Alternatively, you could decide to approach the building as it is, to just see it as walls and glass, purely as a structure. Ad Hoc Photography. Ad Hoc photography is by no means a technical term, and in essence it's probably as far removed from any technical photographic exercises that one could undertake.

This article is all about photographic opportunism, ambling freely and photographing whatever you happen to stumble upon. Step 1 - Take your camera! We've all had those days, when for some reason or another, you're lacking inspiration and don't quite know what to do with yourself. When I start feeling like that, I have one solution, go and get some space, a bit of fresh air and I always take my camera. Gifts for Photographers - Photo Gifts.
Iceland on Photography Served. 21 Things You Can Do Today to Change Your Photography Forever. Shoot Crazy Filtered Photography Using A Dishwasher [Instructables How-To] If you’re rocking a smartphone these days, there’s no excuse to have badly-lit or uninteresting photos… we can thank countless photo apps like Instagram and Hipstamatic for that. But if you’re really interested in getting that same artsy glow in a manual way, look no further than this how-to from Dr. Lab aka Hti. Some materials you’ll need are a roll of Kodak Ektachrome E 200 35mm film, a dishwasher and soap for one load, a dark room (like your bathroom), and a hair dryer.
First place your roll of film into the cutlery basket of your dishwasher and add detergent. Then wash the film on a normal cycle… just don’t try to do a load of dishes at the same time (gross!). Funny Celebrity Photographs : trfling. Photography Designs - davidcopithorne. Photo &Knee Socks Are a Favorite& by Chris Gampat. The Photojojo Store! - the Most Awesome Photo Gifts and Gear for Photographers. 50 Photoshop Tricks for a Fast-Paced Work Environment. Are you a designer on a deadline?
If you are, then I’m sure you can recall the last time you thought to yourself, “if I had a little more time, I could…” what? Polish that button? Find a better hero image? Reevaluate that color palette? Take some time to do a little more QA? The truth is, however, that we designers will always be looking for more time to polish the one pixel that got away.
Of course, since our go-to design tool in the office is Photoshop, we thought we’d share with you 50 simple Photoshop tricks and shortcuts we love using that can help trim excess spent time in your workflows. Important Note: The following require Photoshop CS5 and a Mac OS X. The Usual Keyboard Shortcut Suspects Memorize these shortcuts. 1. 2. 3. 4. 5.Keyboard shortcuts for flipping foreground and background (X): Use this to switch between your current foreground and background colors located in your toolbar. 6. 7. 8. 9. 10. Customized Must-Have Keyboard Shortcuts 11. 12. My Photography Tutorials - 360 Degree Reverse Photography - Gallery.