
Мозаика из скорлупы. Попробуйте такой вид творчества.
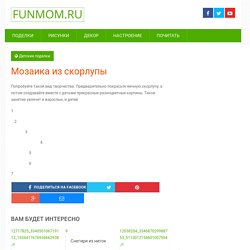
Предварительно покрасьте яичную скорлупу, а потом создавайте вместе с детьми прекрасные разноцветные картины. Такое занятие увлечет и взрослых, и детей. Rainbow Science for Kids: Homemade Spectroscope. Pensarte e Artesanato com Sandra Gobert: COMO FAZER BALÃO MULTICORES DE PAPEL. Template FLOWERS. Red and white yarn flowers.
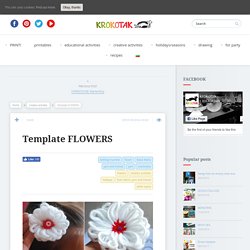
To make them, you need to wind yarn around a round gear shape. Print out the smaller and the larger templates, glue them on cardboard paper and cut them out. Start winding the yarn, tying one end to the shape. Wind the yarn as shown below. Make sure that all the cogs are evenly covered. Sew the yarn in the middle with a needle and thread so you can take the finished flower off the template. What is ‘martenitsa’? In Bulgarian folklore the month of March is often portrayed as a plump, cheerful old lady, “baba Marta”. See also: Easy Yarn Crafts: Creative Ways to Use Yarn Without Knitting or Crocheting. Crafts for Kids Archives. MollyMooCrafts My Crafts Archives - MollyMooCrafts.
Tarcze rycerskie - symetria. Geometric. Woven paper gift topper. I‘m pretty chuffed with these woven paper gift toppers.
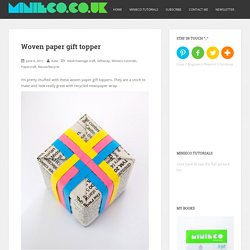
They are a sinch to make and look really great with recycled newspaper wrap. The idea originated from this woven yarn gift topper which you can see at giverslog.com and from this image which comes from the book More Last Minute Knitted Gifts. How-to ♥ Cut some strips of colored paper. Mine were 0.5cm wide. They need to be long enough to wrap around your gift. DIY paper doll faces and speech bubbles ⇆ bloomize. “Smile”, “Hello”, “Thinking of you”, “Be happy” and “Uh-oh” were the expressions that came to me as I made these cuter-than-I-expected faces and assigned a speech bubble to all of them, except one.
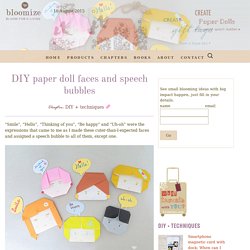
Give anything a speech bubble and anything speaks. All their faces were folded using 6″/15 cm single-sided origami square papers. Let me start with my “Smile” doll and her bob hairstyle. She is very easy to fold up. Fold paper in half both sides by pinching only the ends, don’t crease in full force. Doll #2 The next gal with a slightly shorter bob is just as quick to make. Follow the steps 1 to 6 from above. Doll #3 This next doll looks a little more mature and I love it! Fold down a triangle with the bottom right corner as a point of reference.
Doll #4 and #5 To make these 2, check out the tutorials here and here. Here are some random wip pictures while dressing up the dolls. Random work in progress snapshots. The supplies listed below are the ones I used for this project ⇙ U Create - It's a good day to create! DIY / tuto broche tissée. 20 janvier 2015 2 20 /01 /janvier /2015 12:17 Je vous présente une nouvelle façon de recycler vos cartes de fidélité.
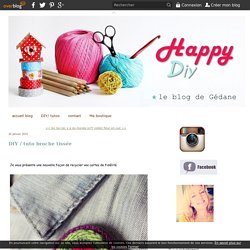
Coupez un cercle de la taille de la carte au ciseau cranteur, passez un fil de haut en bas en tourant tout autour entre chaque pointe, avec de la laine et une grosse aiguille, tissez en alternant un fil sur deux, tirez la laine au fur et à mesure pour un bon applat, jouez sur les couleurs jusqu'au bout du cercle, Crochetez une petite dentelle fine tout autour pour une jolie finition collez à la colle chaude une attache broche sur l'arrière. à très vite, Diy - tutos. 20 janvier 2015 2 20 /01 /janvier /2015 12:17 Je vous présente une nouvelle façon de recycler vos cartes de fidélité.

Coupez un cercle de la taille de la carte au ciseau cranteur, passez un fil de haut en bas en tourant tout autour entre chaque pointe, avec de la laine et une grosse aiguille, tissez en alternant un fil sur deux, tirez la laine au fur et à mesure pour un bon applat, jouez sur les couleurs jusqu'au bout du cercle, Crochetez une petite dentelle fine tout autour pour une jolie finition collez à la colle chaude une attache broche sur l'arrière. à très vite, Partager cet article. DIY / tutoriels...blog de Gédane on Pinterest. Monster Birthday Party Ideas - Wait Til Your Father Gets Home. How to Make a Tassel ... Quickly and Easily. Tassels make a great decorative detail for your knit and crochet projects and all around your home.
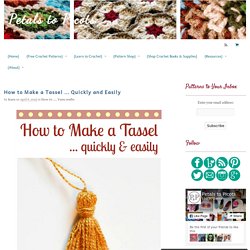
Today I will show you how to make a tassel quickly and easily in any size you desire! And best of all, if consistency is your goal, this method helps keep them all the same size! What you will need: a piece of cardboard or card stockyarn in any color or weight of your choosingscissors Step 1: Before you begin making your tassels, determine how long you would like them. Cut your piece of cardboard or card stock to the height you would like your tassels and wide enough that you are comfortable working with it. Dinosaur Party, Dinosaur Birthday Party and Paint Party. Handicrafts, Handmade, Independent Artisans na Pintereście. Handicrafts, Handmade, Independent Artisans na Pintereście. Dinosaur Party, Dinosaur Birthday Party and Paint Party. DIY Yarn Bottles Pictures, Photos, and Images for Facebook, Tumblr, Pinterest, and Twitter.