
Jewleycreations: POLYMER CLAY MICRO-MOSAIC TESSERAE. If I hadn't written "polymer clay" in my post title, you would probably be thinking these are stained glass tessarae for mosaics!
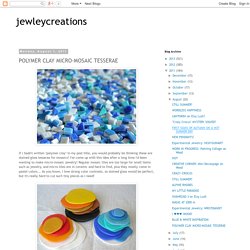
I've come up with this idea after a long time I'd been wanting to make micro-mosaic jewelry! Regular mosaic tiles are too large for small items such as jewelry, and micro-tiles are in ceramic and hard to find, plus they mostly come in pastel colors... As you know, I love strong color contrasts, so stained glass would be perfect, but it's really hard to cut such tiny pieces as I need! Polymer Clay podcast and TV by Polymer Clay Productions.com. Watercolor Mosaic Tutorial. On my first days on Flickr I met a sweet girl from Brazil, Monica Gerard, and she taught me an amazing polymer clay technique - The Watercolor Mosaic.

It was back in 2005. After I tried it I was fascinated by this technique and I made a tutorial in Hebrew. I'm very happy to share it with you now :) enjoy! The Watercolor Mosaic Technique This technique based on the use of transparent polymer clay, Fimo brand, combined with white and black color. PCC Clay Featured Artists Color Photo Transfer Lesson.
The secret of getting bright color transfers onto the clay lies in the paper you use.
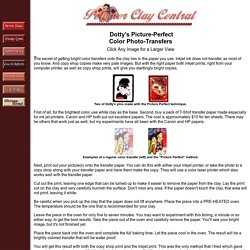
Inkjet ink does not transfer, as most of you know. And copy shop copies make very pale images. But with the right paper both inkjet prints, right from your computer printer, as well as copy shop prints, will give you startlingly bright copies. First of all, for the brightest color, use white clay as the base. Second, buy a pack of T-Shirt transfer paper made especially for ink jet printers.
Next, print out your picture(s) onto the transfer paper. Cut out the print, leaving one edge that can be turned up to make it easier to remove the paper from the clay. Be careful when you pick up the clay that the paper does not lift anywhere. Leave the piece in the oven for only five to seven minutes. Place the piece back into the oven and complete the full baking time.
You will get this result with both the copy shop print and the inkjet print. Creative Paperclay® air dry modeling material: Summer Fun - Mermaid Balancing Toy. Although Summer hasn't officially started yet, the temperatures are rising, school is out, and people are heading to the beach.
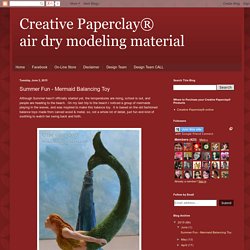
On my last trip to the beach I noticed a group of mermaids playing in the waves, and was inspired to make this balance toy. It is based on the old fashioned balance toys made from carved wood & metal, so, not a whole lot of detail, just fun and kind of soothing to watch her swing back and forth. This mermaid is fun just to balance on a shelf, door frame, or table edge, but I've included the pattern and instructions for a stand you can create for her if you want her to have a resting "hang out". To make your own mermaid you'll need: Delight™ Air Dry Modeling Compound corrugate cardboard 1 round wooden toothpick cut to 1 3/8" long white glue craft knife two round glass decorative vase filler pieces (the kind with a flat bottom and rounded top, about 1/2" to 5/8" diameter.
Pattern Transfer the red outline and markings to cardboard. Paint on facial features. 3-step heart pins with Ron Lehocky. DIY Gnome Tutorial. After a semi-failed attempt at making the toy duck from The Nightmare Before Christmas, I ended up with a ton of spare clay.
Polymer Clay & Trinket Embellishment Tutorial (Bo Bunny DT) A couple of years ago when I was running my Etsy shop I used to make these polymer clay embellishments for scrap pages.

I thought I'd take today to show you all how to make these unique little embellishments, they work beautifully with the Bo Bunny Metal Trinkets! The assignment today was to create a Signs of Spring layout with the new Alora collection. I used a photo I took a couple of years ago in the spring of Meagan on the monkey bars at the park....to me, a sign that Spring is in the air is when the kiddies can go without coats, hat, mitts... Although I have to say we are having crazy warm weather here for Spring, it's almost unheard of to have the kids going to school in shorts in March!
Polymer Clay Mermaid Tutorial. HANDMADE: One week down. Day 6-9.
And a photo of the first week down. For those wondering these will all be for sale at the end of the month. Sorry, no holds. Which one has been your favorite so far? Lemon Cake Recipe (mini style) Bake at 275F for about 45min, cool on rack, break teeth, poop out undigested mini cake.
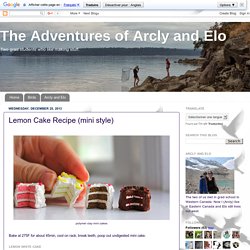
Lemon White Cake Ingredients: Liquid translucent claySculpey (polymer clay) (cake colors and probably translucent)Scalpel or blade Possible glaze for finishing off garnishes after bakingBrush, toothpick etc. Some canes (lemon, lime, candy..). See below. A Happy Song: Fall Leaf Ornaments. I decided to get out the polymer clay again (here's what I did with it the first time) and do a little project for Fall.
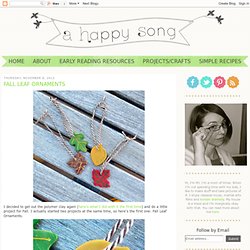
I actually started two projects at the same time, so here's the first one: Fall Leaf Ornaments. I decided to use these as ornaments for my Thanksgiving tree, but these could just as easily become necklaces, gift tags or (if you leave off the hole for stringing) brooches. Sugar Skull Cameos - JEWELRY AND TRINKETS. Gemini Symbol Art Charms: Oven Bake Clay Charms For Homemade Key Chains, Magnets and More. For Homemade Key Chains, Make Your Own Magnets and Birthday Symbol Charms Using The Gemini Symbol This gemini zodiac symbol art charm idea can be used for making easy homemade key chains, homemade magnets or homemade rear view mirror charms...

They make clever homemade graduation gifts... Fabulous homemade boyfriend gift ideas and girlfriend gift ideas... Generally awesome homemade birthday gift ideas for friends, siblings, even dads (my dad has kept the charm I made him in the eighth grade dangling from his rear view mirror for the past 20 years!)... Polymer Clay Tutorial: Faux Pewter Pendants. Today I want to share a fun polymer clay tutorial with you, that is great for all ages!
Premo Sculpey Clay Pendants. Your kids are going to love this one- and I guarantee it will take you back to your own childhood! Who didn’t love rolling “snakes” out of play-doh? The end result of your “playing” are these wonderfully rustic pendants that look like they are forged out of hammered pewter. Are you ready to get busy? Hobbit Doors out of Fimo or Sculpey: polymer clay fairy house. Unique gift for Tolkien and LOTR fans: a DIY free polymer clay Hobbit door tutorial. Turn you bookshelf into the Shire! This miniature Hobbit door would be perfect next to your Hobbit book or Lord of the Rings Trilogy by Tolkien. Everyone has a handful of proudly self-proclaimed geeky friends for whom this would be the perfect gift! Of course you can customize it any way you want! The hinges and door knob need to be baked separately, then glued with super glue.
The door and grass also need to be baked separately. To see some amazing variations, see my previous post about miniature Hobbit doors. Placing a polymer clay bas-relief in a frame. I wanted a deep frame for a polymer clay picture, so I bought this "adjustable depth project frame" from a local craft store. I was worried about baking the clay on a frame with a finish, because I didn't know how it would react in the oven. Still, I went ahead and spread the clay out on the glass, and pressed it against the sides of the frame. As usually happens, it took a few weeks for me to get back to the project.
Ugh! The clay has corroded the sides of the frame and a tar-like substance had seeped onto the clay! At some point in the baking process the glass and clay cracked! I use Pan Pastel chalks, brushes, and pan pastel sponge applicators to "paint" parts of the picture. The concept art for this piece came from Chris Newberg's blog. Home Sweet Home CUSTOM Polymer Clay House Ornament. Polaroid picture charm! I’ve mentioned in past posts that I used to have an Etsy shop, and I used to sell these polaroid charms. They were a very big hit! I actually got the idea from another listing I saw on Etsy, but it was metal (and expensive), so I recreated it using polymer clay. The metal charm looked nice, but this actually looks like a polaroid, since I used white clay.
I started out by rolling out my clay really thin. This is how thin it should be, as you’ll be layering it. I made these guides from paper to lay over the clay and cut around them. Next, I repeated the first few steps to make another square, and placed another paper guide for the window where my picture will go. This part is tricky because it’s really easy to break the thin sides of the window. Once the window was cut out, I placed it on top of the other square I cut out, pushing gently to fuse them together. There will be little gaps around all the edges, that’s fine, because I fill them in later. Until tomorrow!! Like this: Like Loading... How to make polymer clay cupcake charms.
My camera is a little bit rubbish so I am including a few pictures of some decent close ups from other sites so you can get a better idea of how good polymer clay cupcakes can look! What you need at least three different colour polymer clays (I used fimo) polymer cutter or knifetweezerstray or white tileflat based head pinseed beads, diamantes or other things to decorate the cakesoven. Polymer Clay Tutorial - Chatty Charms. Stamp with the letter(s) or word(s) of your choice.