
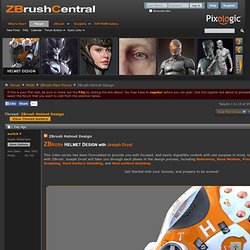
ZBrush Helmet Design Update #7. ZBRUSH HELMET DESIGN with Joseph DrustThis video series has been formulated to provide you with focused, and easily digestible content with one purpose in mind, to create a futuristic helmet with ZBrush.

Joseph Drust will take you through each phase of the design process, including Reference, Base Meshes, Procedural Processes, Sculpting, Hard Surface Detailing, and final surface detailing. Get Started with your lessons, and prepare to be wowed! FINAL HELMET DESIGN CONCEPT VARIATIONS COLOR VARIATIONS TOPIC #1 REFERENCE1. Reference Introduction 2. Using ReferenceTOPIC #2 BASE MESHES1. Check back regularly as we will be posting more videos, and topics in the weeks to come!
Cyborganic Organic Session. ZBrush Helmet Design. ZBRUSH HELMET DESIGN with Joseph DrustThis video series has been formulated to provide you with focused, and easily digestible content with one purpose in mind, to create a futuristic helmet with ZBrush.
Joseph Drust will take you through each phase of the design process, including Reference, Base Meshes, Procedural Processes, Sculpting, Hard Surface Detailing, and final surface detailing. Get Started with your lessons, and prepare to be wowed! FINAL HELMET DESIGN CONCEPT VARIATIONS COLOR VARIATIONS TOPIC #1 REFERENCE1. Reference Introduction 2. Using ReferenceTOPIC #2 BASE MESHES1. Check back regularly as we will be posting more videos, and topics in the weeks to come! Understanding LightCaps in Pixologic Z-Brush. Novedge Webinar #65: Discover ZBrush4R5 with Pixologic. DID YOU KNOW THAT for ZBrush 4. Lightwave 11 Goz. BPR Rendering Workflow in ZBrush 4 R2 by Daniel Bystedt. After posting the image Angry Faun on ZBrush Central, I got a lot of questions about my render and comp workflow.
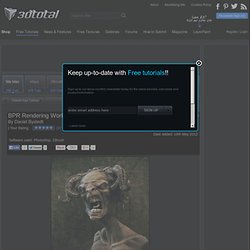
This guide was written while I was using ZBrush 4 R2 and rendering with BPR Render. All compositing was done in Photoshop. Environment Light Press the texture button in Light > Background to import the image that you want as a base to create your lights from. Keep the HDRi in the texture slot so it can be used as environment reflection in materials (Fig.01). Fig. 01 If you are making an environment pass, make sure samples in Light > Background are about 2-3 to create a very ambient lighting.
Fig. 02 Adjust the exposure etc., if you need to get a good intensity on your lighting. Fig. 03 As you can see in Fig.04, there's a shaded pass on the bottom. Re-Angel. Hey guys!
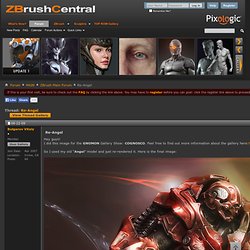
I did this image for the GNOMON Gallery Show: COGNOSCO. Feel free to find out more information about the gallery here: I used my old “Angel” model and just re-rendered it. Here is the final image: I’ve also created a showcase tutorial article about how to create cool renders using ZBrush and Photoshop. Let’s get started.Preparing model and document. Create new document with size twice as bigger as image you want in result.
Conclusion This is pretty much all my tips & tricks for the process of rendering models using ZBrush and Photoshop. Creating a Jedi Game Character by Tom Isaksen (Time-Lapse video) Lighwave 11 zbrush to lightwave. Baking matcaps the easy way. Z4 Beta Testing By: Yiannis Tyropolis. PascalR - Thank you very much, more in depth details comingchemkid - glad you liked him. not really matcap usedThe Namek - I really appreciate it, everything is coming! Scetchguy - Thank you very much. He is going probably for rigging and animating, for a short maybe I usually plan for animation so, i didn't care so much for rendering, but always wanted nice renders of sculpts, props, characters etc to refine the style , communicate ideas, and think about lighting, texturing and stuff. so I 'm definitely going to render stuff on Z4 now!
Novedge Webinar #45: Taking a Closer Look into ZBrush4R3. Mini-tutorial: Zbrush 4.0 custom UI. Paul Gaboury Meet The Pro’s Event. Welcome to the Visualarium. Understanding The Brush System. 6 Rules Of FiberMesh. ZBrushWorkshops :Digital Workshop for Artists. Learn sculpting and Anatomy through specific workshops and live classes created by Ryan Kingslien for ZBrush Community.