
[Unity] rock pack WIP. Thanks everyone !
![[Unity] rock pack WIP](http://cdn.pearltrees.com/s/pic/th/unity-rock-polycount-forum-67501206)
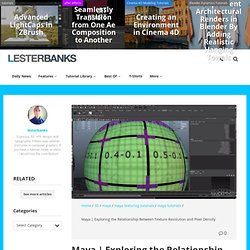
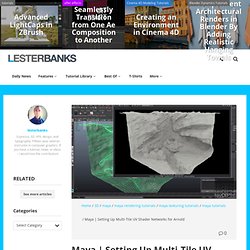
@ErichWK I'll try too post some timelaspe to show my process (both for tileable texture & rocks alone) and for my diffuse too. I use mostly trim dynamic & trim smooth border (customized a bit) with some alphas, some clay brushes (with alpha again) Maya tutorial: How to attach a texture to a mi car paint material. Chris Albeluhn - 3D, UT3, UDK Tutorials. Exploring the Relationship Between Texture Resolution and Pixel Density. Offering a look at the relationship between UV pixel density and texture resolution in Autodesk Maya 3D Generaist and Art Director Timothy Hanson shows how to maximize texture resolution in you projects by using a multi-tile UV workflow.
Paying close attention to pixel density and maximizing UV space, you can exponentially increase texture resolution for your texture maps By comparing two spheres in a Maya scene, one with an 8k texture applied to it, and the other sphere has six 2k texture maps applied using a Muti-Tile UV workflow, Timothy easily demonstrates the benefit of having a multi-tile setup. Timothy also walks through creating a muti-tiled UV set up in Maya, providing some example shading network setups. Setting Up Multi-Tile UV Shader Networks for Arnold. In an extension to his look at Multi-tile workflow in Maya, Max Depth shows how to setup a shading network for Arnold, using displacement, normal, color and reflection maps. how to convert your texture files into the .tx format that Arnold prefers, and marvel at the reduction in render time this workflow offers This tutorial also covers using the .tx format in Arnold, and shows how to convert the texture files to .tx to dramatically speed up rendering.
Previously, MaxDepth explored the relationship between high resolution textures and pixel density with a demonstration in favor of the multi-tile UV setup in Maya. Chris Albeluhn - Texture Density Tutorial. Game Texture Density: This tutorial will cover whether it is always necessary to always use a 0 to 1 UV space for your UV’ing of assets.
This does not apply to every engine, but in this case, i created this Trebuchet for UT3. I will cover the pros and cons for each UV'ing method used. If you create an asset with all the UV’s in the zero to one UV space, some issues can arise. Tutorial:Hard Surface Texture Painting. Hey very nice presentation, good tutorials and tips, but I HAVE to mention this: Use layer masks.
I noticed you actually use the eraser on the textures. This means you actually destroy the original texture. Instead, you should use layer masks (Layer/Add Layer Mask). This is basically a black and white alpha map linked to your texture. You could only do this with your current method by first selecting your texture and then reapply that selection on your new texture but it would require clean up and wouldn't be as fast (the results would not be very good because PS's selection methods are not perfect). Also, you can apply layer effects on layer masks by double clicking it. Give it a try, let me know what you think Other than that great tutorial, thanks for sharing!
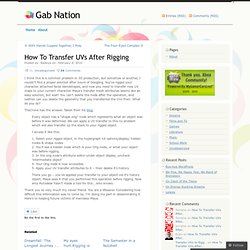
Creating Next-Gen Environment Textures using Total Textures by Daniel Vijoi. This is the second diffuse texture, with the tiling areas also marked out (Fig.21).
Fig. 21 The next major step to be taken is creating the normal map. First thing to do is create a height map from the diffuse map we already created. This is by no means realised by just de-saturating the colour texture and running a filter; there is more to it than that. A close study of the volumes defined by the colour texture is necessary. Here's how the height map looks (Fig.22). Fig. 22 This is how the resulting normal map looks after using the nVidia Normal Map Filter on the previously created height map (Fig.23). Fig. 23 The same method has been used for the second texture. Fig. 24 For some areas I have also added normal map details that were not taken from the diffuse map. The Power of Diffuse. This isn't really a tutorial just a study of one channel, diffuse.
Which is the absorption of light. This tutorial is intended to be general in nature and is supposed to apply to almost every 3d package out there. Max users will have a problem understanding this because diffuse in 3dsmax is color. I don't know what they use for the channel that simulates the absorption of light. Transfer UVs After Rigging. I think this is a common problem in 3D production, but somehow or another, I couldn’t find a proper solution after hours of Googling.
You’ve rigged your character, attached facial blendshapes, and now you need to transfer new UV maps to your current character. Maya’s transfer mesh attributes seems like an easy solution, but wait! You can’t delete the node after the operation, and neither can you delete the geometry that you transferred the UVs from. What do you do? TheCrone has the answer. Every object has a “shape orig” node which represents what an object was before it was deformed.