
Billy Bookcases DIY. Built-in Billy bookcases are certainly not a new concept, but I never felt like the directions were close enough to what I needed.
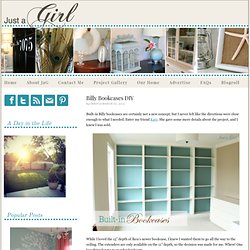
Enter my friend Kate. She gave some more details about the project, and I knew I was sold. While I loved the 15” depth of Ikea’s newer bookcase, I knew I wanted them to go all the way to the ceiling. The extenders are only available on the 11” depth, so the decision was made for me. Whew! After measuring the width of my wall, I knew I needed 4 bookcases. We found these strips at Lowes that would be the width we needed. Once these were attached with small nails and my nail gun, it really made the piece come to life. We didn’t put any wood underneath the shelves, but we did attach the shelves to the back wall with L-brackets from the top. Speaking of crown molding, that went up next. That is where my luck ran out. Finally, we installed the baseboard. The finishing touches involved caulk and paint.
Sorry about the night shot, but this shows the caulking. Speaker Mounts. Making a Stencil. UPDATE: If you are here at All Things Thrifty for the first time, WELCOME!!
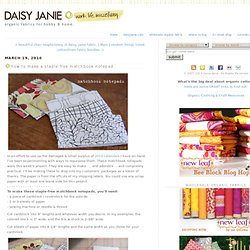
Since I wrote this post about making a stencil I have found that making stencils are MUCH easier with my Silhouette Machine. So, if you would like to see an easy way to make a stencil with a Silhouette check out that post! UPDATE:Also, if you would like some FREE stencil designs, check out that post also! A few weeks ago, I came across this amazing image fromWhitewall and Co. I instantly fell in love with their stencils, but the prices were a little too high for my thrifty core. Step 1: Go to Office Max or Staples and get some clear folders like the ones in this picture below. Step 2: Cut the folders and tape them together. Tape the two folders together to create a large enough area for your stencil. Step 3: Find an image that you like for your stencil and have it printed large enough to trace. Wall-E Art.
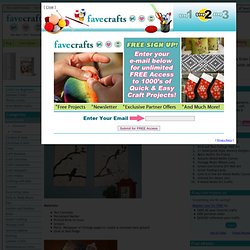
Cardboard Tube Organizational Display. How to make a staple-free matchbook notepad. In an effort to use up the damaged & small surplus of 2010 calendars I have on-hand, I've been experimenting with ways to repurpose them.
These matchbook notepads were this week's project. They are easy to make .... and adorable ... and completely practical. I'll be making these to drop into my customers' packages as a token of thanks. The paper is from the offcuts of my shipping labels. You could use any scrap paper with at least one blank side for this project.- - - - - - - - - - - - - - - - - - - -To make these staple-free matchbook notepads, you'll need:- a piece of cardstock / coverstock for the outside- 2 or 3 sheets of paper- sewing machine or needle & thread Cut cardstock into 9" lengths and whatever width you desire. Cut sheets of paper into 4-1/4" lengths and the same width as you chose for your cardstock. Make a 5/8 - 3/4" creased fold on one end of your cardstock. Tuck a stack of 10 pieces of paper into the fold. Bird and Text Collage Wall Art.
[ Close Privacy Policy ] Privacy Policy / Your California Privacy Rights Revised and posted as of March 4, 2013 Prime Publishing, LLC ("Company," "we" or "us") reserves the right to revise this Privacy Policy at any time simply by posting such revision, so we encourage you to review it periodically.
In order to track any changes to this Privacy Policy, we will include a historical reference at the top of this document. This Privacy Policy will tell you, among other things: Your California privacy rights. ACKNOWLEDGEMENT/YOUR AGREEMENT Company websites are not intended for use by individuals under the age of 18 or those who are not legal residents of the United States. HOW DO WE COLLECT INFORMATION AND WHAT INFORMATION DO WE COLLECT? Distribution Partners Website operators that license our ad serving technology pass information to us so that we may serve advertisements to you. Turn Photo Negatives Into Artsy, Personalized Lamps. How to make gift bags from newspaper. When I bought something at a store recently, the clerk handed me my purchase in a bag made from a newspaper.
I liked it very much and had to make some more—thus today's DIY recycled newspaper project: gift bags made from the Wall Street Journal. You can vary the dimensions, of course, but here's what I used to create a bag that's 5" tall, 4.5" wide, and 3" deep. Stack two sheets of newspaper on top of each other. Beaded Collar Necklace DIY : Trinkets in Bloom. One of the hottest trends right now are collar necklaces.
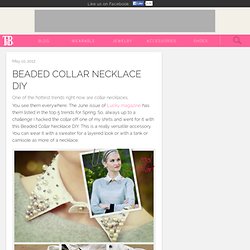
You see them everywhere. The June issue of Lucky magazine has them listed in the top 5 trends for Spring. So, always up to a challenge I hacked the collar off one of my shirts and went for it with this Beaded Collar Necklace DIY.