
magourou
Guide de mensurations Femme pour choisir un patron Burda.
Bricolage. Pin's value. Autre diy. Medieval. Couture. Steampunk bis. Divers. Jeux de Pistes et Chasse aux trésors. Tout Disney. Haunted mansion phantom manor. Musiques MP3. Rammstein - Mein Herz Brennt Official Video HD 2013 (Eugenio Recuenco version) STEAMPUNK. Ronin: Respirator Gas Mask Tutorial. This tutorial is adapted from a workshop I lead at the Nova Albion Steampunk Exhibition last March in northern California.
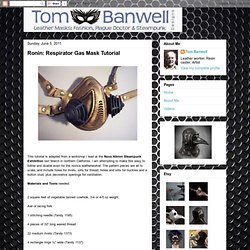
I am attempting to make this easy to follow and doable even for the novice leatherworker. The pattern pieces are all to scale, and include holes for rivets, slits for thread, holes and slits for buckles and a button stud, plus decorative openings for ventilation. Materials and Tools needed: 2 square feet of vegetable tanned cowhide, 3-4 or 4-5 oz weight.
Awl or lacing fork 1 stitching needle (Tandy 1195) 4 pieces of 32” long waxed thread 22 medium rivets (Tandy 1373) 4 rectangle rings ¾" wide (Tandy 1137) 2 buckles ¾" 1 button stud Hammer for setting rivets Anvil or steel plate Heavy shears for cutting leather Scissors for trimming thread Screwdriver for setting button stud Leather dye or wood stain or shoe polish to color leather Contact cement to glue leather Enlarge the pattern so that the ruler marks are one inch long. Assembly Tie two thread ends in a square knot on inside. Googles. How to make a 12 leaves Mechanical Irirs : Assembly it! ANNETTE IN OZ: Springy Thingy Steampunk Card Tutorial / Tipnique Tuesday. It's time for me to share my weekly Tuesday tip or technique.

This tutorial fell out of my tips/techniques book as I moved it last night and so got chosen for today's effort. It makes a card front that the receiver pulls open and the card opens out like a spring to see an inner 20cm square area. Images of a completed card using this technique are below these instructions. Practice this on some scrap paper first. 20cm square piece of card stock or decorative paper of your choice. 1) On all sides measure and make a light pencil dot at the 5cm, 10cm and 15cm mark. 2) From the 5cm mark at the left and right side measure and mark a dot at the 10cm mark 3) From the 10cm mark at the left and right side measure in and mark a dot in at the 5cm mark from each side 4) From the 15cm mark at the left and right side measure and mark a dot at the 10cm mark. 5) Score between all these dots. 6) At the top 15cm mark score down to the right side of the diamond. And this at the back. Creations, inventions et tutoriaux Steampunk, GN, d'un passioné.
Steampunk DIY. At the intersection of Romance and Technology. Building a "Universe Cycle" : Pedal Assembly. Put one flange on each end of an 8" x 1/2 NPT steel pipe.

Tighten as tight as you can.Measure the width of the exposed pipe to determine the proper pedal width. Mine measured about 7.00" I made each pedal out of two pieces because my drill was not long enough to go all the through and I was worried about keeping the hole straight through such a long length. Rip the 2 x 6 to half the pedal width on a table saw. Reversible Corset Vest pattern and tutorial by ...
Gallery. STEAMPUNK. Steampunk.