
DIY Duct Tape Accessories. DIY Criss-cross headband. My addiction to insanely simple DIYs continues.

I threw this together today and thought I'd share:) 1. Take a long strip of fabric (preferably some type of stretchy fabric) 2. Position the middle of the fabric strip at the base of your neck 3. Cross once! I wanted mine to be an easy throw-on every time, so I also just hand-stitched a few stiched through the criss-cross and the knot to keep it from coming undone. SO easy, right? Time - page 6. Guest post {Marie Darby…diy photo lampshades. PINTEREST UPDATE: This is a post from 2010.

I do not take custom orders, only the tutorial is available. The lamps have held up wonderfully. As many of you requested, Marie is sharing a little tutorial here on how she made her lampshades. When she made them she was not planning on doing a tutorial for this blog, so be sure to thank her for taking the time to write all this out. Also, for those wondering…Kara will be sharing some tutorials for her book art on her blog soon. Marie is happy to do custom orders for those that prefer buying over making! * LAMPSHADE – Hobby Lobby carries self-adhesive shades & nightlights, Target has some smaller lamps for $19 that would be perfect for this project, I’ve found some lamps & shades on Craigslist. . * GLUE – I used a hot glue gun for the first lamp. . * VELLUM – I buy this in packs of 20 (I think) in the scrapbooking section of Hobby Lobby.
. * PRINTER – I have a color inkjet printer. If you are using photos – there are several options. That’s it! DIY Bronzer. DIY Fringe Scarf. Everyone needs a go-to fringe scarf in their fashion repertoire.
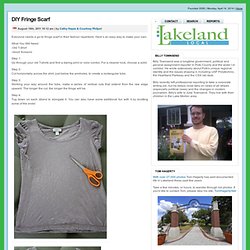
Here’s an easy way to make your own. What You Will Need: -Old T-Shirt -Good Scissors Step 1: Go through your old T-shirts and find a daring print or color combo. For a cleaner look, choose a solid. Step 2: Cut horizontally across the shirt, just below the armholes, to create a rectangular tube. Step 3: Working your way around the tube, make a series of vertical cuts that extend from the raw edge upward. Photo Tile Coasters {Using Resin} Last Christmas I almost had a breakdown...

We had just moved in to our home the month before, but I didn't want to let that prevent us from having the holliest jolliest Christmas. My intentions were good. I wanted to make Christmas special for everyone, but I learned the hard way that I should have been planning ahead!! And that's how it happened. Holder for Charging Cell Phone (made from lotion bottle) My husband and I both have cell phones.

And both of us have phone chargers. And that means lots of obnoxious cords. You never know when one of us may be moving phone cords around, to give our phones an extra charge while we’re chatting away……… or trying to charge our phones up before running errands or something. Needless to say, those phone cords seem to be everywhere…..and are generally in the way and hanging all over the floor. (Okay, and how about when you’re in a hotel or visiting family/friends. I was looking around on the internet for a solution and found this. It made the perfect little holder for my cell phone while it’s being charged. Holder for Charging Cell Phone And no more phone hanging down from the outlet while in this room or that room……..the cord and phone are now up off the ground, and tucked away into the little holder, while the phone drinks up a full charge.
If you look closely, you can see that the orange print is fabric. And turns out, it’s pretty useful. Re-purposing: Tshirts into 5-strand-braided-headbands. I was walking through Target a few weeks ago and noticed this little knit fabric headband that was not just braided together…….but woven.
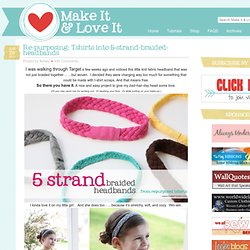
I decided they were charging way too much for something that could be made with t-shirt scraps.