background preloader

DIY and Crafts

Facebook Twitter

Tissue Paper Flowers. When I was in grade school we had Spanish class once a week. I took three years of Spanish in high school and then switched to French in college. I know enough Spanish to ask where the bathroom is, but whether or not I understand the answer is another matter. Oh well, at least I took away one thing from all those years of Spanish class - these tissue paper flowers! I made these all the time as a kid. They're really that simple! All you need is some colored tissue paper and a bunch of green pipe cleaners. 1. 2. 3. 4. 5. ...and carefully separate the layers of paper. 6. 7. I experimented with a bunch of different flower shapes. To make a chrysanthemum, follow the instructions above. To make a dahlia, use 4 squares of hot pink tissue and 2 squares of pink. To make a peony, use 2 squares each of pink and pale pink, and 4 squares of white.

To make a rose, use 2 squares pale peach and 4 squares peach . To make a daisy, use 6 squares of white tissue and 2 squares of yellow. The Pinterest Project: Coconut Sugar Scrub. I'm a girl. 
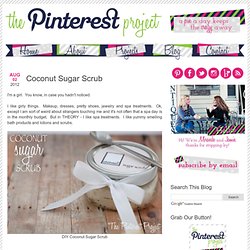
You know, in case you hadn't noticed. I like girly things. Makeup, dresses, pretty shoes, jewelry and spa treatments. Ok, except I am sort of weird about strangers touching me and it's not often that a spa day is in the monthly budget. But in THEORY - I like spa treatments. I like yummy smelling bath products and lotions and scrubs. DIY Coconut Sugar Scrub In the past year or so, I've become a huge fan of coconut oil. A body scrub that contains only 2 ingredients! You'll need sugar and coconut oil. I had to test it out immediately. Just put some of the scrub in your hands, and scrub away.

Doesn't it look pretty? Since I know you're going to make your own, I'm including a labels printable for the labels I used on these jars. What's your favorite body product? The Pinterest Project: A DIY Gel Air Freshener. You may know that I live in a house with a few members of the opposite gender. 
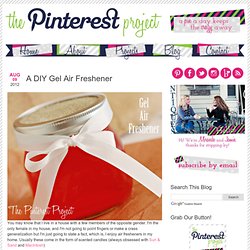
I'm the only female in my house, and I'm not going to point fingers or make a crass generalization but I'm just going to state a fact, which is, I enjoy air fresheners in my home. Usually these come in the form of scented candles (always obsessed with Sun & Sand and MacIntosh) But with a toddler roaming around and my total ADD way of existing, I usually leave my candles unlit. I have been known to light a candle and forget about it. Once, for 2 days. Ok let's get back to the point. I have never thought about making my own air freshener (outside of potpourri, which for some reason seems so 1994 to me, and I apologize right now for my potpourri narrowmindedness).

Here's what you'll need: - heat proof jars (I used mason jars, because I have a million and what's cuter than a mason jar?) First you'll prepare your jar(s). Now, you'll boil 1 c of water on the stove. Then, decorate your jar! DIY. Oh goodness, I haven't posted anything regarding a DIY post in forever, my apologies! I know most of you come for the giveaways, but there are a handful of you that come for some of my other posts that have nothing to do with reviews or giveaways and I feel horrible that I haven't posted anything sooner.

With the holidays finally out of the way and us being caught up on most of our reviews I can finally get back to my normal schedule. Which in this case Tuesdays were always meant to be review and giveaway free. A chance for me to post and share with you all some things that I've been doing in my spare time. Don't get me wrong, I've been doing them, but posting them was put on the back burner. The holidays may be over, but we're far from done with the Winter our here in good old Canada. In my part of town we've just begun to have snow. What I love most about this is that it's all ingredients you have in your kitchen, so it's not expensive at all to make. 1. 2. 3. 4. Tutorial: Repurposed Dresser To Bench! Craft: Valentine's Day Wall Art. I loved how my Valentine's Day garland and wreath looked so I decided to make another Valentine's Day decoration. In our living room we have a big blank wall that is patiently waiting for us to finish the wall art we plan on hanging.

I decided to use that space and try to make a simple, cheap wall art. Supplies: Card stock, pattern to print (I did sheet music), scissors, tapeCost: $0 (I already had all of the supplies) I started off by printing off sheet music. Then I found a heart shape that I liked (via google images). I cut out the hearts by hand - I'm very jealous of people with cricuts or other similar machines that do it for you. :-) I had originally planned on just taping the hearts to the wall (I was going for very simple wall art) but decided it might look neat if the hearts stood a little bit off of the wall.

Does that make sense? I printed the outline with the folding lines (light grey) onto card stock and cut them out. Then I taped them to the backs of the hearts. All done! Babblings and More: Homemade Mod Podge. Don't forget to vote for us daily! 
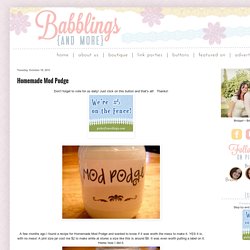
Just click on this button and that's all! Thanks! A few months ago I found a recipe for Homemade Mod Podge and wanted to know if it was worth the mess to make it. YES it is, with no mess! A pint size jar cost me $2 to make while at stores a size like this is around $8.

It was even worth putting a label on it. Heres how I did it. Put a strip of masking/packing tape directly on your jar so that you can take it off later easier. Stick the sticker label on the tape. Tape over the label so that it will be semi-waterproof. Mod Podge in a Pint Jar (matte) Fill jar half way up with white glue (like Elmers) Then fill jar up with water. Shake Well. This is a 50-50 mixture glue/water. It will have a Matte finish. If you would like a Glossy finish, add 1 TBS of clear varnish.

Shake it! If you have tried it with the varnish, we would love to hear how it went. See it for yourself how it works. The little lovebirds. Happy wednesday. i thought i'd share a little project on the blog today. i don't share {or do} a lot of diy's, thanks to my busy schedule. however, yesterday i was feeling awfully crafty- and the leisure summertime allowed me to create something fun. i totally stole this idea from one of my best friends, and would link it to her blog if she had one. It's time to get your craft on, and create a fun, inexpensive and adorable calendar!

"call me a thief": that title relates to the fact, that i made this project for a grand total of $3. {pretty impressive, right? What you will need: 1. paint samples {usually free! 2. a lovely picture frame! 3. dry erase marker. 4. of course you will need the essentials: scissors and glue. instructions: 1. simply pick out your paint samples and colors. I chose to do an "ombre" look, however mixed colors are darling too! 2. trim to the size you want your boxes. 3. paste onto a solid white piece of paper the size of your frame. 5. ta-da! DIY Canvas Prints.

I LOVE the look of canvas prints…but, I haven’t been able to persuade my frugal little self to actually pay for them. Then, along came this idea. It was inspired by my super crafty sister in law. She’s amazing, really. And after seeing what she did with her family photos…I thought to myself : “I wonder if you could wrap your own photos onto canvas? “….turns out…YOU CAN!!! Here is what you will need: -CANVAS 2″ smaller on each side than your actual photo. -PHOTO 2″ larger on each side than your canvas. -WOOD GLUE (make sure it’s the white wood glue…NOT the yellow stuff!!)

-TEXTURE CREAM or CR TEXTURE COATING If you are in Utah (SLC area) you can go in and purchase a 6oz jar of texture cream for $8.95 at The Wood Connection. -FOAM ROLLER I have used two different kinds of rollers for my canvas’s. STAPLER any old stapler will do…just a good old home/office use stapler Instructions: Squeeze the wood glue onto the canvas. Be sure to go all the way to the edge of the canvas with the glue. Southern Lovely: Button burlap {heart}

I think I must really be into canvases lately, because here is yet another craft involving them. :) I LOVE Valentine decor. 
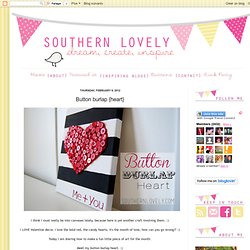
I love the bold red, the candy hearts, it's the month of love, how can you go wrong?! :) Today I am sharing how to make a fun little piece of art for the month. Meet my button burlap heart. :) Supplies needed: Canvas Paint Tape Burlap Buttons Hot glue Vinyl (optional) Start with a blank canvas. On the burlap, I traced a heart & cut. Once that is finished, hot glue your button burlap heart to your canvas. Add the final touch with your vinyl letters & your artwork is complete! Pretty simple, right?! {diy} yarn wrapped painted jars. Da na na na na na NA NA! « Corvus tristis: Science, Craft and an Odd Bird. Materials I made something AWESOME, and I started with these three thrift store shirts (which cost me fifty cents, fifty cents and a buck fifty, respectively). It took me two days of nearly straight labor (I even forgot to eat lunch on day one, I was having so much fun), and the finished product has left me as excited as a little kid on Christmas.

So what did I make? I made final and definite proof that I am an astoundingly HUGE capitol-G Geek. Here, have a hint: Oh yeah. Look Ma, Handstitching! Is this awesome enough? A hand-stitched appliqué makes for a pretty awesome shirt, but is it finished? Mmm, detail work. With much pinning and sewing (by machine and by hand) and measuring and cutting and vast, sad amounts of seam ripping and re-pinning/measuring/cutting/sewing, detail was added. Complete with utility belt… Or a hood with bat ears, which I stuffed so they’d stand up: …and bat-eared hood… Or even black forearms with requisite trio of arm spikes. …and arm spikes! Oh yes. Bam! Oh no! w00t! How to make roses from maple leaves. Folding Trees & Kusudama Tutorial part 1. The Japanese kusudama is a paper ball made out of multiple identical origami shapes glued together. 
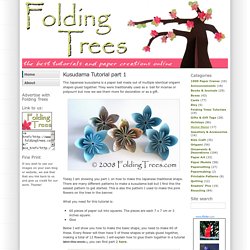
They were traditionally used as a ball for incense or potpourri but now we see them more for decoration or as a gift.

Today I am showing you part 1 on how to make the Japanese traditional shape. There are many different patterns to make a kusudama ball but I find this the easiest pattern to get started. This is also the pattern I used to make the pink flowers on the tree in the banner. What you need for this tutorial is: 60 pieces of paper cut into squares. Below I will show you how to make the basic shape, you need to make 60 of these. Fold the bottom corner to the top. Fold the left and right corners up to the middle corner. Fold the same points down. Open up the flaps you have just created and flatten them. Fold the top triangles towards you so they are level with the edges of the paper. Fold the triangles back using the crease you made earlier and glue the outside triangles together. DIY Weddings. Cut 18-gauge cloth-wrapped floral wire to desired length: 12 inches is a good starting length for a bouquet; 6 works well for a boutonniere.

Clockwise from top left:Button: Cut 11/2-inch square of crepe paper. Place thumbnail-size wad of cotton in center; push end of wire into cotton. Wrap paper around cotton; twist ends around wire. Secure with floral tape. Bud: Cut a 3-inch square of crepe paper; fold it into a triangle. Pistil: Cut a 1/2-by-6-inch strip of off-white crepe paper. Floret: Cut 6-by-2-inch strip of crepe paper; fold every 1/2 inch. Triple Button: Cut three 1-inch squares of crepe paper; make three wads of cotton the size of a pinky nail.

Fringe: Cut a 6-by-2-inch piece of crepe paper. {Valentines day} pixel-y popup card. I‘ve been scratching my head trying to come up with a card for my hubby {AKA the non-romantic type}. I finally decided to make this pixely popup heart card! They are really minimal (which I love) and take about 20 minutes to make (that includes the card, insert and envelope). You can even make some pixely confetti to put inside the card (if you are a big kid like me!). Full instructions and printable templates below! (BTW I remember seeing something similar in a popup book years ago. If anyone knows of the book then do let me know!). How to 1. (If you have a cutting machine then see note at end of post!)

Cut along the black lines and score the grey lines. 3. 5. 7. Edited to add: The lovely Kayla from saynotsweetanne has send me a .dfx file of the card which you can use if you have a cutting machine. Real Weddings: Eliza & Toby’s Victorian Farmhouse Wedding. Most favorited all-time. Repurposed DIY For Everyone! I've heard it from so many different people...and I've said it myself!

"I wish I could... " I'd like to showcase some repurposed DIY designs I've collected that I think anyone and everyone could do - and do well! It won't be hard to find the supplies, either. Not only will you feel the elation of creation (hey, that rhymes!) , you'll also be warm and fuzzy in your heart - knowing that you're helping to save the Earth, one repurposed project at a time. spotted at Canadian House & Home So, no more "I wish I could... ". Until next time... Michael Stumble this post. Turn an old book into a keepsake box for tiny treasures/ Such a good idea! Make a Hula Hoop Chandelier. Home » $1 and Free, cheap crafts, Decor, Headline 17 June 2012 23,871 views 7 Comments by rhonda The longer I blog, the more I am convinced that you can make a chandelier out of just about anything. Here's and idea I've never seen before: Sarah from Sarah with an H needed something to snazz up a lounge-y porch area, so she assembled a simple light fixture using a hula hoop and icicle-style Christmas lights!

You could even use hula hoops in differedt sides nested together to make multi-tier version of this project. [how to make a hula hoop chandelier] Project estimate: Hula hoop, $1 and upLace, on hand or $1 and upChristmas lights, on hand or $1 and upHot glue, on hand Total: $1 and up Disclosure: this article may contain affiliate links or other forms of sponsored content. Fancy Up Your Sterlite Drawers. Sterlite Drawers Revisited: A Follow-Up to Help You Fancy Up.