
It's a good idea to use free paint chips: Check out the 31 ways paint chips are used in all kinds of projects!!
Some of these you may have seen around blogland others are from Etsy. 1.PaintswatchWall2.SnowmanOrnaments3.cut leaves 4. Note booklets 5. Paper Flowers - Anyone Can Do That. Japanese Kusudama, this tutorial is featured on Craftuts Anyone can do that, I assure you.

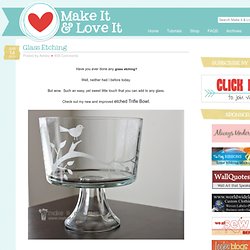
The proof: I can, just take a quick look at my result below. And, believe me, I am neither meticulous nor particularly patient. Holder for Charging Cell Phone (made from lotion bottle) My husband and I both have cell phones.

And both of us have phone chargers. And that means lots of obnoxious cords. You never know when one of us may be moving phone cords around, to give our phones an extra charge while we’re chatting away……… or trying to charge our phones up before running errands or something. Needless to say, those phone cords seem to be everywhere…..and are generally in the way and hanging all over the floor. (Okay, and how about when you’re in a hotel or visiting family/friends.
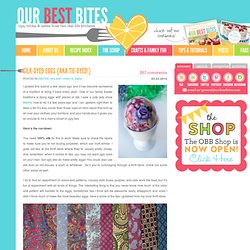
Glass Etching. Have you ever done any glass etching?
Well, neither had I before today. But wow. Such an easy, yet sweet little touch that you can add to any glass. Check out my new and improved etched Trifle Bowl. The perfect bowl for desserts of all kinds…..and even a great place for fresh fruit on the counter. Silk-Dyed Eggs {aka TIE-Dyed!} I posted this tutorial a few years ago and it has become somewhat of a tradition to bring it back every year!
One of our family Easter traditions is dying eggs with pieces of silk. I saw a cute lady show Martha how to do it a few years ago and I ran upstairs right then to steal a tie! It’s way cooler than those cups of neon liquid that end up all over your clothes, your furniture and your hands plus it gives you an excuse to rid a man’s closet of ugly ties. How To Style a Fishtail Braid - A Beautiful Mess - StumbleUpon.
We love the look of fishtail braids!

Turn Photo Negatives Into Artsy, Personalized Lamps - StumbleUpon. Stencil with freezer paper (harry potter tee)... - StumbleUpon. DIY: Make your own Halloween dinnerware. So now you've seen my interpretation of a Raven themed dinner party, I wanted to show you how I made the dinnerware.

If you are like me you probably oogle over the holiday themed dishes but quickly shy away since you don't want to shell out for a whole set just for one celebration. (I don't even have real china so I think its safe to say I won't be buying any themed kind either) So when this idea of making my own for next to nothing came to mind, I just had to try it. Obviously this interpretation is quite macabre but you could totally mix it up to make it your own - think nursery rhymes for baby showers, holiday song lyrics for christmas, bible passages for easter, dirty doodles for hen nights...
I could go on and on. Start off with plain white plates of your choosing (available cheaply everywhere), a porcelain 150 pen, some blue masking tape and a small stencil (optional). “pimpad” burk -Craft of the Day, “pimped” jar. Det finns många sätt att piffa till en gammal glasburk.

Det här är ett sätt. Jag har testat ett par andra varianter tidigare: se här, här och här. /There are many ways to decorate an old glass jar. DIY Inspiration - Recycled Ties. Before we begin, there's a few more ties gathering over on my recycled ties Pinterest board - so feel free to hop over, and make sure to let me know if you have, or have seen great tie projects to add.

Last weekend I had ties on my mind with the creation of a recycled tie dress for my Divine Little Miss M. So I thought it would be fun to put together a collection of some fabulous recycled and repurposed tie creations out there - the kinds that will have you running to your nearest thrift store to scoop up loads of ties and get busy creating. Ready? My Purple Crayon bacopa67 Liz Tibo Creations Better n Before. How-To: Duct Tape Roses - StumbleUpon. Washer Panache. Wire & Paper - StumbleUpon. Motherhood, Frugal Fashion & Thrifty Living. Apr12th2010 I’m sure these tutorials of mine are all starting to look the same.

That’s because they are. Haha, enjoy. Supplies 2 colors of coordinating fabric (or not. . * I ordered a bunch of these little rings from an Etsy shop called The Perfect Bead. Instructions I chose two coordinating fabrics in peachy/pink shades. Cut 5 circles from the first fabric, varying from 1 inch in diameter down to about 3/4 inch. Use your lighter to singe the edges of each circle. Stack your “petals”, alternating between the two types of fabric, with the largest circles on the bottom and the smallest on the top. Run your needle and thread through the center of the stack to secure. Stitch or glue beads, pearls, rhinestones, or anything else you have onto the center of your flower. Glue the back of the flower to the little pad on the ring and you’re finished!
These little rings make great gifts for birthdays, bridesmaids, or even Mother’s Day. Clever ideas to declutter. I came across this clever idea on HGTV on how to recycle tin cans to wonderful storage organisers. For more ideas and instructions, click here. (above) "Hot glue heavy-duty magnets to ten soup cans and stick them to a steel cookie sheet. Hang it within kids’ reach using a plate hanger. Use the cups to hold crayons, chalk, markers and even Legos. The Beauty of Mason Jars - Shelterpop. - StumbleUpon. Fairy lights can be enhanced with feathers, paper, cardboard cones or...egg carton cups! These recycled cardboard cups offer an unusual texture and soft colors that, with minimal skills, can be turned into a vine of light-emitting morning glory.
For this project, use LED lights only. Save different colored egg cartons. With a pair of sturdy scissors, cut away excess cardboard surrounding the cup strips. Then cut out each separate cup. Starting at the cup opening, make a short slit into each side of the cup. ...love Maegan: * Leather Lanyard Bracelet Maeg-it Yourself * Fashion+Home+Lifestyle Blog. If you went to Summer Camp as a kid, you’ll totally remember making lanyard keychains with that brightly colored plastic lace {I had tons of them!} …so I thought, why not do it with leather lace? And I did. And I love them! Pair them with stacks of other bangles and bracelets to add a little texture! {p.s. you can also make this into a necklace, headband or belt as well}
- StumbleUpon. Hi friends! I can't tell you how excited I am to be a creative guest on Ucreate today! I've been bubbling with excitement for weeks and have been scheming over what project would be Ucreate-worthy. I hope this one fits the bill...! First of all, I'm Autie and my friend Jen and I blog over at iCandy handmade. Re-purposing: Tshirts into 5-strand-braided-headbands. I was walking through Target a few weeks ago and noticed this little knit fabric headband that was not just braided together…….but woven. I decided they were charging way too much for something that could be made with t-shirt scraps.
And that means free. So there you have it. Free People Clothing Boutique Blog - StumbleUpon. UPDATE: This post originally ran on March 23 2011, but with summer winding down we wanted to bring it back up for some late summer inspiration! Going home to roost - StumbleUpon.