
Wind-up paper butterflies are my fave (guest post from amelia) I had a baby so I’ve invited some fave guests to take over for me while I spend time with the little guy.
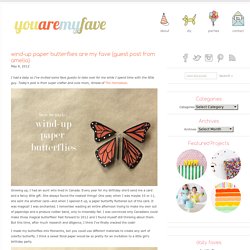
Today’s post is from super crafter and cute mom, Amelia of The Homebook. Growing up, I had an aunt who lived in Canada. Every year for my birthday she’d send me a card and a fancy little gift. She always found the neatest things! One year, when I was maybe 10 or 11, she sent me another card—and when I opened it up, a paper butterfly fluttered out of the card. I made my butterflies into Monarchs, but you could use different materials to create any sort of colorful butterfly. Materials: You’ll need heavy cardstock, 24 gauge wire, silicone rubber bands (I found mine in the hair aisle at Walgreens) needle-nose pliers, scissors, tape, a paintbrush, a black marker, and a white ink pen.
Step 1: Measure and cut your wire. Step 2: Find the center of the longer wire. Step 5: Find the center of the shorter wire, and wrap it around the base of the paintbrush. I'm So Looking Forward To Fall, So Much So...Here Are Some REAL Fall Fashion Loves To Get You Excited Too. Bird Mobile. DIY Globe Garland. I create map and nautical chart pillows here at salt labs in Detroit, MI.

It seems like a natural evolution for me to be making map pillows. Maps are part of my DNA. I almost can’t walk or drive anywhere without a mental map in my brain of the places I’m travelling to or from. I have to know the north, east, south and west of the place I’m in. In Michigan, one intuitively orients oneself by the surrounding bodies of water, our Great Lakes. Over the past year, I’ve been on the craft show circuit, first locally, then regionally. Indirectly my daughter, Micha, was the inspiration for creating my map paper garlands. At Renegade, people loved them. 1. start with a square of map paper (I used 5-inch squares for my garlands) 2. fold both ways diagonally (called valley folds in origami) 3. fold horizontally, then vertically (called mountain folds)
10 cool things to make with maps. Maps have such great memories attached to them, and they’re beautiful in their own way too.

Dust off your well-used holiday maps or scour flea markets for character-filled vintage finds, then get to work on these 10 cool cartography themed projects. Via: seekatesew.blogspot.com.au A fancy hole punch and a sewing machine are all you need to make these ethereal map garlands. Get the tutorial at See Kate Sew. Brenna’s pinhole artwork. This perfect-for-summer project comes from brenna berger at paper + ink. she documents her amazingly clever custom invitation designs on her blog, so when it comes to paper it’s no surprise that she’s full of ideas. i love the simple, modern feel of these, and the fact that they cost next to nothing to make. on an semi-related note, i recently decided to have a movie marathon of all corporate “must make it big in nyc” movies from the eighties (wall street, secret of my success, working girl…you get the drift), but now i am definitely not going to start it until i have some paper and a thumbtack ready:) thanks, brenna!

-kate CLICK HERE for the full how-to after the jump! Materials: 1. paper (preferably cotton) 2. thumbtack 3. pony bead and hot glue (optional) 4. scrap cardboard (at least as big as your paper) 5. tape 6. image of choice (some options are available here) 5. cut to size and you are done! Arts &Crafts for Holiday and Celebrations. Easy Craft Ideas - Accordion Book - Paper Source - StumbleUpon. This easy to make accordion book is a personalized way to organize all of your small odds and ends.

Each envelope page can hold something different such as- "to do" lists, stamps, tickets, coupons, and business cards. Also a fun craft idea for a gift - fill with photos, tickets, and other keepsakes and share with a special friend. Materials: Chartreuse A2 Envelopes Glue Stick Bone folder Labels Gel Pens. Paint Moss Graffiti - Step-by-Step Guides for Offbeat DIY Projects.
The DIY FAVES. So, Savannah and I are becoming aware of your DIY love, so expect to see more of that here.
We will have makeup & hair tutorials as well as clothing, jewelry, and home DIY projects. We are excited to share these with you so be on the look out. In the meantime, here are some of my favorite DIY projects. Hope you enjoy! TUTORIAL: Coffee Stirrer DIY Wall Art - makeanddogirl.com - StumbleUpon. Last week, I posted a preview of the simple, inexpensive wall art my mom and I created.
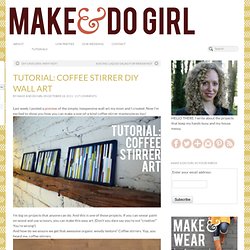
Now I’m excited to show you how you can make a one-of-a-kind coffee stirrer masterpieces too! I’m big on projects that anyone can do. And this is one of those projects. If you can smear paint on wood and use scissors, you can make this easy art. (Don’t you dare say you’re not “creative!”