
A Beautiful Mess. A Beautiful Mess. Although there are so many great things that the Internet has to offer, there are a few downsides as well to the old world wide web.
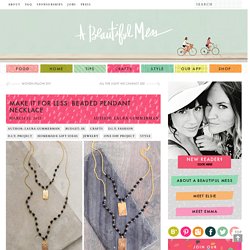
While I love that I can choose from a seemingly endless online pool of items to buy, everyone knows the pain of clicking on a Pinterest photo only to see that either the item isn’t actually for sale or it sold out two years ago and it’s never coming back. Of course, if you are a DIYer, that may not be the end of the road for you! A Pair & a Spare diy. I met Sophie, the incredibly talented designer behind Sophie Monet jewelry, last year while in New York and we instantly bonded over a love of all things DIY.
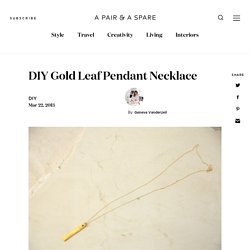
Soph handmakes the gorgeous pieces under her label, painstakingly sculpting them out of wood, and adding stone, chain brass and gold leafing, skills she picked up while growing up in her dad’s woodworking shop (fyi, I have a little studio envy right now). The mix of sanded dark wood, precious stones and hints of gold are a nod to her love of art and nature and her experiences living between LA and New York.
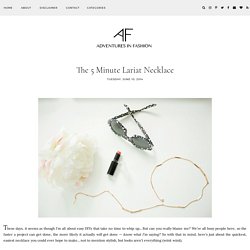
I was lucky enough to get to browse through her pieces in person when we had some downtime at our hotel and was blown away by her gilded collection, handshaped wood pieces with accents of gold leaf made into the most unique necklaces, rings and bracelets – the sort of jewelry you can imagine wearing everyday. Adventures in Fashion. Start by adding your beads to the eye hook, leaving enough room at the end to make a loop.
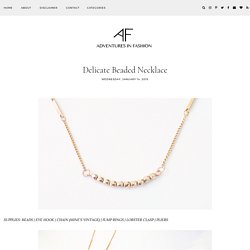
Using a pair of pliers, sharply bend the wire to one side, then griping the wire at the tip of the hook, bring it up and around to form a loop. If you haven't done this before, it may take a few practices, but it's easy, I swear! When that's all done (seriously, go ahead and pat yourself on the back), gently bend the wire up on each side, then use jump rings to secure each end to your chain. Finish it off with a lobster clasp, and bada bing bada boom, you're done! Xx Photos by Adventures in Fashion + Brittney Le Blanc. Adventures in Fashion. Hi friends, welcome back!

Hope everyone had a nice weekend... mine kicked off in classic TGIF style with a (tearful) viewing of Fuller House, and culminated in utter speechlessness when Lady Gaga appeared at the Oscars wearing a pant-gown hybrid that I can only assume was made by angels in heaven... clearly an eventful weekend for me. But in other more pressing news, I have what may just be the easiest DIY of all time for you today, complete with that 90s flair you all know and love — the wrap choker. Yes, another choker. But this one was too good and easy not to share, so here we are... let's do this, shall we? Start by measuring out how much cord or leather strip you'll need by wrapping it around your neck the way you plan on wearing it, then cut off the excess. Once both charms are secured to your crimp rings, attach one to each end of the cord, securing in place firmly with jewelry pliers (see above). Photos by Team AiF. Adventures in Fashion. With more things on my calendar and to-do list this week than I care to count, I was in the mood for the quickest, easiest possible DIY...
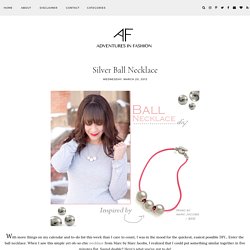
Enter the ball necklace. When I saw this simple yet oh-so chic necklace from Marc by Marc Jacobs, I realized that I could put something similar together in five minutes flat. Sound doable? Here's what you've got to do! 1. Adventures in Fashion. These days, it seems as though I'm all about easy DIYs that take no time to whip up...
But can you really blame me? We're all busy people here, so the faster a project can get done, the more likely it actually will get done — know what I'm saying? So with that in mind, here's just about the quickest, easiest necklace you could ever hope to make... not to mention stylish, but looks aren't everything (wink wink). Start by measuring how long you would like your necklace to be, and remove any excess chain. Adventures of a diy mom. A few weeks ago I mentioned that I am now a Prima Bead Blog Team Member.
A couple weeks ago I received my welcome package. Adventures of a diy mom. Sometimes a simple design can make a big impact.
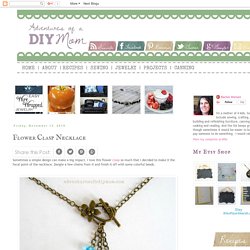
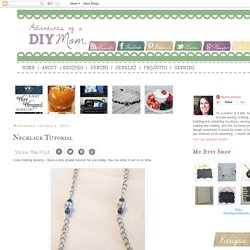
I love this flower clasp so much that I decided to make it the focal point of the necklace. Dangle a few chains from it and finish it off with some colorful beads. Want to make your own Flower Clasp Necklace? You will need: chain decorative toggle clasp {I used a flower clasp} jump rings beads eye pins. Adventures of a diy mom. Last weekend my husband was away.
What's a girl to do, but to break out the beads and make herself something pretty? The kids and I ate at the bar all weekend because the table was covered with my projects. This pendant was easy, although a little time consuming. Adventures of a Diy Mom. I love making jewelry.
Adventures of a Diy Mom. I've taken a long break from blogging over the holidays. But that doesn't mean I wasn't busy creating. I wanted to make something special for my Young Women girls for Christmas. Since there are 18 of them it had to be something not too time consuming and something they would like. I came up with this simple pearl cluster necklace, with the pearls being the colors of the Young Women Values. Alice and Lois. Baisley and Noir. When you're feeling lazy but still want to make something: here is the easiest geometric necklace you'll ever make. Cafe Craftea. Asos.com is one of my absolute faaaavorite sites to shop at (disclaimer: not endorsing, I just really love them) because they have such unique pieces and their fashions are always on point.
I spotted this totally DIY-able Gogo Philip necklace, so I made this necklace from some extra hexnuts on hand from my last project! DIY Gogo Philip Inspired Crystal Hexnut Necklace(Difficulty: Easy) Supplies (1) Gold hexnut(2) Jewelry pliers(3) E-6000(4) Cord end(5) Jump ring(6) Necklace chain (I ended up using silver instead of gold)(7) Faux rhinestone stickers Steps. Craft Crazed Mom. Craft Paper Scissors. Crafts Unleashed. I have admitted before that I do not consider myself a jewelry maker. But I am a die-hard DIYer and I can usually figure things out by looking at them. I saw this ladder pearl necklace that I liked on Pinterest, but the link was broken. I figured out how to re-create it from the picture, and I am sharing it with you today! Keep in mind, this pearl necklace DIY jewelry would be super easy to re-create using whatever beads or colors of pearls you prefer.
Once I figured out how to make it, I made several colors to give as gifts. To begin this pearl necklace DIY tutorial, measure out your chain. Trim your chain, and loop it in half. I found it helpful to secure the two ends of the chain to my work surface with tape to hold them in place. Insert a head pin into your pearl of choice. With the pearl flush to the bottom of the head pin, trim the opposite end of the pin to about 1/2″ above the pearl. Select another bead. Trim the un-looped end of the eye pin to about 1/4- 1/2″ from the bead. Darice. Darice. Darice. Darice. Delicate Construction. Instagram is one of my newest addictions! Doodle Craft. Wire Wrapped St. Doodle Craft. Eat Drink Chic. EHow. Every Crafty Endeavor.
Eyes of Style. Eyes of Style. Eyes of Style. Fall for DIY. Fall for DIY. I’m off to my local German Market today with the family. It’s the ultimate Christmas tradition and even though the stalls are the same every year and it’s always mega busy I don’t mind, it’s worth it for the festive atmosphere and hot gluewine!
It is also one of the things me and Al did together when we first started dating, so it’s dead romantic for me as well! Fall for DIY. Head pins and eye pins are a staple of jewellery making. One of the most useful reasons to use head pins is to turn beads into pendants or charms. As long as there’s a hole going all the way through it, you can use this technique. Fall for DIY. Fall for DIY. Fall for DIY. Fall for DIY. Fashion Diva Design. Fashion Diva Design. Fashionrolla. Flamingo Toes. Flamingo Toes.
Flamingo Toes. For the Love of. For the Makers. For the Makers. For the Makers. For the Makers. For the Makers. For the Makers. For the Makers. For the Makers. For the Makers. For the Makers. For the Makers. Fun Family Crafts. Fun Family Crafts. Fun Family Crafts. Happy Go Lucky. Happy Go Lucky. Happy Hour Projects. Happy Hour Projects. Happy Hour Projects. Happy Hour Projects. Happy Hour Projects. Happy Hour Projects. Happy Hour Projects. Happy Hour Projects. Happy Hour Projects. Happy Hour Projects. Happy Hour Projects.
Happy Hour Projects. Happy Hour Projects. Happy Hour Projects. Happy Hour Projects. Happy Hour Projects. Happy Hour Projects. Heart Handmade. Hello Glow. Hey Wanderer. Hey Wanderer. Homey Oh My. How did you make this. Infarrantly Creative. Inspiration Realisation. Instructables. Instructables. It Happens in a Blink. It Happens in a Blink. Janis All Things Beautiful. JoAnn. JoAnn. JoAnn. JoAnn. JoAnn. JoAnn. JoAnn. Just Between Friends. Laura Wadsworth.