
Long time no craft: Choco-mint style stars! Jo Hannah: French Knitting Masterclass with Teri Howes. Jo Hannah About Me Jo Hannah I dabble in Precious Metals and Cake but not at the same time!

View my complete profile Followers Search This Blog Loading... FEEDJIT Live Traffic Feed. Loom Weaving. Weaving Frame A simple weaving frame can be made by making incisions in both ends of strong cardboard.
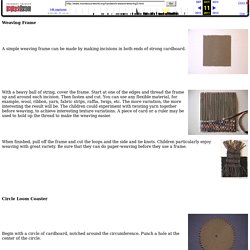
With a heavy ball of string, cover the frame. Start at one of the edges and thread the frame up and around each incision. Cardboard Weaving Loom ∙ How To by Jenny Bones on Cut Out. Curly Made: DIY Fringe Trim // Sweater update. I got this sweater from my dad a couple of years ago, and it has been in my drawer without much use ever since, so I thought that adding a fringe trim would be the perfect way to give it a fresh new look.
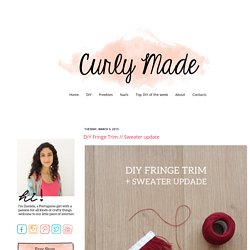
Problem was, I didn't had any in hand and if I ordered it online it would take some time to arrive, so my option was to try and figure out how to make one myself. And here's how you can quickly create fringe trim yourself. You will need: Sweater or any other thing you want to place the fringe on; Glue, this might work even better if you have fabric glue; Small strip of fabric; Cotton Crochet Thread; Old Headband or ribbon; Needle and thread; Scissors; and a ruller. Measure the place where you want the fringe to go, mine was 12 cm Fold the fabric in half and cut a thin strip With the fabric still folded measure, the 12 cm and cut the excess. Apply a line of glue on half the strip. Keep adding small bits of thread until you reach half of the strip.
How to Make Yarn Dolls – Make Your Own Yarn Dolls – Homemade. When I was little I loved to make things to play with.

My grandpa helped me build a big dollhouse out of some scrap wood, so my sister and I were very much into playing with little dolls. I never had a doll that I bought that lived in the dollhouse, but instead we made cute little dolls from yarn and some from pipe cleaners. Are you enjoying what you see here? Get new articles sent right to your inbox! Sign up for our weekly newsletters for new articles sent right to your inbox plus get a free copy of my Gardening and Preserving Journal, just for signing up!
Making Yarn Dolls is a fun project that can be done with boys or girls and doesn't take long to create, but they make a great project for a snowy day. To make yarn dolls you just need some yarn (and any yarn will do, so if you don't have any you can look for the cheapest yarn at the store!) Start by creating the arms of the doll. Cut the arms away from the main skein of yarn and cut 2 small pieces of yarn to tie up the arms with. Meu Mundo Craft: Tricô sem agulhas. Toilet Paper Roll Knitting Idea #8: Summer Skinny Skarf.
It wasn’t until I figured how to knit a hole into a spool-knit tube (see Spool Knit Wrist Warmer) that I realized that a spool knitter could be used to knit a flat panel.
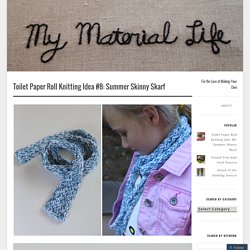
Why it took me so long I don’t know. Spool knitters are knitting looms after all – just because they are round doesn’t mean you have to create a tube with them. What I did to create the flat scarf above was to start knitting on one stick and work my way around to the last stick. Then, instead of continuing to work in a circle, I took my working yarn (or yarns in this case – two strands of Rowan DK Handknit Cotton) and pulled it around the front of that last stick and started working back in the direction I had just come from. Back and forth, back and forth – instead of round and round – that’s how you knit flat on a spool knitter. Because I wrap my sticks as I use the spool knitter, you will notice a directional change in the pattern created by the stitches. Figure 1 Figure 2. T-shirt yarn (with seams) T Yarn. Recycle TutorialTools & Materials: 1.
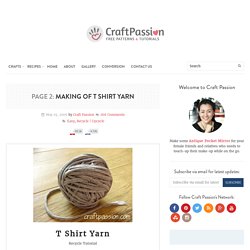
T-shirts (those without side-seam) 2. A pair of sharp scissors Place the T-shirt flat on the floor or working table. We only need the bottom-halve portion of the T-shirt. Cut horizontally from sleeve to sleeve as shown above. Fold the T-shirt from side to side, leaving an inch allowance as shown. Cut into strips as shown, remember not to cut the 1 inch allowance. Finish cutting the T-shirt from top to bottom evenly. Unfold the 1 inch allowance and it will look as shown below. Arm Knitting. Finger crochet. Tassels. Knitting spools. THE LOST ART OF KNITTING NANCYS Pictures and instructions on how to make and use them (Viewed best in Internet Explorer.
Some other browsrs may not be able to open the image files. Click on main site to browse 70 other topics ranging from exotic kaleidoscope designs to the strange world of lucid dreaming. NEW!!! Jump down to the Innovations knitting machine review.) Whether you call them Knitting Nancys, Bizzy Lizzys, knitting mushrooms, knitting spools, corkers, peg knitters, knitting nobbys (or knitting noddys) or knitting knobbys, these knitting devices all owe their existence to the medieval lucet. It's used by threading yarn through the hole then in a figure eight around the prongs. Knitting Nancys are four-prong variants of the lucet.
Versions like the one pictured above used to be made out of wooden thread spools, something difficult to do in these modern times since thread spools are now plastic. Yarn is fed down through the hole and left to hang. Different Stitches: