Cadence KAL: Finishing your Knit! « KristenMakes. OK, so my Cadence is done being knitted, but it still looks messy. 
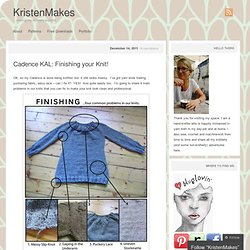
I’ve got yarn ends trailing, puckering fabric, wavy lace – can I fix it? YES! And quite easily too. I’m going to share 4 main problems in our knits that you can fix to make your knit look clean and professional. First off, you can see that where you have a messy edge where you began or ended. Next we have an underarm with some loose stitches. Now grab your darning needle (see my favourite needle above!) The guide above shows the method that works best for me for neatening up that join. Now the gaping underarm is a bit trickier because there is more than one stitch to fix. After all bits have been neatened up, hide all those ends! The pile of ends! Alright nearly there. Now mine is knitted from wool so I like to let it soak in lukewarm –to-warm water with a bit of mild soap/shampoo/conditioner/fabric softener/specialty hand-knit soak. When it is completely dry, you are finished!
Like this: Like Loading... The Thumb Trick: Sometimes called an afterthought thumb, I first read about it in Elizabeth Zimmermann's Knitter's Almanac. 
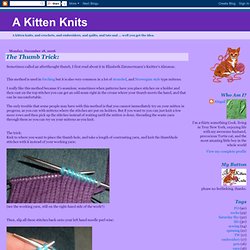
I really like this method because it's seamless; sometimes when patterns have you place stitches on a holder and then cast on the top stitches you can get an odd seam right in the crease where your thumb meets the hand, and that can be uncomfortable.
The only trouble that some people may have with this method is that you cannot immediately try on your mitten in progress, as you can with mittens where the stitches are put on holders. But if you want to you can just knit a few more rows and then pick up the stitches instead of waiting until the mitten is done, threading the waste yarn through them so you can try on your mittens as you knit.
The trick: Knit to where you want to place the thumb hole, and take a length of contrasting yarn, and knit the thumbhole stitches with it instead of your working yarn: (see the working yarn, still on the right-hand side of the work?) Ta da! Adding a new ball of yarn in the same color. Today: "Joining yarn," or "What to do when you're at the tail end of the old ball of yarn, and you need to add in a new ball of the same color.
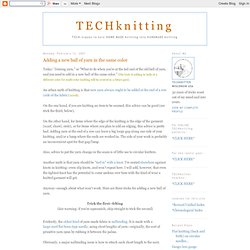
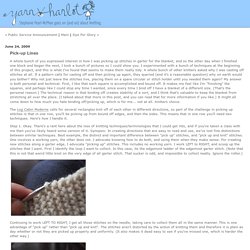
" (The trick of adding in balls of a different color for multi-color knitting will be covered in a future post). An urban myth of knitting is that new yarn always ought to be added at the end of a row (side of the fabric) (scroll). On the one hand, if you are knitting an item to be seamed, this advice can be good (see trick the third, below). On the other hand, for items where the edge of the knitting is the edge of the garment (scarf, shawl, stole), or for items where you plan to add an edging, this advice is pretty bad. Adding yarn at the end of a row can leave a big loopy gap along one side of your knitting, and/or a lump where the ends are worked in. Also, advice to put the yarn change in the seam is of little use to circular knitters.
Another myth is that yarn should be "tied in" with a knot. Anyway--enough about what won't work. Click picture. BACK to the back join. The back join (subject of a previous post) is a method for working in the tails AS YOU GO in multi-color knitting. The back join is NOT confusing, but judging from the e-mails in the TECHknitting in-box, the first post about it WAS confusing. It would be a pity to obscure such a useful technique with badly-written instructions, so here's another run at it--with an additional illustration showing the back join as it is being knitted.
The back join (one more time) The back join is usually used in circular knitting (around and around) because back-and forth knitters usually change at the fabric edge. Therefore, the illustrations below show the back join in circular knitting. So, suppose you are knitting around and around on circular needles in LAVENDER and you want to switch to PURPLE. 1) (above) Begin the back join by knitting to the last LAVENDER stitch. 3) (above) In step 3, you will INTERLOCK the old color (LAVENDER) with the new color (PURPLE) at the spot you have previously marked.
Steeking with crochet binding. Thank you to everyone who entered the Coastal Knits contest. We had 501 entries! I think that might be a record number of comments for a single post on Through the Loops. I used a random number generator to select our winner, Carol P! Carol has been notified and Hannah will send the book to her shortly.
In other news I decided to do a modification to a sweater I knit three years ago. It seems my girls are more of the cardigan wearing sort. All it took was a quick crochet reenforcement: Then a pair of scissors to give it the snip, snip: Front bands were added, a trip to M&J trimming yielded just the right buttons, and we've got a newly revised sweater. Weaving in Ends. I have some good news. And, I have some bad news. Good news first: there is no one right way to weave in your ends. So, chances are, you haven’t been doing it wrong! Now, the bad news: there are so many different ways to weave in your ends, you might not be doing it the best way either.
Having options, it’s a blessing and a curse. Some of our most seasoned customers would come in to find a knitting newbie at the communal table, finishing up a project in some newfangled kind of way. The perhaps unsettling truth is that there is probably another way to do whatever it is you are doing. Stockinette Weaving in Ends with Duplicate Stitch (on the ‘Right Side’) Weaving your ends using the duplicate stitch method means you will sew along your fabric, following the path of the stitched yarn.
With your tapestry needle threaded, bring your needle from the back or ‘wrong side’ of the fabric to the front or ‘right side’ of your fabric at the base of the nearest ‘V’ created by the knit stitches. Garter. k1p1 invisible bind-off tutorial « crankygrrrrrl. This being my first real adventure in toe-up socks, i was a loss as to what bind off to use. sensational knitted socks didn’t have a recommended bind-off (did it?) 
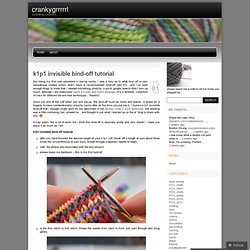
…and i’ve read enough blogs to know that i needed something stretchy. a quick google search didn’t turn up much, although i did rediscover laurie b’s toes and heels webpage (it’s a fantastic collection of links for different toe and heel techniques…thanks!).
Since you end at the cuff when you knit toe-up, the bind-off must be loose and elastic. it would be a tragedy to have (unintentionally) slouchy socks after all the time you put into it. i found a k1p1 invisible bind-off that i thought might work for me described in the twisted sister’s sock workbook. the wording was a little confusing, but i plowed on…and thought to put what i learned up on the ol’ blog to share with you. :) it may seem like a lot of work, but i think this bind-off is espcially pretty and very elastic. i hope you enjoy it as much as i do!
Last step!! Viola! Short Rows: Shadow Wraps. Over the last couple weeks I’ve reviewed the plain wrap, the yarn over wrap, the Japanese wrap, and the double stitch wrap. 
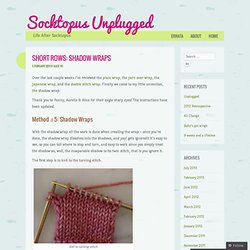
Finally we come to my little unvention, the shadow wrap. Thank you to Penny, Aurelia & Alice for their eagle sharp eyes! The instructions have been updated.
Method #5: Shadow Wraps With the shadow wrap all the work is done when creating the wrap – once you’re done, the shadow wrap dissolves into the shadows, and yay! The first step is to knit to the turning stitch. Knit to turning stitch Before going any further, let’s just take a moment to identify the relevant stitches. Daughter & Mama Stitches Pick up the mama stitch with your right needle. Pick up mama sittch Place the mama stitch on your left needle to the right of the daughter stitch (ie closest to the tip of the left needle), being careful not to twist it. Place mama stitch on needle Knit mama stitch New shadow created The shadow wrap is now on your right needle; the mama and her daughter still on the left needle.
Cast On: Provisional. A provisional cast-on keeps cast-on stitches "live" so that they can be knit later. 
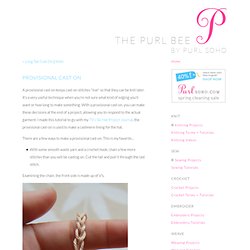
It's a very useful technique when you're not sure what kind of edging you'll want or how long to make something. With a provisional cast-on, you can make these decisions at the end of a project, allowing you to respond to the actual garment. I made this tutorial to go with my 70's Ski Hat Project Journal, the provisional cast-on is used to make a cashmere lining for the hat. There are a few ways to make a provisional cast-on. This is my favorite... With some smooth waste yarn and a crochet hook, chain a few more stitches than you will be casting on. Examining the chain, the front side is made up of V's. The back of the chain has bumps in it. Insert a knitting needle into each bump on the back of the chain, and using the yarn you are knitting with, pick up however many stitches you're casting on.
Then just knit! Then remove the crocheted chain by untying the end and gently unraveling the whole chain. Picking up along a garter edge. Pick-up Lines A whole bunch of you expressed interest in how I was picking up stitches in garter for the blanket, and so the other day when I finished one block and began the next, I took a bunch of pictures so I could show you. I experimented with a bunch of techniques at the beginning of this project, and this is what I've found that seems to make them really tidy. A whole bunch of other knitters asked why I was casting off stitches at all.
If a pattern calls for casting off and then picking up again, they queried (and it's a reasonable question) why on earth would you bother? The Log Cabin Moderne calls for several rectangles knit off of each other in different directions, so part of the challenge in picking up stitches is that in one row, you'll be picking up from bound off edges, and then the sides. Step 1. Continuing to work LEFT TO RIGHT, I get all those stitches on the needle, taking care to collect them all in the same manner. Step 3. Step 4. Step 5. Ta dah!
Finished, front... Charisa_martin: How to Knit a Welt, a Ridge, a Pintuck: Texture! Welt, Ridge, Pintuck: How ToA knitted welt adds texture and definition to your knitting. You can do it small, you can do it large. It's easy. Here's how to do it. Click a photo to see it bigger. [download the Wedge Hat pattern, and get this tutorial in the pattern.] 1. 2. Photo (a): knit the ridge fabric 2. Photo (b): pick up stitches from the original fabric (not the ridge fabric) 3. Photo (c): knit the welt closed - knit two stitches together. photo (d): after the welt is closed - live stitches are once again the original yarn (white, wrong side view) 4. Photo (e): finished welt after knitting it closed, front of fabric You've knit a ridge, a welt, a pintuck!