
Printmaking & Art Supplies Shop Melbourne - Neil Wallace Printmaking Supplies. Groupe public Printmaking on the XCut XPress. Annie Day; Printmaking Sisters Printmaking Workshops Safer Printmaking. Collagraph with Lynn Bailey. Fragments par Karine Leger. Introduction to Printmaking: Dry Point. Dry point is the most direct form of intaglio.
The artist simply takes a sharp point and uses it to scratch into the metal plate to create the image. Monoprinting and Chine Colle. Not sure about gouache, but what I've found with water colours is the following: - When I just dampen the paper, I have more gaps.
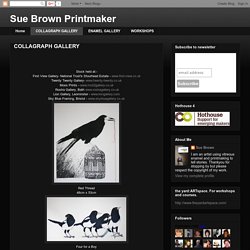
If I actually soak it for 5 minutes and then wait for the sheen to disappear before printing, the paper accepts the pigment much more readily from the plate. (not necessarily a better result, depending on what you are aiming for) - Using a spoon to burnish, I go over the print 5 - 6 times, (vertical, horizontal, two diagonals, and circles) attempting to fully cover the print area each time. I got substantially better prints once I started to burnish more heavily and longer. - If I add gum arabic to either the surface of the plate or to the watercolour paint, the pigment appears to be more easily released from the plate. . - Some colours are more likely to transfer fully. Hope this info helps, even if it gives you just the basis for some additional experimentation. Sue Brown Printmaker: COLLAGRAPH GALLERY. Stock held at:- Lion Gallery, Leominster - www.liongallery.com Sky Blue Framing, Bristol - www.skybluegallery.co.uk Red Thread 48cm x 53cm Four for a Boy 68cm x 32cm Three for a Girl. 32 x 68cm Outside. 56 x 44cm.
Mystory. PaperArtsy: 2016 Topic #9 Mono Printing {Challenge} Another older technique still used today is screenprinting, originally called silkscreen printing as silk was used before the invention of synthetic mesh.
Evidence of this goes back to China in 960 AD and did not arrive in the West until the 18th century. A blocking template or stencil is used to cover the mesh in the chosen design. Then a blade or squeegee is used to pull paint or ink across the mesh. The medium seeps through the mesh onto the chosen substrate, with only the blanked out areas left clear. Andy Warhol made screen printing popular in the 1960's, here he is working on one of his iconic images. Many layers can be added,each a different colour, take a look at this screen print.. this has 21 colours.
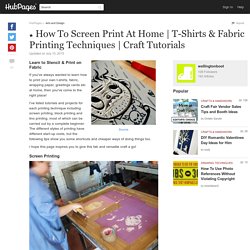
Linocut Tutorials & Art Tutorials by Australian Artist Lynette Weir. Lavender - The Arts & Crafts Press. T-Shirts & Fabric Printing Techniques. The following are all types of printing which can be used to transfer designs to fabric (and sometimes other surfaces) at home: - Stencilling: Stencils are usually made from paper, card or plastic, and the design you want to print is cut out of the sheet by hand.
Michelle ward: tutorial: cutting stencils. Much of this information was previously published on my street team blog, or my main blog, but I have gathered it all into one place to encourage you to make your own stencils or masks, or both!
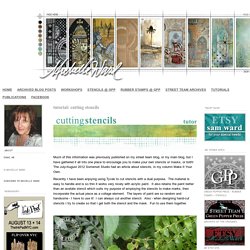
The July/August 2012 Somerset Studio had an article about stencils, in my column Make It Your Own. Recently I have been enjoying using Tyvek to cut stencils with a dual purpose. The material is easy to handle and is so thin it works very nicely with acrylic paint. It also retains the paint better than an acetate stencil which suits my purpose of employing the stencils to make marks, then incorporate the actual piece as a collage element. Blog — Ecouture Textiles. I use watercolor and printmaking papers available in art stores.
Fibre Art, Eco Printing, Artists' Books, Vintage Textiles.
Prints and Patterns - Stencils, Wall Stencils - iStencils.com. Gelli Plate Printing Extras! (Part 1) - Create Mixed Media. (The following demonstrations are bonus techniques from Gelli Plate Printing by Joan Bess, copyright 2014.)
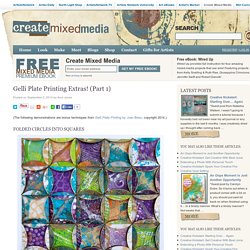
Folded Circles into Squares Create several Gelli prints that are printed on both sides of the paper. Print using your favorite techniques, textures and marks. Printing on card stock works well for this project. Cut Gelli prints into 1½” circles. Apply a decorative line around the edge of each circle with a metallic gold leaf pen so that it shows when the edges are folded inward. Cut a 1″ square from chipboard (cereal box, etc.). Place the 1″ square template in the center of a Gelli printed circle and draw a pencil line along the square template edges. Position the squares and glue in place onto the substrate of your choice. Quilters may recognize this design concept as inspired by the traditional Cathedral Windows pattern. You can change the dimensions of the circle and square size. Layers of Holes The inside edges of the holes are painted with acrylic paint. Altered Book Files. Gelli Plate Printing Extras! (Part 2) - Create Mixed Media.
(These demonstrations are bonus projects from Gelli Plate Printing by Joan Bess, copyright 2014.)
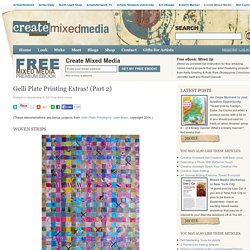
Woven Strips To create this piece, several prints were put through a shredder that cuts paper into 1/4″ strips. If you don’t have access to that type of shredder, simply cut thin strips with an craft blade on a cutting mat or use a paper cutter. (This is a great way to use prints that you’re not satisfied with!) . . . Gelli Plate Printing Extras! (Part 3) - Create Mixed Media. (These demonstrations are bonus projects from Gelli Plate Printing by Joan Bess, copyright 2014.)
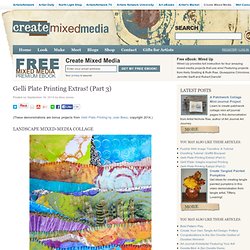
Landscape Mixed-Media Collage This is a great way to use your prints! Tear several prints into various sized pieces and place them on a substrate, arranging them to overlap in a way that resembles a landscape. Add fabric, yarn and found papers, tucking them in between layers. Dyed cheesecloth, novelty yarns, and snippets of various papers—like music, maps and text from old book pages—all work well layered in between the torn Gelli printed pieces. Gelli Plate Printing Extras! (Part 1) - Create Mixed Media. Gallery - Make Monotypes. Eco prints on paper. Lovely results from eco leaf prints on water colour paper! Blackberry, Cotinus Coggrygia, Chokecherry, Japanese Maple and Tagetes petals on water colour paper, folded.
Amazing that the same red Chokecherry leaf prints both blue and green. ‘Twas a Dark and Stormy Eco Print… A series of posts about eco prints with rust on cotton rag paper and on fabrics. This group of prints on 140 lb. watercolour paper is shown assembled in accordion book form. Watercolour paper was cut, folded into four page accordions and layered with leaves and pieces of rusted iron; the stack was soaked in water and vinegar then steamed as usual for an hour or so. This collection was left to cool before removal of the eco printing “plates”. Threadborne. Tutorial 1 Leaf Monoprinting by Cassandra Tondro Cassandra Tondro’s online tutorial on extracting natural dyes from leaves to obtain a print. Cassandra calls her end product a “monoprint” . Cassandra is a “Green” artist living in California. She has been making leaf monoprints for about four years. She has graciously allowed me to link to her tutorial.
Leaf Monoprint Process. Eco Printmakers and Natural Dyers.