
Make It and Love It. Free Pattern – Grumpasaurus. Matt & I have a saying around our house that if one of us is grumpy then we are a Grumpasaurus.
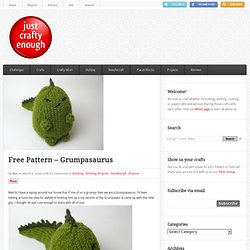
I’d been batting around the idea for awhile of knitting him up a toy version of the Grumpasaur & came up with this little guy. I thought he was cute enough to share with all of you. This was supposed to be a stocking stuffer for Christmas & then a Valentine’s Day gift but I actually just finished it yesterday. I had to keep starting over to get the shapes I wanted for the body & the tail. Of, course you don’t have to make your dinosaur grumpy, have fun embroidering any expression you want. Grumpasaurus Four size 3 double pointed needles Jo Sharp Classic DK Wool in Pistachio & Moss (less than one ball of each) Black Yarn for embroidery Tapestry Needle polyfil or other stuffing Gauge 6 stitches per inch (gauge is not super important as this doesn’t need to fit anyone.
Body:(You are knitting the Grump’s body from the bottom up.) Using lighter green cast on 6 stitches. Yarn wall. Whattya need?
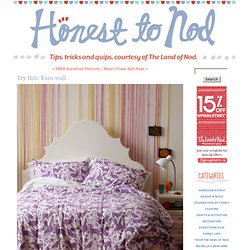
Two different color yarnsScissorsPush pinsA wall How do I make a yarn wall? Step 1: Set push pins in a horizontal line on wall (let spacing between be random). Step 2: Cut lengths of yarn appropriate for your room. Make them longer than you need; you will cut off excess soon. Step 3: Tie one end of yarn around each push pin. A quilt is nice: rounded quilt corners tutorial.
Lately (if you haven't noticed) I have really been into roundedcorners on my quilts.

I really like how it looks, and how it seems to soften the quilt-- which I especially love for baby quilts. The great thing about rounded corners is you don't have to do mitered corners on your binding. The bad part is you MUST use bias binding. Looks matter: how to build a look savvy brand. Bridal Clutch or Bridesmaid Clutch Pouch Purse : by lolos Looks matter: how to build a look savvy brand As much as I champion on building your internal story brand there does come a point when that brand needs to translate visually.
A great brand can get lost two ways–when your visual brand does not represent your story and when your true purpose is not a part of that story. Don’t just be beautiful, unique, or handmade. Be mission driven and represent that direction with some visual cues. No matter your “look” here are 5 tips for making the most of a gravitating brand. Tip no. 1: Keep it simple. Weaving fabric - Happiness blog by Gédane. Tracer un quadrillage sur l'envers du tissu d'au moins trois colonnes minimun, on peut en faire autant que l'on veut il n'y a pas de règle il faut tracer des carrés,( ici ils font 1 X1 cm) mais ils peuvent faire 2 ou 2.5 cm il faut marquer d'un trait un carré sur deux, une fois dans un sens une fois dans l'autre voir photo ci dessous on a besoin d'une aiguille et de fil solide piquer au extremités le carré qui possède un trait en fonction du sens et nouer serré maintenant avec de la patience vous allez voir se tresser votre tissu English version Draw a grid on the back of the material of at least 3 columns; there' s no hard and fast rule, you can do as many as you like.
Scraplights. Project 11 Week 17 – Shredded Newspaper Lantern. Most people have a paper lantern or two lying around the house, but they can get pretty boring very quickly, so this week’s project is focused on rethinking that old standard!
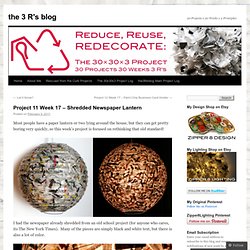
I had the newspaper already shredded from an old school project (for anyone who cares, its The New York Times). Many of the pieces are simply black and white text, but there is also a lot of color. I made a mixture of water, glue, and some Mod Podge and just started laminating the pieces on there. I did about 1/4 of the lantern the first night, and left it to dry only to wake up the next day and find that I hadn’t used enough glue and all the pieces had curled up and were falling off.
So I rubbed the failed pieces off, and started again. I love the mixture of the newsprint and the pops of color, and this was a totally fun and fresh start for a tired old lantern! TetraBox Light by Ed Chew. Liquid to Light Designer Ed Chew takes a green step in the right direction with the TetraBox lamp, a light object made from discarded drink packets that would have otherwise ended up in landfills already packed to the brim.

The design is achieved by unfolding the packets and refolding them into hexagonal and pentagonal sections that are then pieced together to form a geodesic sphere or any other desired shape. Here, the Epcot-like ball makes an attractive overhead light and casts an impressive web of shadows and shapes on the surrounding space. This to That (Glue Advice) 101 Crafty Gifts. Most favorited all-time.
{Valentines day} pixelated popup card. I‘ve been scratching my head trying to come up with a card for my hubby {AKA the non-romantic type}.
I finally decided to make this pixely popup heart card! They are really minimal (which I love) and take about 20 minutes to make (that includes the card, insert and envelope). Crafts for Men. Everyday inspiration and ideas for home and family. The Sweetest Occasion - Celebrations + Design.