
Felt craspedia (a.k.a. billy buttons) There was a time — and maybe we’re still in it — when almost every stylish home contained a vase of craspedia, also known as “Billy Balls,” “Billy Buttons,” and a few other terms I’m not aware of.

And why not? Craspedia are a very cool-looking flower, after all; definitely a great choice for mid-century modern fans, with those long, skinny stems and graphic yellow balls. I have a bunch of them in my home as well, and I do love them. However, I don’t like that the dried ones lose their vivid color and the fresh ones don’t keep long. Enter this super simple felt version by Tanya of Dans le Townhouse: an almost perfect substitute for the real flower. Read the full how-to after the jump! Materials mustard yellow wool roving (found in yarn/craft stores or online)one bowl of hot, hot, hot as you can stand waterone bowl of cold, cold, cold as you can bear watercloth-covered stem wire (from the floral section of craft stores — I used 20 gauge) Instructions 1. Craft Passion: Free Craft Pattern & Tutorial. Mandalas coloring pages - Coloring pages for kids - Miscellaneous coloring pages - printable coloring pages - color pages - kids coloring pages - coloring sheet - coloring page - coloring book - kid color page - pirates - clowns - cowboys - misc.
Diy week {vinyl chalkboard. UPDATE: The giveaway is now closed, Kaylene has the last counting comment.
I know chalkboards are a bit of a craze right now, but I couldn’t help myself with this. If you are unlike me and can’t imagine painting your walls with chalkboard paint, you might fancy a vinyl chalkboard. I am sure most of you have seen the vinyl companies out there that provide all kids of custom graphics and text for your walls and other surfaces. Did you know you can buy sheets of vinyl? Did you know you can buy sheets of chalkboard vinyl? Supplies: 1 sheet of chalkboard vinyl Exacto Knife Letter decals scissors cup (if you want rounded edges) Cute masking tape (to tape it if you aren’t ready to apply it to the surface) Chalkboard Marker Step 1: Use a cup to trace rounded corners Step 2: Cut the rounded corners.
101 Simple Handmade Gift Tutorials. These simple handmade gift tutorials will make any crafty person’s heart sing with joy!

You don’t need special skills or a bunch of time because these can all be done super fast! Simple and cute…that works for me! Oh, and think of all the money you will save making these gifts. {At least that’s the story I tell my husband…shhhh!} You are going to love these fabulous tutorials!!! You can make all your gifts for years from this list! If you love creative links, please subscribe to Everything Etsy! Thanks so much for all your tweets, stumbles, Facebook likes and pins on my Sewing Tutorials and Free Printables posts…you are the coolest crafty friends! DIY Chan Luu Bracelet « My goal this holiday season was to really try my best to make some homemade gifts.

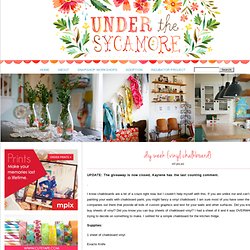
So far I’m doing pretty well with my wreath, some burlap covered candles, some personalized coasters and this past weekend I gave a try at some jewelry. You may have noticed how wrap bracelets are everywhere lately. Chan Luu bracelets are extremely popular these days. They come in singles and also in wraps. I love love the look of these bracelets. I did the top bracelet by simply following this tutorial. 1. 2.Bring your needle up under the right cord through the center and pull the thread through. 3. 4. HoopWithLoopPendant.
Materials: 18g. or 20g wire The length depends on the size pendant you want.
Mandrel... you can use anything that is the size you want.... a sharpie marker, a knitting needle, etc. Bent Nose pliers Round nose pliers Cutters This is a very simple pendant to make, but after starting with this basic shape, you can do so much with it. NOTE: This tutorial prints best with IE (Internet Explorer). Begin by cutting a piece of wire and wrapping it around your mandrel at the size you want. Use your bent nose pliers to make a bend against the mandrel where the wires cross. Wrap the straight wire around the bent wire. Make at least one full wrap, then bend your wrap wire straight down in the front so that it's to the left of center just a hair. If you've never made simple loops, practice with scrap wire to see what size loops you like, then mark that spot on your pliers, and note how much wire is needed for that particular size loop.
Use your round nose pliers to turn the loop. St. Patrick’s Day Kids Craft: Perler Bead Bowls - Daily Party Dish. My kids and I discovered this fun craft the other day and decided it would be great for St.
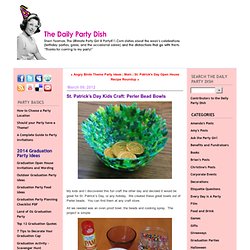
Patrick’s Day, or any holiday. We created these great bowls out of Perler beads. You can find them at any craft store. All we needed was an oven proof bowl, the beads and cooking spray. The project is simple. Start by spraying the inside of your bowl with cooking spray. When you’ve filled your bowl with one layer of beads, put the bowl in the oven or toaster oven for 10-15 minutes at 400°.
After “cooking”, take the bowl out and let the beads cool in the bowl for a few minutes.