
50 Ways To Re-Purpose & Reuse Glass Jars. Festive Stars made from Recycled Drinks Cans. November 1st, 2011 I’m preparing for a couple of craft fairs (details coming soon) at the moment and decided to have a go at making some Festive decorations by recycling some drinks cans I’ve been collecting.
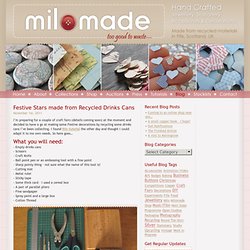
I found this tutorial the other day and thought I could adapt it to me own needs. So here goes… What you will need: - Empty drinks cans - Scissors - Craft Knife - Ball point pen or an embossing tool with a fine point - Sharp pointy thing – not sure what the name of this tool is! Step One First you need to get a star shape printed onto paper or card and cut out. Step Two Next you need to cut the tops and bottoms off your drinks can and give the insides a good clean – I used a craft knife to do this as well as scissors – be careful of sharp edges! Step Three Put a bit of sticky tape (rolled up) onto the back of your cardboard star and stick this to the silver side of your can and draw around it – I use my sharp pointy tool to do this but you could also do it with a fine permanent marker. Drink Can Tinwork. How To Make A Punched Tin Dragonfly. Several requests have arrived from the blogiverse for a tutorial for making a punched tin and bead dragonfly.

So here it is! NOTES before we start: ** Wiring on the wings is a bit tricky and I have done my best to make the process clear. If you will follow the written steps, you should have no problem creating your own dragonfly. However, if you have a question, don't hesitate to write me. ** And keep in mind that attaching the wings to the body with wire is optional. However, I have come to prefer using wire to attach the body to the wings. ** Your dragonfly will be very happy in your garden as garden art as long as you use aluminum pop cans for the wing material and polymer clay such as Sculpey for the body beads.
To create the wings, refer to my tutorial for punched tin butterfly wings. FYI - the wing span of this particular dragon fly is 7 1/2" because I am using rather large beads for the body. Annette uses her Cuttlebug to imprint designs on pop cans! 1. 2. 3. 4. 5. 6. 7. 8. 9. 10. How To Make Punched "Tin" Butterflies. Punched "tin" butterflies are almost always fluttering about somewhere in my home or garden!
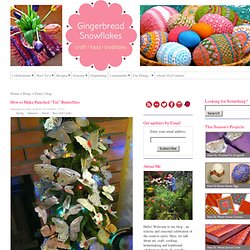
I never tire of making them and my enthusiasm has resulted in a rather large collection. (Huge - actually!) So consider this fair warning - they are addictive! In addition to the instructions below, it may be helpful to review the tutorial for making Punched "Tin" Light shields posted last November as the techniques are quite similar. Easter Cross Made From Recycled Soda Cans. Michele Made Me ... do it!

To be honest, I had pretty much given up on the idea of doing any more "recycled/reuse" crafting. And then I began following Michele, the brilliant mind behind the Michele Made Me Blog and the Tute 'n Pattern Shop. (I share more of her story here.) As you can see above - she has become my "recycle/reuse" muse renewing my interest in using materials destined for the recycle bin or the dump to create new art of lasting value!
DIY Upcycled Pop Can & Resin Heart Pendant. Do you have a pile of aluminum cans in recycling bin purgatory?
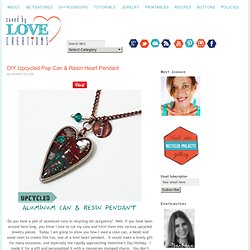
Well, if you have been around here long, you know I love to cut my cans and form them into various upcycled jewelry pieces. Today, I am going to show you how I used a coke can, a bezel and some resin to create this fun, one of a kind heart pendant. It would make a lovely gift for many occasions, and especially the rapidly approaching Valentine’s Day Holiday. I made it for a gift and personalized it with a monogram stamped charm. You don’t need a lot of expensive supplies and equipment to one of these yourself.
Empty Soda Can, rinsed with warm soapy water Jewelry Shoppe Heart Bezel and corresponding heart paper punch (got mine at Hobby Lobby) Any heart shape bezel and a sharpie or other permanent marker Glossy Accents or other metal glue Grungeboard or scrap cardboard Embossing folder and machine Perfect Pearls 3 colors of acrylic paint Metal paint primer (I used Martha Stewart’s) Vintaj Sanding Block Magic Glos Resin. Recycled Aluminum Flowers. Aluminum Can Ornaments. Thank you for visiting Little House in the Suburbs.
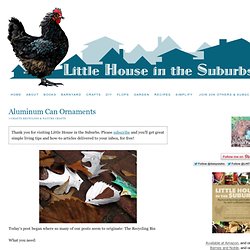
Please subscribe and you'll get great simple living tips and how-to articles delivered to your inbox, for free! Today’s post began where so many of our posts seem to originate: The Recycling Bin What you need: Empty aluminum beverage cans Scissors Sandpaper (sanding block is helpful but not necessary, or wrap sandpaper around a bit of wood) Pen or pencil Ribbon or cord for hanging 1. 2. 3. 4. 5. 6. 7. PS: Welcome Stumblers: Thank you for dropping by! Other Posts that went crazy on StumbleUpon:Making Soap from Kitchen Grease Secrets of the No-Sew Rag Rug. Projects To Make From Aluminum Cans. 15 Creative Ways To Repurpose Old Beer Cans. 60 Recycled Can Projects.