
DIY storybook paper roses. DIY storybook paper roses You’re going to love today’s DIY project so much that you’re going to want to start tearing pages out from old books tonight!

Remember the storybook roses in Shanna + Richard’s wedding? Sweet, right? Floral designer, Cathy Brim of Bloom Floral Design created the elegant branch bouquets seen in their ceremony using Valerie Lloyd’s paper roses design, and now we’re jumping-out-of-the-pages excited that Valerie is sharing her DIY secrets with you! Extreme Repurposing. For the Love of: Mason Jars. <div class="greet_block wpgb_cornered"><div class="greet_text"><div class="greet_image"><a href=" rel="nofollow"><img src=" alt="WP Greet Box icon"/></a></div>Hello there!
If you are new here, you might want to <a href=" rel="nofollow"><strong>subscribe to the RSS feed</strong></a> for updates on this topic. Make a Lunch Box from a Milk Jug. How to Build a Pencil Crossbow. Ever want a crossbow but don’t want to go out and actually spend hundreds on a dangerous weapon?

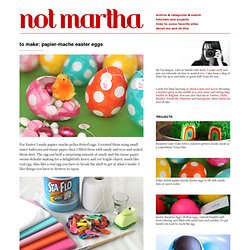
Now you can make one with everyday household items using these simple steps! From John Austin’s book: Mini Weapons of Mass Destruction. Finished product: Step 1: Step 2: Most Popular Repurposing Tricks of 2011. Papier-mache easter eggs. For Easter I made papier-mache polka dotted eggs.

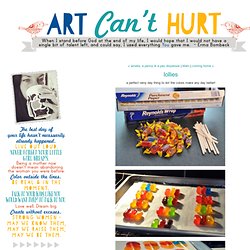
I created them using small water balloons and tissue paper then I filled them with candy and toys and sealed them shut. The egg can hold a surprising amount of candy and the tissue paper seems delicate making for a delightfully heavy and yet fragile object, much like real egg. Also like a real egg you have to break the shell to get at what’s inside. I like things you have to destroy to open. You’ll need: water balloons (they make the egg-iest shape)white tissue paper (one sheet will make about three eggs)colorful tissue paper (one sheet will make many eggs, so you don’t need much)a 3/4 inch hole puncha paint brush you don’t care much aboutliquid laundry starcha sturdy shot glass to hold your egg while you’re working with ita way to hang the balloons to dryenough time to let these dry overnight, and a few hours to let them dry after filling and sealing them (you’ve been warned) Note: I tried a few variations on the starch. Why the loop? Lollies - a little ART CAN'T HURT.
A perfect rainy day thing to do!

The colors make any day better! How to make LOLLIESyou will need: jolly ranchers, candy sticks, parchment paper, foil & a cookie sheet 1) lay a piece of foil on cookie sheet. cover foil with a piece of parchment paper.2) unwrap candies and place side by side on parchment paper in your choice of color & flavor combinations. use three candies together for extra large lollies, and only two candies together for regular lollies.3) heat candies in oven for about 5 minutes at 200 degrees. keep a close eye on the candies and take them out as soon as they've barely melted together. if you leave them in too long they will melt too much and you won't be able to put a stick into the lollie. alter the cook time accordingly.4) carefully take cookie sheet out of oven. immediately lay candy sticks into place on melted candies. slowly twirl in melted candy to coat the stick and so it will hold in the lollie. they're hot!
Sun Lamps. UPDATE: This post originally ran on March 23 2011, but with summer winding down we wanted to bring it back up for some late summer inspiration!

A fellow fp girl sent this to me a couple weeks back and i’ve been thinking about it ever since! I can think of a million reasons why these would be awesome… as apartment décor, as outdoor party décor, and – wouldn’t they be the best thing EVER for camping in general or at a festival? Just let them sit in the sun all day, and they’ll last all night! I am absolutely going to make some to bring with me to bonnaroo this year. Holder for Charging Cell Phone (made from lotion bottle)
My husband and I both have cell phones.

And both of us have phone chargers. And that means lots of obnoxious cords. You never know when one of us may be moving phone cords around, to give our phones an extra charge while we’re chatting away……… or trying to charge our phones up before running errands or something. Needless to say, those phone cords seem to be everywhere…..and are generally in the way and hanging all over the floor. (Okay, and how about when you’re in a hotel or visiting family/friends. I was looking around on the internet for a solution and found this. It made the perfect little holder for my cell phone while it’s being charged. Holder for Charging Cell Phone And no more phone hanging down from the outlet while in this room or that room……..the cord and phone are now up off the ground, and tucked away into the little holder, while the phone drinks up a full charge.
If you look closely, you can see that the orange print is fabric. And turns out, it’s pretty useful.