
Pimpmydrawing.com - Free vector people for architecture and design - 2d dwg ai models - woman, man, kids, dog... Anything you need!! Big Blue Whale free 3D Model .max. Tropical Plant Pictures: Semi-deciduous trees. High Quality 3D Models To Download For FREE. Lệnh cắt DIM, sắp xếp DIM và cách khắc phục lỗi nhảy DIM trong autocad. Wood construction textures. Collection. Turn Useless Objects into Gold: Give Your AutoCAD Drawing a Makeover. Turn Useless Objects into Gold from our resident AutoCAD expert UrbanLISP to make your work … Turn Useless Objects into Gold from our resident AutoCAD expert UrbanLISP to make your work in AutoCAD more efficient.

After the conceptual phase during which you make a lot of sketches, it’s time to get real. A good drawing of the existing situation of the site is essential for making a proper plan drawing. Although AutoCAD is the industry standard for these drawings, when working on projects across the world, it becomes clear that there is no standard on how information is organized.
Vismats: glass / transparent / translucent. 12 Trang Web Download Stock Đẹp Miễn Phí. Model. GRAPHISOFT Filetransfer. Architecture Visualisation. Kubity. Downloadable 24/7. 3d render section in sketchup. Tutorial01: Creating a Realistic Crowd in Photoshop. This is a tutorial how to quickly create a convincing crowd using the powerful brush tools in Photoshop.
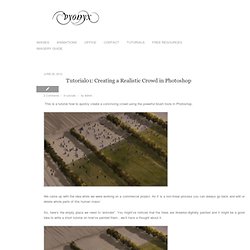
We came up with the idea while we were working on a commercial project. As it is a non-linear process you can always go back and edit or delete whole parts of this human mass! So, here’s the empty plaza we need to “animate”. You might’ve noticed that the trees are likewise digitally painted and it might be a good idea to write a short tutorial on how’ve painted them…we’ll have a thought about it. I really hated the idea spending another hour or so positioning 3D-bipeds in 3ds max, and then waiting on the renderer and then rendering selection masks, etc. So, the first thing we need to do, Daves, is to create a decent brush in Photoshop we are going to use to randomly paint people over the terrain. I started up roughly blocking a humanoid silhouette in a blank Photoshop document…something like this. Once you are happy with the result, go to the Edit menu ->Define Brush preset…. DOUG & WOLF. Vismats: plastics / composites. LUXIGON. Casa da Severa. The building, originally composed of three storey and an attic and a total of six independent apartments, presented several structural problems as well as scarce living conditions, such as precarious sanitation facilities and very small and narrow spaces.
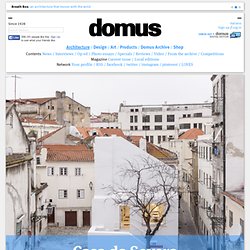
In order to adapt it to its new programme, the whole interior was demolished, preserving the facade and its strong presence in the urban fabric of the area. José Adrião Arquitectos, Casa da Severa, Lisbon, Portugal Casa da Severa features a café/restaurant that can be accessed directly from the square by a staircase, which acts as a continuation of the public space. Its main room takes part of the maximum height available taking advantage of having hollowed its interior, having at its highest point 6,50 m.
One of the walls of its interior is prepared for video projection. The ground-floor is where technical areas are located, kitchen, lavatory and storage. QUICK TIPS: COLOR OVERLAYS - quick tips color overlays. Layer blend modes in Photoshop are something that I use for every rendering I do.
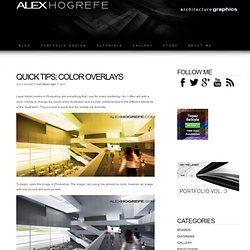
I often will add a color overlay to change the mood of the illustration and provide cohesiveness to the different elements of the illustration. This process is quick and the results are dramatic. To begin, open the image in Photoshop. The image I am using has almost no color, however an image with lots of color will work as well. Create a new layer and move it to the top of the layers pallet. Next, select the "paintbrush" tool. Once paint is applied, go over to the layers pallet and set the layer blend mode to "Overlay. " In just a few seconds, the illustration has changed drastically. And with blue and green tint. BLOG. This past post received a lot of feedback from you asking for a more detailed breakdown of the illustrations.
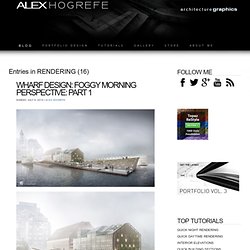
The interior illustration in particular got a lot of attention so I am going to start with that one. Since several different parts of the workflow have already been talked about in the past, I will be adding links to the corresponding sections to avoid too much duplicate information on this site. 1. For this interior shot, I started the process by identifying where and how I wanted to light the space. I designed some linear pendant fixtures to provide most of the ambient light. View selected in the Sketchup Model Blue highlights show proposed locations of artificial light 2. 3. Above, a rendering from Kerkythea with artificial lights 4.
DIAGRAMS: PEDESTRIAN PATHS. I received a lot of emails asking if I could explain how I created the pedestrian paths diagram in the previous post.
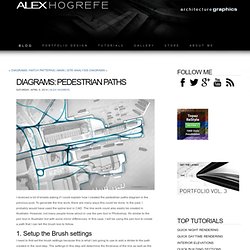
To generate the line work, there are many ways this could be done. In the past, I probably would have used the spline tool in CAD. The line work could also easily be created in Illustrator. However, not many people know about or use the pen tool in Photoshop. It's similar to the pen tool in Illustrator but with some minor differences. 1.