
Guest blogger - Sasha from The Guilded Bee: Here's another DIY project from our sweet friend, Sasha - from the The Gilded Bee.
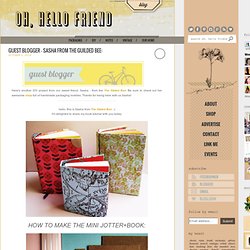
Be sure to check out her awesome shop full of handmade packaging lovelies. Thanks for being here with us Sasha! I'm delighted to share my book tutorial with you today: Supplies you’ll need to make this project: • One—8.5 x 5.5 sheet of cardstock • One---1/2 x 3 inch piece of cardstock or paper • Two---2 5/8 x 3 1/8 inch pieces of cardboard, chipboard or matboard (not corrugated) • Hot glue gun and glue sticks • 25---3 x 5 inch ruled or blank index cards • Two---3 x 5 inch sheets cardstock • 2 rubber bands • Pencil • ¼ inch wide Ribbon: One-6 inch piece, plus two-1 inch pieces To make the page block: * 1.
. * 2. . * 3. . * 4. . * 5. . * 6. To make the cover: * 1. Make a little mark at the center of each side of your paper (4.25 inches on center). On each side of those center marks, draw three lines paralleling each other (6 lines total): DIY: Wine Bottle Light « Wit & Whistle. November 3rd, 2009 This past spring Daniel and I went on a road trip from San Francisco to the Grand Canyon.
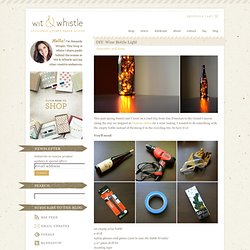
Along the way we stopped at Chateau Julien for a wine tasting. I wanted to do something with the empty bottle instead of throwing it in the recycling bin. Marble magnets. I finally gave in and made marble magnets.
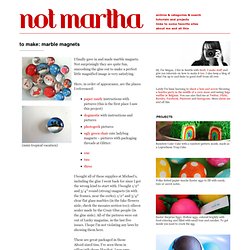
Not surprisingly they are quite fun, smooshing the glue out to make a perfect little magnified image is very satisfying. Here, in order of appearance, are the places I referenced: Tutorial: Shabby Chic Dangly Earring Display. This fun little shabby chic earring stand, made from an altered picture frame, is a great way to hang and display all your beautiful, dangling earrings.
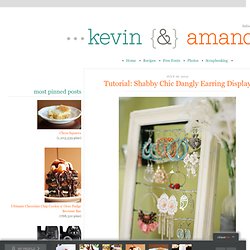
I had the idea for this project after we talked about my love affair with dangly earrings and how to display them. I don’t know about you, but I just love seeing them all hanging in a row! :) The next day I made this earring frame, and it was so quick, easy, and inexpensive to put together, I knew I had to share it with you!
:) I spent a grand total of $5.34 on this project. Cost: Less than $10 Time: 30 mins Supplies: picture frame, 12′ of picture wire, acrylic paint & brush, staple gun (or nails/tacks, etc) Print Hula Hoop Rug Page. DIY Doily&Lamp - StumbleUpon. Do-it-Yourself DIY String Wedding Lanterns Yarn Chandeliers. Jessica of Wednesday Inc shows us how to make those gorgeous twine chandeliers from the inspiration shoot she shared with us this morning.

Using balloons, glue and twine, you can also make these lanterns for your wedding – and then bring it home and use it as your very own mid century lampshade. What you will need are: balloons, glue, yarn, tray for glue, corn starch 1/2 cup of Corn starch, 1/4 cup of Warm water, clear fast drying spray paint, hanging lamp cord or fishing line (depending on your desired final product), and a lighting kit if you’re looking for a fully functional lantern.
Jessica recommends using a sharpie to mark on the inflated balloon how much room you need to leave for the lighting cord. She also recommends coating the balloon with vaseline prior to wrapping the yarn coated with glue so it doesn’t stick on the balloon once it’s dry. You can see all the details on Jessica’s blog. Twig flower pots for giving, or keeping: a tutorial - Nini Makes. Twig flower potI like to give plants to friends or family instead of cut flowers.
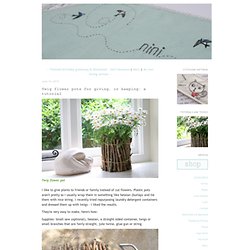
Plastic pots aren't pretty so I usually wrap them in something like hessian (burlap) and tie them with nice string. I recently tried repurposing laundry detergent containers and dressed them up with twigs - I liked the results. They're very easy to make, here's how: Supplies: Small saw (optional), hessian, a straight sided container, twigs or small branches that are fairly straight, jute twine, glue gun or string Gather a pile of twigs and cut them down to roughly the same length; you'll want them a little taller than your container.
Take a long piece of twine (about a metre and a half) and at the middle of your piece of twine begin tying the sticks together. After checking the length, tie the twigs again at the other end. Cover a straight sided container with a strip of hessian (burlap). Now just wrap the twigs around and tie it on. Stuff to Make in my Old Age - StumbleUpon. Cheap Metal Hooks Turn Sticks to DIY Wooden Coat Hangers. Plastic Cup Lamp - StumbleUpon. Now that my university is closed for winter holidays, I finally have more free time to do all the crafty things I’ve been wanting to.

One of these is a lamp made from plastic cups I’ve seen at taf, the art foundation, in the Monastiraki region in the center of Athens. When I first saw it at taf, I was amazed; I looked closely and I couldn’t believe my eyes! The object itself is so peculiar, modern and alien-like it could be in any design exhibition. With my best friend’s birthday coming up, I decided to make it myself and give it to her as a gift. Bottle Cap Table with Poured Resin Surface - StumbleUpon. Home accessories. Craft Room Ideas.