
DIY Chan Luu-Style Wrap Bracelet. Like this: Like Loading...
Filed under Accessories, Bracelets, Jewelry Tagged as Accessories, bracelets, Chan Luu, DIY, DIY Jewelry, do it yourself, Fashion, Fashion DIY, jewelry, Runway, Runway DIY, Wrap Bracelets. DIY Wrap Bracelet - Honestly WTF. You should all know by now that we are all about stacking bracelets on our wrists.

The more, the better. In fact . . . the most, the best! With that being said, we’ll show you how to master a version of the ever so popular wrap bracelet. It’s so simple and addicting, you’ll soon be churning out these wristlets with your eyes closed. Perfect Summer Bangle - StumbleUpon. Here's a fun tutorial on how to make a message bangle that's one-of-a-kind, done in the sun, waterproof and weatherproof.

Even after several trips to the beach, it won't fade or wash off! Essentially, it's the Perfect Summer Bangle. Used in this tutorial: Inkodye Red Prepare. All you'll need for this project is a raw wooden bangle (we got ours from DIYBangles.com), a black paint marker, plastic wrap, and some Inkodye! Transcribe. Perfect. Pour. Braided Headband Tutorial - StumbleUpon. It's chilly outside here today and I'm loving it!
I enjoyed every minute of reaching into the closet and pulling out soft cozy blankets, snuggling up on the couch with my blanket and laptop to check my e-mail this morning... Don't get me wrong, I'm not a fan of temps below 40 degrees, but a high of 65, I'll take it! Anyway.... on with the tutorial. Here is what we are making today! What you need- Thick hair tie Six 1" strips of fabric Bulldog clip or safety pin Sewing machine (or needle and thread) Fabric tac I ripped my fabric strips so they were a bit frayed on the edges, personal choice. Tack each end of the braid just enough that it doesn't come undone . Then tack both braids together on each end, be careful not to twist the braids. DIY Ribbon + Chain Bracelets from #MAGICLV & Dismount Creative. Here’s the second DIY I led with with BurdaStyle direct from the MAGIC floor.

We did these bracelets on Wednesday, the final day of the show. How to make a scrabble tile pendant - Beads Online Australia - StumbleUpon. DIY TUTORIAL and a giveaway! - StumbleUpon. Happy Monday everyone!
Today I am going to show you how to make this necklace and introduce my first giveaway! Below are the steps to make this tulle necklace. And to win this necklace, just leave me a comment below! A winner will be announced on Friday. Survival Bracelet (Updated!) - StumbleUpon. Shes Crafty: DIY Multi-Chain &Ribbon Necklace. Due to the resounding success of her last She’s Crafty, my friend Pandora from Accessory Source is back with another lovely necklace DIY tutorial that would make a fantastic christmas present for a friend or relative!
She says: When it comes to jewelry, I favor big and bold pieces. And while I tend to wear mostly gold, lately I’ve become obsessed with mixing metals like silver and gunmetal (and throwing in some bling for good measure!). DIY : Sailors Knot Bracelet& - StumbleUpon. Skip To My Lou - StumbleUpon.
DIY Wrap Bracelet. How to Make Wrap Bracelets - AuntiesBeads.com. Lovely Wire Knot Ring Tutorial. You can make this lovely ring (or a version of this design) yourself, using just some basic tools, wire and a lip balm! Yes, in this tutorial I am going to demonstrate that just basic beginner tools and a wire from Michael’s can go a long way! Wouldn’t this ring make a great present?? For the purpose of this tutorial I am going to be using the very basic, cheap tools that are available almost everywhere.
Little Wishes - Beyond Beyond. Well, we are dusting off our obligatory black armband over in Beyond Beyond land for one of our most favourite shops ever – Early Bright (mega sad face) they have been the purveyors of some delicious and inspirational bling that is more art than jewellery. And we just want to share one of the most beautiful pieces every a wish in a jar.
We used to shake dandelion bushes when we were little in the vain belief that we would get a Barbie dream house, Michael Jackson tickets, the ability to breakdance overnight (although we never progressed beyond being able to do backspins), millionaire moolah, or our favourite wish was that we had been dropped off at the wrong house (sorry parental units) and we were really the offspring of some family with the financial clout of Daddy Warbucks and the Rothschild’s combined. About the author I'm the big kahuna with the whole shebang. Amma = Idiot + Savant. Summer bracelets DIY. When M. came home from her camp with school, she showed me this yellow bracelet she made with 'scoubidoo' strings.

One of her friends taught her how to make these and of course I wanted to have a go at it too. Instead of scoubidou string I used strips of fabric for one and leather - what did you think?! - shoelaces in offsetting colors for another one. I believe both resulting bracelets look really nice. The possibilities in terms of material to braid with are endless. Paper Bead Tutorial & mad mim - Sewing and other craftiness from Miriam... One time I was seriously considering buying a pair of sandals because they were offering a free bonus paper bead necklace.
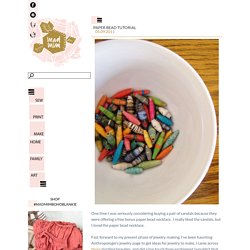
I really liked the sandals, but I loved the paper bead necklace. Fast forward to my present phase of jewelry-making. I’ve been haunting Anthropologie’s jewelry page to get ideas for jewelry to make. Little Miss Momma: Scrunch Fabric Flower Pom Pom Headband TUTORIAL. Scrunch Fabric Flower Pom Pom Headband Tutorial {NOsew step-by-step instructions}

Triple Stud Ring – a little tough, a little sweet, a ... - StumbleUpon. We’re so excited to continue to add to our amazing crew of writers at we heart this. Today, we want to give a big welcome to Kirsten, who will be sharing her crafty ways with the lucky wht readers every month. A fan of vintage everything (but especially shoes) with a love of art, music, beauty, fashion, she’s a wht chick after our own hearts! And make sure to check Kirsten’s blog, Studs and Pearls for tons of inspirational photographs, musical fun and loads more tutorials. ~ wht As many of you creative ladies know, studs and multi-finger rings are some of the most well loved fashion trends right now.
Double and triple finger rings are such significant statement pieces, and can really bring an outfit to an entirely new level. My love of studs and my love of jewelry making crossed paths (along with inspiration from high end, designer multi-finger rings) – and the triple stud ring was born. All photos: kirsten for we heart this ** Any kind of adjustable ring blank will do.
Instructions: Sparkle Sparkle! Trim turned bracelets in a jiffy! Bug Belly Bar. Make your own paper bead jewellery - Better Homes & Gardens Magazine -... - StumbleUpon. Most of us have a little stash of leftover decorative papers from projects and parties. But before you put your scraps in the recycling bin, take a look at what you can do with them. These colourful beads can be made from any paper – junk mail, magazine pages, used giftwrap or leftover stationery papers – and they’re so easy, you and the kids can whip them up by the dozen. Paper beads Gather your supplies Paper; ruler and pencil; scissors; wooden skewers; glue stick; disposable plates or plastic container; gloss spray varnish; leather cord, for stringing; necklace findings (2 silver leather clamps, 2 jump rings and a clasp per necklace); needle-nose pliers Note: For a triple-string necklace, make sufficient beads for 3 strands of beads. Here’s how Step 1 Use Bead templates to choose the shape of your paper strips.
Step 2 When you have cut a number of strips, you can start to roll your beads.