
Transferir imágenes con cinta adhesiva. Con este tutorial aprenderás a transferir fácilmente imágenes de un soporte a otro.
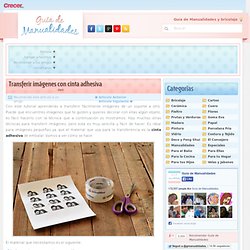
Puede que encuentres imágenes que te gusten y quieres decorar con ellas algún objeto, es fácil hacerlo con la técnica que a continuación os mostramos. Hay muchas otras técnicas para transferir imágenes, pero esta es muy sencilla y fácil de hacer. Es ideal para imágenes pequeñas ya que el material que usa para la transferencia es la cinta adhesiva de embalar. Vamos a ver cómo se hace. El material que necesitamos es el siguiente: Imágenes impresas con impresora láser.Cinta de embalaje transparente.Tijeras.Un recipiente con agua.Adhesivo en spray. Cortamos la cinta de embalaje en una tira un poco más larga que la imagen que deseamos transferir, para poder trabajar más cómodamente. Pasamos el mango de las tijeras o cualquier objeto duro sobre la cinta para conseguir que la cinta se adhiera perfectamente al papel que tiene la imagen impresa.
Via duitang.com on Indulgy.com. MaryM's Original Daisy Bullion Edging, tatting with crochet hook, crochet tatting, cro-tat, Cro-Tat, cro tat, edging, trim, tutorial. If you like the reocities.com project you can donate bitcoins to: 1E8rQq9cmv95CrdrLmqaoD6TErUFKok3bF MaryM's Original Daisy Bullion Edging©2001 - tatting with crochet hook, crochet tatting, cro-tat, tutorial, how to - Copyrighted.

Please copy, reproduce, collect or redistribute with permission only. Finding little to not-much on the internet for tatting with crochet hook, I dreamed up this little design. (Of course, Crochet Tatting is quite an old art, recently come into vogue again - It is described and pictured in "The Godey's Lady's Book" in the 1850's!) 30 Easy And Cuddly DIY Ideas For Recycling Old Sweaters.
Tutorial » Whipperberry. Manualidades de navidad paso a paso pagina 3. Manualidades Navideñas. Diy and Crafts. Tree Branch Bookshelf. Gathered Clutch Tutorial. Anna of Noodlehead is sharing the most beautiful gathered pouch tutorial.
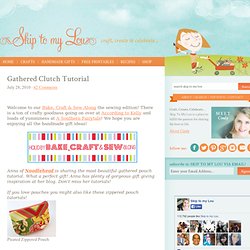
What a perfect gift! Anna has plenty of gorgeous gift giving inspiration at her blog. Don’t miss her tutorials! If you love pouches you might also like these zippered pouch tutorials! Pleated Zippered Pouch Lined Zippered Pouch How To Make A Gathered Zippered Pouch Materials needed: 1/4 yard each of three coordinating fabrics (you’ll definitely have scraps leftover)8″ zipper (you can always purchase a longer zipper and shorten it, just follow the directions on the packagescraps of medium weight fusible interfacing Cutting the pieces: For the main exterior, cut two pieces, one 5.5″ tall by 9″ wide, and one 5.5″ tall by 13″ wide (this will be the gathered front) Pieces of medium weight fusible interfacing for exterior pieces of clutch: (2) 5.5″ tall by 9″ wide For the front band, cut one piece 4″ tall by 9″ wide.
Turn tube right side out and press with seam in the middle. Grab the 13″ wide main exterior piece. Most favorited last 7 days - page 2. Tutorials. Wipe Off Weekly Menu Board. I am a meal planner.
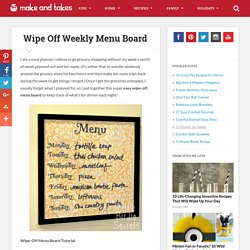
I refuse to go grocery shopping without my week’s worth of meals planned out and list made. (It’s either that or wander aimlessly around the grocery store for two hours and then make ten more trips back during the week to get things I forgot.) Once I get the groceries unloaded, I usually forget what I planned for, so I put together this super easy wipe-off menu board to keep track of what’s for dinner each night! Flashback: Woven Map Basket : Daily source of DIY craft projects and inspiration, patterns, how-tos. Maps can be amazing design elements, with all their intricately drawn lines and minute details.
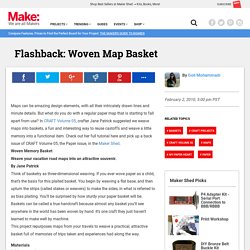
But what do you do with a regular paper map that is starting to fall apart from use? In CRAFT Volume 05, crafter Jane Patrick suggested we weave maps into baskets, a fun and interesting way to reuse castoffs and weave a little memory into a functional item. Check out her full tutorial here and pick up a back issue of CRAFT Volume 05, the Paper issue, in the Maker Shed.Woven Memory Basket Weave your vacation road maps into an attractive souvenir. By Jane Patrick Think of basketry as three-dimensional weaving. If you ever wove paper as a child, that’s the basis for this plaited basket. Materials. Origami For Everyone. Counter Proposal. Wire & Paper.
36 Do It Yourself Gift Box Tutorials For Your Christmas Presents « PrintRadar - Scanning digital space. Most favorited last 7 days - page 4. Things to Make and Do. Most favorited last 7 days - page 5. Top 100 Tutorials of 2010. Como hacer flores con material reciclado. Splitcoaststampers Tutorials: Alcohol Ink by Cindy Lyles: Card Making Techniques.
Dominos are non-porous too!
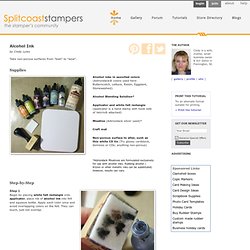
The application for this techique is endless. Glossy paper, buttons, CDs, and so forth. If finished product is to be worn or handled roughly, consider sealing it. DecoArt DuraClear Varnishâ„¢ is recommended, available in gloss or matte. It is a premium polyurethane finish that dries quickly (few hours) and with scant fumes.