
Free Photoshop Tutorials, Custom Shapes, Photo Effects, PSD Files and More. Create a Leather-Textured, Realistic Briefcase Icon. Our goal for this tutorial is to draw a realistic leather briefcase entirely from scratch.
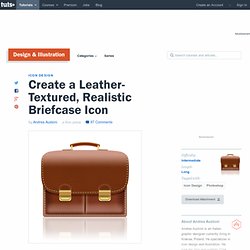
We'll use Photoshop's amazing layer styles and incredible brush engine to create textured leather, convincing stitches and gold-plated locks. Let's get started! Video Tutorial Take a look at this supplemental video tutorial for this concept. Step 1 Let's start by creating a new RGB blank document, choosing a 512 px square canvas. Select the Rounded Rectangle Tool (U), choose Shape Layer and set the Radius to 10 px in the Options bar (1a). Step 2 Let's achieve a higher realism by introducing some color variation. Step 3 Let's add a real leather texture. Set its blending mode to Soft Light and reduce the Opacity to 50% (3c).
Step 4 Now select the "main" layer and double-click on it to bring up the Layer Style window. Step 5 Now duplicate the layer and scale it down, clearing all styles (5a). Step 6 Now we'll use a clever technique to create the stitches. In the Brushes palette set the brush's properties. How To Create a Cool Animated Menu with jQuery. In this tutorial we’ll be building a cool navigation list complete with a sliding hover effect.
Learn how to build the concept in Photoshop, lay out the basic HTML elements, style everything up in CSS then tie it all together with a few lines of jQuery to create a semantic, accessible and degradable menu design. The design we’ll be building features a cool label image that slides into place under each navigation item on hover. We’ll build the design to work without jQuery first of all to ensure it’s widely accessible to users without Javascript enabled, then enhance the effect with jQuery for the majority of users.
View the animated menu demo. How To: Make the Viget Inspire Background. A few of you have been asking, so here it is: An overview of how we put the Viget Inspire background together.
The driving philosophy behind real-texture stuff like this is to fake as little as possible. No matter how many brushes you have or how good you are in Illustrator, there's a quality of unpredictability in real photographs and real, physical elements that adds great subtle qualities to any design. After coming up with the concept of the sunrise/hikers, the next step was to find two real images to craft it from. We needed a real skyline with a row of trees, and a real bed of watercolor effects with the kind of subtle variations watercolors do best. The two lucky candidates were found on iStock. Creating A Cool 3D Web Design Effect. In this tutorial I will show you some very easy techniques, using gradients and layer styles, that we can use to produce nice subtle 3D effects in our web designs.
Step 1 Create a new document with 1000x750px. 40+ Greatest Web Interface Design Photoshop Tutorials, Part I. Whether you kick off a web interface design by sketching on papers or blank Photoshop canvas, it’s good to get some guides and inspirations.
Here we’ve compiled some of the nicest Photoshop tutorial that guides you, step by step, building up a web interface all the way from scratch. While you are at it, here’s more design related content we’ve written previously that might interest you Full list after jump. Beer/bar restaurant website layout Design a Web 2.0 tab with Photoshop How To Create a Stunning Vista Inspired MenuHow to make a semi-transparent Vista-inspired menu using gradients, shadows, and blurring to produce a stunning modern effect. Create a Professional Web 2.0 Layout. 43 PSD to XHTML, CSS Tutorials Creating Web Layouts And Navigation. I haven’t found really good this kind of list article so I created my own.
As being designer myself, coding part usually is hardest part in web development process. But there are so many great tutorials teaching how to use simple XHTML and CSS to get amazing layouts and they offer You to see what’s really happening behind the scenes explaining every step. Learn how to use CSS, how to create layouts in the right way, forget about table-layouts and enjoy CSS real power and put these 43 PSD to XHTML and CSS tutorials in good use! 1. From PSD to XHTML Tutorial In this first-ever video podcast, I start the conversion process of an Adobe Photoshop mockup of a website, into a real live CSS based website. 2. 3. 4. 5. 6. 7. Great tutorial about creating site with Illustrator, coding with Drupal, using standards compliant XHTML and CSS. The Complete Lesson Index: 8.