
MrJonHodgson's Channel. Home. FZDSCHOOL's Channel. Targete's NEWS. Umbrella Sky. APB Whistler Step by Step by ~arnistotle. Turn a Picture of Your Face into a Glamorous Digital Painting - Photoshop Tutorial. Step 1 To start softening the hair you need to have in mind: - How to use the smudge tool properly (this includes changing shape, hardness and strength and adequate them to the piece you're working on); - To delimit parts of the hair that invisibly form a line shape (pieces of the hair); - Smudging pieces at a time, not all at once; If you're not so good with those, it's not a big deal, just keep reading.
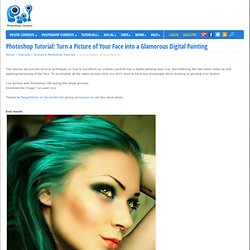
If by other side you're completely new to the matter, it may be a little difficult for you. So to star0, download a stock with a pretty good amount of hair that hasn't been manipulated yet. Step 2 To make it clear about what i mean with hair's pieces check the image below. Don't forget, they're not exactly precise, feel free to adjust the limits to your own preference. Step 3 Having in mind the second piece i indicated on the last step, select the smudge tool with diameter around 40-45, hardness 70% and strength at 35%.
Step 4. Tutorials. Step 1: Line art I've always been fascinated by realism, and because of this it is really important to me that the base line-art sketch has got proper proportions.
I usually use the old trick by putting a grid on top of a reference photo I've shot, and then I copy the same grid onto a blank canvas and start drawing grid by grid from what I see on the reference photo. I make sure to keep the grid on a separate layer so that I easily can remove the grid at a later stage, and also keep the drawing on a separate layer underneath the grid. Step 2: Blocking in, and grey scale shading Once I have the line art version ready, I delete the layer with the grid, and then I make another layer behind the line art drawing which I fill with one grey scale colour using a hard brush. Now I start shading with grey scale tones only by looking closely at the reference photo. Step 3: Brush usage next page > 3D Total - The cg artists home page.
Digital Painting Video Podcast Bobby Chiu Mozilla Firefox. Introduction It's very crucial for a creator to foresee the image in his own mind and be able to know if it will make a good artwork, or not.

I wanted to create a scene filled with tension and drama, just like a still from the film itself. Designing the Movement Planning the work, I wanted to bring out the tension and conflict as a priority, which led me to an explosive duel scene that would draw audiences into the work. What troubled me was deciding whether the duel should take place during the day or night. Fig. 01 Fig. 02 Architecture I re-designed the poses and polished up the buildings. Fig. 03 Dramatic Element In the film, Megatron is pictured as the destroyer, and Optimus Prime as the protector. Composition To enhance the tension of the scene, I chose a radial composition that was similar to the basic perspective. Fig. 04 Painting & Progression Colour-wise, it took me a long time to consider the colour of the sky, and it also went through a lot of changes. Colouring Fig. 05 Fig. 06 Fig. 07.
Making of Yuka. Introduction After receiving some positive feedback to my last work “yuka” I decided to write a detailed tutorial about creating process.

My main goal was to create a painting which was really detailed. I knew that I wouldn’t be able to do it without a real photograph so I started to look for something that would interest me and make me want to spent a lot of hours painting it in photoshop. And I found a perfect picture on . I received a lot of e-mails saying that it's not a big deal to just paint something like this using a real photograph. Tools For this work I used Adobe Photoshop CS2 and Wacom Intuos 3 tablet. Preparation.
The Art of Daarken. 70+ Mind-Blowing Digital Painting Tutorials.