
Gain Staging In Your DAW Software. If you don't understand gain structure, you may be undermining your recordings and mixes without even realising it.
Despite the immense power and flexibility available in modern digital audio worstation software, many people still find that the mixes they craft entirely 'in the box' sound unsatisfying. Mix Mistakes. We explore some of the most common causes of mix failure we've tackled in our monthly Mix Rescue column.

Banish these demons and you're most of the way to a devilishly good mix! Over the years, I've listened to piles and piles of amateur mixes from home studios, including thousands of productions submitted by SOS readers to Mix Rescue, Studio SOS, Demo Doctor (the predecessor of the current Playback column), and the My Sound Files section of the SOS forum. On top of that lot, I've heard almost as many mixes again from students and teachers working in small college studios.
Tips on Mixing Dub Drum Beats. The dub approach to mixing is based around the creative use of effects and usually improvised re-arrangement of the instruments and parts used in the song to create a unique ‘version.’
Start by setting up your basic mix so that all elements are well balanced and the sound stays crisp whilst keeping bass and drums dominant. A great many classic dubs were made on very basic tape machines, so to emulate this you can sub mix or group the individual channels so you can dub the whole drum kit simultaneously etc. Basically it means you need fewer fingers and less brain power, which helps... Tips on Drum Recording & Mixing. General Use two room mics on the kit as well as conventional close mics and overheads- one in front of the kit for a bass drum heavy sound (positioned 50 cm in front of the bass drum at head height- move closer or further as is required) and the other above the drummers head pointing to the snare (for a snare heavy sound) Unless its the desired effect don't over compress bass drum, snare and hi-hat microphones when recording.
Save it for the mix. Remove any cymbals or toms that are not being used so as to avoid extra resonance. When using two microphones on the snare (one on top & one underneath) remember to check/reverse the phase on the bottom microphone. Interactive Frequency Chart - Independent Recording Network. 9 Sound Design Tricks To Hack Your Listeners Ears. Thinking inside the Box: a complete EQ tutorial - dnbscene.com. ContentsThis article was originally written and published on dnbscene.com in 2003.
Part One: Intro To begin: an anecdote. I started making music with Impulse Tracker. Compress to impress: a complete compression tutorial - dnbscene.com. ContentsThis is a follow-up to our popular article on EQ, "Thinking inside the box: a complete EQ tutorial", which was written by dnbscene co-founder Steve Mercer (aka hipnotic).
This article was written by Marc Crouch, owner of dnbscene.com, and is intended as an accompaniment to Steve's article. Ah, the compressor. This magical tool will fix all your volume problems and make your tunes instantly sound fat and professional. Just pull your tune into an audio editor, pick a "mastering" preset and whack the ratio up. Now play it back and... what's that? Compression is an oddly misunderstood tool in digital music production, and yet it is one of the two most essential processes you can apply to give your tracks that professional "full" sound. Mixing Advice. All About EQ - Tuts+ Music & Audio Tutorials. The equalizer is an important piece of audio technology.
As one of my Conservatorium tutors once said, when you’re setting up a session, adding an EQ as the first insert is almost as essential as creating the tracks themselves. Studio audio isn’t about capturing every frequency of every sound: it’s about creating a polished track that highlights the best of each instrument. Let’s take a look at this basic yet widely misunderstood tool, the parametric EQ plug-in. The equalizer is an important piece of audio technology. How to Use a Parametric Equalizer. The equalizer is an important piece of audio technology.
As one of my Conservatorium tutors once said, when you’re setting up a session, adding an EQ as the first insert is almost as essential as creating the tracks themselves. Studio audio isn’t about capturing every frequency of every sound: it’s about creating a polished track that highlights the best of each instrument. Let’s take a look at this basic yet widely misunderstood tool, the parametric EQ plug-in. How to Use a Parametric Equalizer. 8 Easy Steps To Better EQ. Twice a month we revisit some of our reader favorite posts from throughout the history of Audiotuts+.
This tutorial was first published in December 2008. How to Create a Sidechain Effect in Cubase. A sidechain configuration can be used to trigger an effect that is inserted on one channel with an audio signal from another channel.
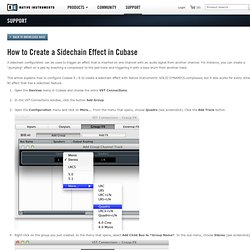
For instance, you can create a "pumping" effect on a pad by inserting a compressor to the pad track and triggering it with a bass drum from another track. This article explains how to configure Cubase 5 / 6 to create a sidechain effect with Native Instruments' SOLID DYNAMICS compressor, but it also works for every other NI effect that has a sidechain feature.
Open the Devices menu in Cubase and choose the entry VST Connections.In the VST Connections window, click the button Add Group.Open the Configuration menu and click on More…. From the menu that opens, choose Quadro (see screenshot). Click the Add Track button. - Mixing & Mastering : Resource Library and More Information. Learn about everything that happens after tracking - from editing to mixing various instruments to the ins and outs of mastering. - Beginners Series : Resource Library and More Information. The Beginner’s Guide to Compression – Tuts+ Tutorials. Compression is one of those studio processes that is all too often taken for granted and not used to its full potential. Today’s producers think nothing of inserting compressors on every single channel of their DAW when mixing, but old school engineers had to learn to make the most of only a few units of compression—and this made us learn them inside out. Republished Tutorial. A Basic Guide to Mixing and Mastering – Tuts+ Tutorials.
The Beginner’s Guide To Mixing [Part 1] Today I want to start a short multi-part series on mixing basics. It’s called The Beginner’s Guide To Mixing, but really it is the same guide (or path let’s say) for the advanced mixer. Every good mixer needs to keep these things in mind as they begin their work. So I see this guide as more of a course in foundational mixing concepts that will serve you well for years to come.
Step #1 – Monitoring Levels Before you even begin to touch a thing in your DAW (Digital Audio Workstation) you’d be wise to set one thing in place: your monitoring levels. The slightest change in volume can affect how you hear your mix and cloud your decision making. Step #2 – Gain Staging.