
Working with Cloth. Premium - Create a Detailed Building from a Texture. How to create a realistic terrain tutorial by Dogan Gungor. 3ds max tutorial : Create water from spline with Garment maker. 3ds Max Tutorial Modeling An Audi R8 Spyder Part 6. Model a Detailed, High-Poly Camera in 3ds Max 2010. This massive, 117 step tutorial covers the entire process of modeling a detailed DSLR camera, that would be suitable for use as a high-poly scene object in a render, or for generating normal maps to be applied to an in-game model.
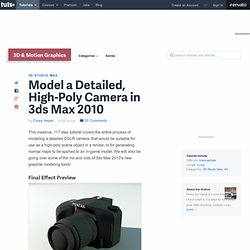
We will also be going over some of the ins and outs of 3ds Max 2010's new graphite modeling tools! Final Effect Preview Step 1 The first thing you need to do is set up your reference in the scene. To do this, place a plane in the front, top, and side view ports, and make them the same dimensions as the source image (which you can download from the link above). Step 2 Now you can begin to model. Step 3 Apply a new material to the model, so that you can see the underlying reference images. Step 4 Left click on the box to select it, and then right click to convert the object to an 'editable poly'. Step 5 Try to pick key points on the object to place your segments. Step 6 From the back, insert two edges. 3ds Max 2010 has a new 'swift loop' tool that is handy for this. Model, Sculpt and Texture a Demon-like Monster in 3ds Max and ZBrush – Day 1. This is a multi-part tutorial on creating a Demon-like 'Lok Warrior' with realistic muscle anatomy.
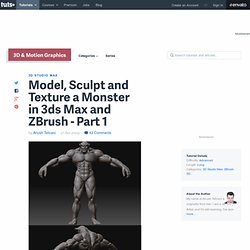
In the first day of this tutorial we will create a base mesh for our character using poly modeling. In day two we will take this mesh into ZBrush and sculpt intricate muscle anatomy. On day three we will texture the creature and add the finishing touches to the artwork. Let's begin day 1 of this tutorial. Step 1 I used two images from 3d.sk to model the base mesh more accurately. Step 2 Start with a cylinder with 5 height segments. Step 3 From the front viewport delete the half side of your model so that you can add a symmetry modifier. Hair & Fur in 3D Studio Max. Following a great thread in the finished works section of the forums, pixela was very kind to send me a little ‘How-To’ about the the use of 3D Studio Max’s Hair & Fur modifier you can see on the chair in the image above.
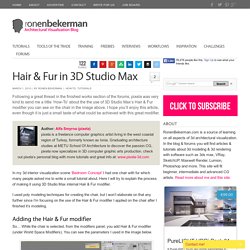
I hope you’ll enjoy this article, even though it is just a small taste of what could be achieved with this great modifier. In my 3d interior visualization scene ‘Bedroom Concept’ I had one chair with fur which many people asked me to write a small tutorial about. Here I will try to explain the process of making it using 3D Studio Max internal Hair & Fur modifier. I used poly modeling techniques for creating the chair, but I won’t elaborate on that any further since I’m focusing on the use of the Hair & Fur modifier I applied on the chair after I finished it’s modeling. Sofa Modeling in 3ds max. This video tutorial is created by artist Mahmoud Keshta in 3ds max 2009.
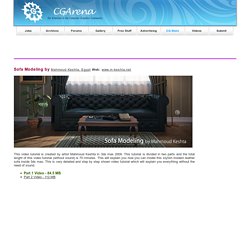
This tutorial is divided in two parts and the total lenght of this video tutorial (without sound) is 70 minutes. This will explain you how you can model this stylish modern leather sofa inside 3ds max. This is very detailed and step by step shown video tutorial which will explain you everything without the need of sound. If you are on slow internet connection or want to keep this video tutorial for future viewing then you can download the video tutorial from CGArena forum. You need to register (free) to download this and many other video tutorials. Related Links Video Tutotial - Interior Lighting by using Mental Ray. 3ds Max Spiral Hose Modeling tutorial.