
Home - CS 418 Spring 2012 - University of Illinois - Engineering Wiki. Visible Earth: Browse by Collection: Blue Marble. Rope Physics. Rope Simulation In this tutorial, you will find a simulation of a rope.

This simulation is based on the simple physical simulation engine in Lesson 39. In order to benefit from this tutorial, you should know how forces are applied to masses in simulations, how position and velocity of a mass is iterated while the simulation runs, and how 3D vectoral operations are used in physics. If you hesitate on any one of those subjects, read about them from Lesson 39 and other sources, and develop several applications. In physical simulations, the purpose is to form a physical setting, which acts the same as in the natural environment. The scale of space and time to observe is related to: 1. 1. Here, the mathematics of motion is called "classical mechanics", which is simply representing masses as particles in space and accelerating these masses by forces as the time passes. 2.
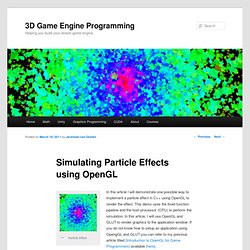
Performance of the computer to run the simulation, determines how detailed we could observe. OpenGL_-_Particle_System_Tutorial_-_Blending_-_PointSprites. Apple. OpenGL:Tutorials:Tutorial Framework:Particles. In this example, We're going to extend the principles used in the Ortho example to produce a nice particle effect.
Setting Up Each particle has unique position, direction vector, color and a 'life' values. These values are contained by a structure: typedef struct { float xPos,yPos,zPos; float xVec,yVec,zVec; float r,g,b,life; }SpriteInfo; We'll also specify a few parameters for the particles which can be tweaked to change the appearance of our effect: const float PARTICLE_SIZE = 0.5f; const int NUM_PARTICLES = 10000; const int INITIAL_PARTICLE_SPREAD = 100; const float SPEED_DECAY = 0.00005f; // (Gravity) Another new thing here is time-based movement.
Here we use three long values to manage the time: Time1 stores the tick count of the last frame, Time2 is the tick count of the current frame and Ticks is the difference between them. Managing the Particles The first thing we must do with our particles is set them all to a known state. Texturing and Lighting in OpenGL.
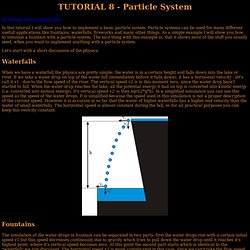
Some comments on OpenGL rendering of particles. When rendering particles in OpenGL there are many possible ways to represent them. The following goes through some of the possibilities with associated pseudo-code. At the very basic level it is possible to simply render the particles as points: glPointSize( 3.f ); glColor4f (1.0f,1.0f,1.0f,1.0f); glBegin(GL_POINTS); for(i=0; i<npoints; i+=nskip) { glVertex3f(x[i], y[i], z[i]); } // Done drawing points glEnd();
OpenGL Video Tutorial - Materials. OpenGL Video Tutorial - Home. Simulating Particle Effects using OpenGL. Particle Effect In this article I will demonstrate one possible way to implement a particle effect in C++ using OpenGL to render the effect.
This demo uses the fixed function pipeline and the host processor (CPU) to perform the simulation. Tutorial 8 -Particle System. Download Source/Application.
Cocoa - Mac OS X version of Texture2D.m, .h available. Tutorial 4: Texture Mapping. One of the most powerful tools in computer graphics is texture mapping.
Texture mapping applies an image to a surface. Modeling a complex surface is often impractical because of the detail required and it would be difficult to render this fine detail accurately. Instead, texture mapping allows a simple polygon to appear to have a complex surface texture. For this tutorial you'll be working with some code I've created. You'll find this code in tutorial4.zip. Note that my CTexture class that you will be using can read PPM and BMP files.
At least 4x4. CS193E - Cocoa Programming. OpenGL:Tutorials:Tutorial Framework:Texture Mapping. Texture mapping is the application of an image to a polygon, this gives the illusion of detail without pushing up the poly count.
Loading the Texture For this tutorial I have used our own TGA loader as the image loader. The code was simply cut and pasted into 'tga.h'. You can use any method to load an image as long as you know five things: A pointer to the image data, The image width, The image height, The color depth, The format of the image data, I'm going to bundle up the texture loading into LoadTexture(), this function takes and filename and returns a GLuint texture handle. Cs 5721 computer graphics. CS 5721 - Computer Graphics Lab 8: OpenGL Texturing Note: You are ALL now at the point where you may want to seek out additional references for OpenGL.
The best reference, by far, is the OpenGL Programming Guide: Fifth Edition, The Official Guide to Learning OpenGL, Version 2, by Shreiner, Woo, Neider, and Davis, 2005. The first edition of this book is available online (and for free). It is very dated and does not contain current information about OpenGL. Description. Free Online Image Converter - jpeg png bmp gif tiff eps fig ps. i2img Provides conversion among major image formats - Supported image formats are (JPG, PNG, BMP, GIF, TIFF, PBM, PGM, PPM, WMF, SGI, PDF, EPS, FIG, PS, SVG, RGB) Sci2ools This service is part of Sci2ools, which is a free online document processor and image converter toolbox.

Sci2ools offers the following services: The service enables you to load files from your computer or from URL. Tutorial 4: Texture Mapping. Instancing OpenGL. This is more or less a re-hash of my "rendering lots of cubes" article, but hopefully more coherent and informative.
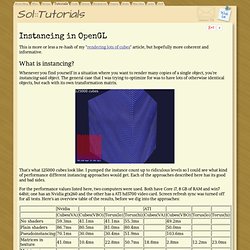
Whenever you find yourself in a situation where you want to render many copies of a single object, you're instancing said object. The general case that I was trying to optimize for was to have lots of otherwise identical objects, but each with its own transformation matrix. That's what 125000 cubes look like. I pumped the instance count up to ridiculous levels so I could see what kind of performance different instancing approaches would get. Each of the approaches described here has its good and bad sides. For the performance values listed here, two computers were used. The test setup uses 64000 instances, and the geometry includes cubes in vertex arrays (VA) or vertex buffer objects (VBO), and low (~80 tris) and high (~230 tris) poly count toruses (both in a VBO).