
How to Grow Green Onions Indefinitely. I'm officially dubbing this the week of Scallions and Pinterest.
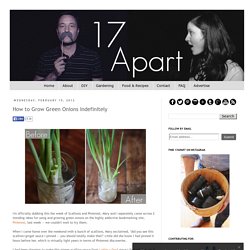
Mary and I separately came across 2 trending ideas for using and growing green onions on the highly addictive bookmarking site, Pinterest, last week — we couldn't wait to try them. When I came home over the weekend with a bunch of scallions, Mary exclaimed, "did you see this scallion/ginger sauce I pinned — you should totally make that! " Little did she know I had pinned it hours before her, which is virtually light years in terms of Pinterest discoveries. I had been planning to make this ginger scallion sauce from Lottie + Doof since I first set eyes on it. Find my own variation on the recipe newly published on E.A.T. — this is one I'd definitely recommend trying. Sites-Gardeners-Site. Basil is one of the most versatile herbs you can grow.
Freshly picked leaves can be added to salads, sandwiches and sauces, and can be made into pesto or dried for use in the winter. Basil has a lower germination rate than many seeds, averaging just 60%. Fortunately, most seed packets contain many more seeds than you’ll need. Basil is a hot weather plant and is very susceptible to frost damage. Seeds and plants should not be put into the ground until the soil is warm (65 to 70 degrees) and the weather has settled. To get a jump on the basil season, you can start your basil seeds indoors, 3 to 4 weeks before planting time. Basil prefers growing in a lightly moist, slightly acidic, well-drained soil that contains lots of organic matter (like compost!). The standard culinary basil, typically used for pesto and Italian cooking, is called ‘Genovese’.
Growing Your Own Garlic - Planting Growing Harvesting and Storing Garlic. As far as I'm concerned, garlic gets the blue ribbon for growing your own.

It's absurdly easy to plant and care for; it tastes great; it looks beautiful and it takes up so little ground that even those with very small gardens can raise enough to be self-sufficient in garlic for a good part of the year. All you have to do is choose the right varieties; plant at the right time, in the right soil; then harvest when just right and store correctly. 1. Choosing Types of Garlic If you look in a specialist catalog like the one at Gourmet Garlic Gardens, you'll find dozens of varieties of garlic listed. You see where this is going – and you can see a lot more types of garlic on either of those websites, but for general purposes the most important difference is the one between softneck and hardneck.
Softnecks are so called because the whole green plant dies down to pliancy, leaving nothing but the bulb and flexible stems that are easy to braid. Gardeners in most of the U.S. can try some of both. 2. RHS Plant Selector Results. Top Ten Most Nutritious Vegetables and How to Grow Them in Your Garden. A perfectly ripe, juicy tomato, still warm from the sun.
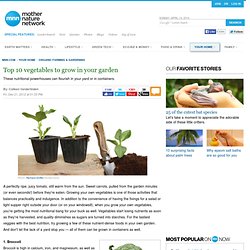
Sweet carrots, pulled from the garden minutes (or even seconds!) Before they're eaten. Growing your own vegetables is one of those activities that balances practicality and indulgence. In addition to the convenience of having the fixings for a salad or light supper right outside your door (or on your windowsill), when you grow your own vegetables, you're getting the most nutritional bang for your buck as well. Vegetables start losing nutrients as soon as they're harvested, and quality diminishes as sugars are turned into starches. Broccoli is high in calcium, iron, and magnesium, as well as vitamins A, B6, and C. How to grow broccoliGrow broccoli in containers: One broccoli plant per pot, pots should be 12 to 16 inches deep.What to watch out for: Cabbage worm. 2.
There is nothing like peas grown right in your own garden — the tender sweetness of a snap pea just plucked from the vine is unlike anything you can buy in at a store. Make your own paper seed packets (origami) 5.3 years ago seed saving, seed storing When I posted about my adventures in saving onion seeds I mentioned the desire to purchase some small envelopes to hold the seeds. jimmycrackedcorn promptly responded with a comment scolding me for my lack of cheapness.

Which I shamefully have to agree completely and took his advice and decided to make some of my own. I followed the directions from the ICPS Seed Bank though I did do a little improvising to make the packets a little smaller and I got lazy on my folding so I have provided the cheap/lazy directions below. Step #1: Start with a sheet of paper and fold down the middle, this will allow two seed packets per sheet of paper: Step #2: Use scissors to cut out the individual triangles which will be come your seed packets Step #3: Fold one corner one third of the way across the paper Step #4: Insert the other corner inside the fold and fold flat Step #5: Open top and pour in seeds, add a label, and fold over top. SproutRobot.