

Craft Love / Cut two rectangles. Sew a tube on top of both. Pull ribbon/fabric through and knot. Sew sides up. #Tank #DIY. Constructing the Basic Bodice Block. An alternative method of creating garments to using patterns constructed in standard sizes, is to construct a pattern using custom measurements - this results in a garment with a near-perfect fit.
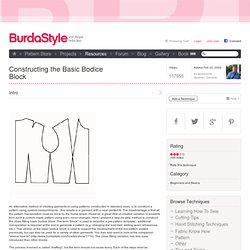
The disadvantage is that all the pattern manipulation must be done by the home sewer. However, a great deal of creative variation is possible from such a custom-made pattern using even minor changes. Here I present a step-by-step method to construct the close-fitting basic bodice block. The term "block" is used to describe a pre-pattern template - additional manipulation is required at the end to generate a pattern (e.g. changing the bust dart, adding seam allowances, etc.). This version of the basic bodice block is used to support the development of the bra pattern posted previously, but can also be used for a variety of other garments. The process involved is called "drafting", but the term should not cause worry. A word about the body measurements needed.
Future plans and skirt revision. Thank you all so much for the lovely and kind comments on my last post, all very much appreciated and gratefully received.
It is indeed extremely exciting, not least because i've spent the last 40 years wondering just what it is that I would like to do ... and now I know! Hurray! I wish it hadn't taken quite so long, but I do beleive in fate and the fact that everything has it's time and place, and even pace .. I am feeling very positive and I'm also looking forward to more blogging time! I'm continuing with my skirt making 'series' which never got past the pencil stage last year! Cutting out the right size pattern. When you cut out a pattern, how do you decide which size to go for?
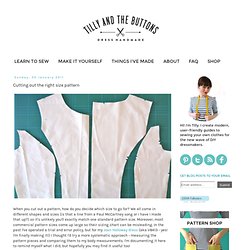
We all come in different shapes and sizes (is that a line from a Paul McCartney song or I have I made that up?) So it's unlikely you'll exactly match one standard pattern size. Moreover, most commercial pattern sizes come up large so their sizing chart can be misleading. The Mighty Dart ~ The Role of Darts in your Fitted Clothing. €¨â€¨We’re in awe over every new pattern released by Sarai Mitnick from Colette Patterns.

Colette Patterns have a modern vintage look, and impeccable instruction. Our pattern reviewers are always so impressed with the company, the patterns and with their finished results. We’re thrilled Sarai is joining us today for our Make It, Wear It! Series to teach us all a little more about the role of darts in fitted clothing. How to make a tailor's ham. Make This Look. Free Pattern Month Day 18 - Vivat Veritas: Scallop Waist Skirt. (Today's featured pattern after intro.)

I found Chie's blog through her posting her lovely pieces on Grosgrain's flickr boards or through her features on Burdastyle. I'm not quite sure which one it was. But either way, I was hooked. I love how her clothes look amazing from the front AND back. She always on the front pages of Burdastyle and for very good reason! Chie is a japanese seamstress based in Tokyo. As she sewed more she began documenting her progress and blogging about various aspects of her sewing life. Lotus Flower romper left. Thank you Chie for joining me for Free Pattern Month. Home — A Fashionable Stitch. Shaped pockets tutorial. Good morning, friends!

Thank you so much for all your sweet words on the skirt I posted Wednesday. Today I’m going to share with you how I drafted those pockets; it’s very easy. Plus it’d be a great way to experiment with various shapes (other than scallops) as well. Shaped side pockets were especially popular in the 50s, when emphasizing the hips was at it’s most popular. But if you would prefer not to draw as much attention to that area, you can always move the pockets closer to the center front of the skirt as well.
S Skirt Pattern Calculator. A 60cm long, 50° skirt, made 3cm wider in the waist to allow for darts in the back.
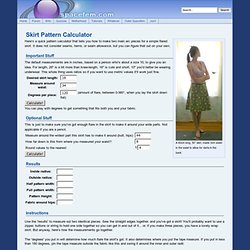
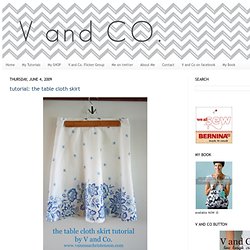
Here's a quick pattern calculator that tells you how to make two main arc pieces for a simple flared skirt. It does not consider seams, hems, or seam allowance, but you can figure that out on your own. Instructions Use the 'results' to measure out two identical pieces. The table cloth skirt. Measure 1"from the top and this is where your zipper top will be. pin your zipper all along (the 6 inches that is left opened) make sure the zipper is facing away from you. and at the bottom of your opening (like 1/4" lower than your opening) place a pin sideways so you can see where you will need to cross over your zipper using a zipper foot, sew down one side (pull pins out as you go) make sure you are sort of close to the inside of your "teeth" of the zipper. when you get to the needle that indicates where the end of your zipper is suppose to be (the blue needle i put sideways), sew over the zipper, back stitch a few times to make sure you make enough of a "barrier" so your zipper will stop. next you want to sew up the other side still close to the zipper. when you get to the top make sure you back stitch. and cut off the extra zipper part on the bottom. the hardest part of the skirt is now done.
DIY: Wrap-turned-Scarf. Messy dress tutorial. In my opinion, every creative and modern gal needs a messy dress- well maybe not every gal- maybe just me? My 35th birthday is this weekend and there will be celebrating which means I need (or want) something new and funky to wear. Sewing Pattern: Unisex Boxer Short. Be it a pair of boxer shorts or a pair of sport shorts… it is a perfect gift to celebrate father’s day for this summer!

I made this for my hubby. It is from a pattern I copied from his old favorite sport shorts with some modifications on the front pockets. The cutting is perfect, and comfortable to wear too. RUFFLED TOP & Weekend designer. Featured: Abaete Lauren Top Ever the chic choice, a simple shell blouse is the definitive feminine look.
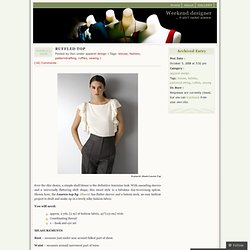
With cascading sleeves and a universally flattering shift shape, this sweet style is a fabulous day-to-evening option. Shown here, the Lauren top by Abaeté has flutter sleeves and a bateau neck, an easy fashion project to draft and make up in a lovely silky fashion fabric. How to make a High-waist corset skirt. The Convertible "Infinity" Dress: How it almost defeated me, and ...
I made this thing. It’s pretty cool. It’s a convertible dress that’s basically a circle and two straps, so it’s really easy, inexpensive, and crazy versatile. It’s been around forever and everyone seems to love it (in fact, part of the reason I’m posting this is to answer some questions for people I’ve run into), and I can hardly believe how close I came to not making it at all. I first found the instructions at a blog called rostitchery, and then I came across a second set at Cut Out + Keep. It sounded so easy. So I bought some material, spread it out in the living room, cut out my pieces, and… …stopped. I didn’t understand the next step. Turn the skirt inside out? How To Make An Easy Dress (For Cheap!) Two facts about me: I'm cheap. I love dresses. I wear dresses probably 6 days out of the week.
Choosing fabric: weight vs. drape. {click to enlarge, and feel free to repost!} Weight and Drape Most of us understand the concept of fabric weight. Even neophyte seamsters can tell the difference between a heavy fabric like denim or a wool coating vs a light fabric like silk crepe or chiffon. You can feel the weight of a fabric easily by the thickness when you feel the fabric in your hand: it feels either light or heavy. DIY-pleated dress. DIY Advent 6: An Old Sweater Becomes a Skirt DIY - Outfits, Shoes & Accessories Dana. What can happen when washing clothes with his thoughts somewhere else, is to see in the small picture. How to make the most of it, shows the lower photo.