
Things I would Love To Do To my Hair!! &3 - Polyvore - StumbleUpon. 3549 1472 623 103 1218 132 58 22 60 1174 568 129 442 3364 992 834 430 2615 1144 45 694 1248 310 1452 189 333 1595 226 938 613 1742 2295 1821 3300 158 1159 340 84 4 1786 1287 70 337 337 382 798 44 750 479 24 691 755 2540 256 488 135 366 374 897 4363 1528 689 247 271 185 2971 843 90 1993 972 49 30 141 603 14 88 67 968 615 47 201 298 826 15 413 527 263 635 204 95 350 515 211 148 1211 157 33 10 1555.

Double Strand Lace Headband. Today’s headband DIY is how to make a Double Strand Headband.

This headband is made almost exactly the same way as the Single Lace Headband. All you need is 36 inches of lace or ribbon 1 inch width or narrower. I used 1/2 inch width lace from Joann’s Fabrics. 3 1/2 inches of braided elastic 3/8 inch width or larger. Cut the lace so that you have two strands that are 18 inches long. Lay the end of one length of lace over the other as the picture shows.
After you have the ends lined up lay the elastic over the top so they overlap by 3/4 of an inch or so. Then with a sewing machine or by hand stitch across the two layers of lace and the elastic. After you have sewn one side do the same to the other side. I leave mine this way because usually the elastic and stitching are hidden by my hair. Simple 3 Twists Hairstyle.
First, a little back story: I was on Pinterest (I know, big surprise) awhile back and Ms.

Ez from Creature Comforts pinned a fun messy hair-do, and mentioned she needed to learn how to do it. So I piped in that I should show her how. I have been wanting to do a hair tutorial for ages now, so this was the perfect reason to get it done. I was a hairstylist in my first life, and I am not too shy to say I was a pretty good one – I can’t say that about everything, so I will take it where I can ;). So here it is, my first hair tutorial, wahoo! It is best to start with 1-2 (even 3) day old hair that has a little wave to it. Next you will want a little lift through the roots. So now we have the hair looking a little fuller, and the front styled the way we want it to look in the end. Split your hair into three sections, pulling the sides in front of your shoulders, leaving just one section in the back.
Lift the back section up and backcomb at the base. Take the section and twist once like shown. Pretty Side French Braid low Updo Hair Tutorial. I wore a more relaxed version of this hair style in an outfit post in June of 2009 but for reasons unbeknownst to me, I never did a tutorial for it.

Recently though, a few of my lovely readers have asked for it …so here it is. Enjoy! If you can’t see the video go to: Pretty Side French Braid Updo * * * it would be so pretty with flowers pinned in * * * * . . . wearing the braid out . . . . . . and a few days ago, I wore it more casually, with straight hair . . . My bro took these last four the other day …the ones above these four, I took …from the reflection in the mirror, which didn’t turn out as fantastic, for obvious reasons. Have Fun! Partial French Braid with Cascading Hair ~ Tutorialalso known as the "Waterfall Braid". I’m not the originator of this hair style but I’ve gotten so many requests for it, I thought I’d give it a go for you.
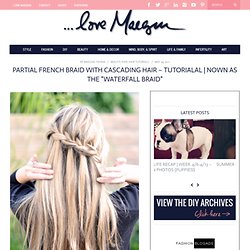
I don’t know what it’s called either so I haven’t researched it and/or found any other tutorials for it …thus, this is my version of it, and I’ve dubbed it the Partial French Braid w/ Cascading Hair. The photos I’ve seen online show the braid a little more straight across the back of the head and mine sort of braids at an angle, similar to my side/low french braid up-do. I’m sure this is 100% easier to do on someone else’s hair than your own but it goes pretty quickly once you get the hang of it …I mean, it’s my shortest hair video tutorial to date. That’s gotta mean something, right Enjoy. Note: Apologies in advance for the yelling of “NOOOO” towards the end, where I momentarily fear I’m going to lose my entire braid and have to start over.