Vulpix. Riolu. Pokémon. Zorua. Colors. Accesories. Furniture. Hula Hoop Rug. How-To: "Stained Glass" Votive Holders. By Jenny Ryan Many times when I’m at the grocery or drug store, I can’t resist throwing a few scented votive candles in my cart.
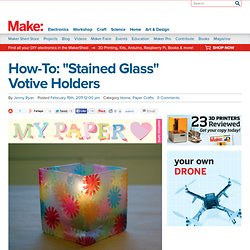
When I’m ready to burn them, it’s easy enough to sit one on a cute little vintage china saucer, but I recently decided to try and find a fancier display solution for them. I also wanted the project to be inexpensive, and the materials used to be things I already had on hand. I was inspired by memories of making faux-stained glass in elementary school and came up with these fun little glass votive holders. This project is quick and easy, and a great way to whip up custom party décor on the cheap. Materials Tissue paper in your desired colors Mod Podge (matte finish), in a pinch you can also use school gluePaintbrush Scissors Glass containers to fit your candle(s), I used thrifted vases and wine tumblers Paper punches in various shapes Q-tips, optional Directions Step 3: Start affixing the punched-out paper shapes to the glass using your paintbrush.
Eevee. DIY Key Catch All Plate. Thanks to Hurricane Irene, we were holed up at home for half the weekend watching constant weather reports. So whats a girl to do with her time than complete a fun project that has been in my head for a while. Using some sculptey clay I bought a while back, I wanted to make a little key catch all plate. I've never used this stuff before so I didn't know what to expect. Materials: Sculptey clay, rolling pin, glass bowl, key, butter knife, oven The end result isn't exactly as I hoped.
Anyone master this material and have tips for me on how to improve? Minecraft pikachu. Charizard. Umbreon Plushie. Well, after many *many* requests, I finally did an Umbreon. I know this will bring about an onslaught of requests for the other 'Eevee-lutions' and yes I'll get to them all... eventually :D It just depends on my yarn stash, my time and well --- motivation. LOL As with all the patterns, if you have any problems or if you notice anything wrong in the pattern (I'm prone to typos LOL) let me know and I'll get back to ya as soon as I can :D Umbreon Materials: Eevee Plush. I finally decided to tackle Eevee.
The pictures I'm afraid don't do the doll justice at all. She's really much cuter than the pictures show. LOL Eevee can be a tough one mostly because she's all shades of brown. The 'collar' is worked a little different, but it's basic and simple, and allows you alot of room to 'arrange' it however you like. If I have one great weakness, it's doing the faces.
If you have any problems with the pattern, please let me know, I'll fix it as soon as possible. WW yarn in brown, tan G Hook Fiberfill Small scraps of felt in dk brown, black Yarn needle sewing needle and thread to match yarn and felts (optional) FRONT LEGS (make 2): Upper leg (make 2): Rnd 1: Ch 12. Feet (make 2): Rnd 1: 8 sc in magic ring (8) Rnd 2: sc in next 3 sc, 2 sc in next sc, sc in next 3 sc, 2 sc in next sc (10) Rnd 3-6: sc in each sc around (10) Rnd 7: dec over next 2 sc around (5) Stuff moderately firm and fasten off.
AH! Creations. Hello everyone, it’s been a while since I was able to write up a pattern for any amigurumis I make.
School kept me pretty busy this past semester and I lost some of the pattern for another pokemon I had made (Axew). I’ll try and get the other one to you soon but in the meantime, I also finished the much requested Vaporeon. She is pretty quick to make and very posable. I have some other big projects on the way so hopefully I’ll be able to finish them before school starts again. I hope everyone had a Merry Christmas and has a Happy New Year. Materials: blue cotton yarn dark blue caron simply soft yarn white and cream redheart yarn black, white and light purple felt g hook stuffing glue gun Body, Head, Legs. Images (21) Download (16) Images (24) Images (22) Images (23) Skylanders. Skilanders trap teem. MUSTRY3. Earring Display. This fun little shabby chic earring stand, made from an altered picture frame, is a great way to hang and display all your beautiful, dangling earrings.
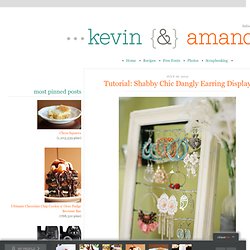
I had the idea for this project after we talked about my love affair with dangly earrings and how to display them. I don’t know about you, but I just love seeing them all hanging in a row! :) The next day I made this earring frame, and it was so quick, easy, and inexpensive to put together, I knew I had to share it with you! :) I spent a grand total of $5.34 on this project. Cost: Less than $10 Time: 30 mins Supplies: picture frame, 12′ of picture wire, acrylic paint & brush, staple gun (or nails/tacks, etc) I started out with a black 8×10 picture frame from Walmart, $3. Since the frame wasn’t real wood, I was a little concerned with how it would turn out once I painted it.
But as you can see from the above images, this little inexpensive frame did great! Next, I took a piece of wire and laid it across the back of the frame. Glowing jar project. Download (16)