
Everything to know about the PARTICLE SYSTEM. Procedural Lightning Material - UE4 Quickie Tutorial. [UE4] UV distortion/Lightning tutorial. Intro to Cascade: Creating a Beam Emitter. 06 - Creating a Mesh Emitter. Into to Cascade: Particle Terminology. Tutorial Fireflies particle system Unreal engine 4. Leaf Particle Effect. 1.7 - Particle Emission from Skeletal Mesh Bone. Texturing a Landscape in UE4 (Unreal Engine 4) Unreal Engine 4 Tutorial - Vertex Painting. Unreal Engine Documentation. To handle 5 textures in the blend weights setup, you need to create a material similar to this: This works very similarly to the 3-way and 4-way setups.
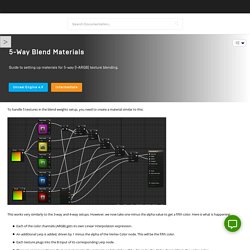
However, we now take one minus the alpha value to get a fifth color. Here is what is happening: Each of the color channels (ARGB) gets its own Linear Interpolation expression. An additional Lerp is added, driven by 1 minus the alpha of the Vertex Color node. Ue4: advanced materials (Ep. 21 Painting Puddles) UE4 Tutorial: Milky Glass - fastest and easiest way - aka frosted glass [Unreal Engine 4.18] UE4 - How to Make Dynamic Flowing Water. Unreal Snow or Water or Snow Material. Skybox from DDS cubemap. Creating and exporting the cubemap In this tutorial we are going to use Spacescape ([1]).

It's free, powerful and easy to use. It also comes with some presets! Open the program. After creating your skybox, click on File > Export skybox. Choose your save location, file name. Proceeding inside the engine The time has come to open the engine and import your file! Open the file in the editor and set: "Compression Settings" > "UserInterface2D (RGBA)" "Mip Gen Settings" > "NoMipmaps" "Texture Group" > "Skybox" Finall, you may need to untick the sRGB checkbox. Create a new material. The material setup is only 3 nodes and looks like this: Create a new actor. Choose SM_SkySphere. Then, just do this: Drag and drop it inside your level and set the material. Blueprint Rotating Movement Component. Overview In UE3 we were able to make rotating actors through creating Mover (Interpactor) and adjusting it's Rotation Rate parameters.
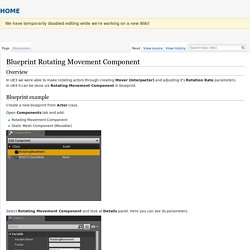
In UE4 it can be done via Rotating Movement Component in blueprint. Blueprint example Create a new blueprint from Actor class. UE4 Tutorial: Lighting Effects (IES Textures) Volumetric Fog and Lighting in Unreal Engine 4. UE4 Simple Waterfall Material Tutorial. Ue4: advanced materials (Ep. 8 Using Alpha/opacity masks) UE4: How to fix translucent materials (dithered opacity) Unreal Engine 4 Toon Outlines Tutorial. When people say "toon outlines", they are referring to any technique that render lines around objects.
Like cel shading, outlines can help your game look more stylized. They can give the impression that objects are drawn or inked. You can see examples of this in games such as Okami, Borderlands and Dragon Ball FighterZ. [UE4] Material function Fun - Radial UV distortion. Using Poliigon displacement textures in Unreal Engine 4. Post Process Materials.
Custom Depth Stencil is an extension of Custom Depth where you can use a stencil, or cutout, of your rendered object to then do visually interesting things like the example below that enables you to visualize occlude objects, draw object outlines, or only be visible from certain viewing angles.
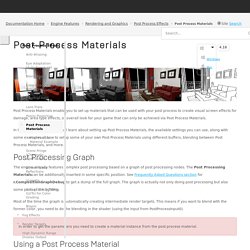
There is a lot of potential with what you can do by having access to the stencil of an Actor in your scene. Using the following settings to enable and assign a stencil value. In this scene, Custom Depth is enabled on three objects and a Custom Depth Stencil Value is set for each, but without any post processing pass to visualize the content, this feature remains invisible. Once you've setup your Post Process Material you will be able to visualize how the Custom Depth Stencil looks, The occluded objects render with a randomly assigned color based on the Custom Depth Stencil Value used. This is a setup of the Material we used to visualize it: Click image for full size. VR and Post Process Material - Unreal Engine Forums. Hi all, I'm having a bit of a problem with my post process material and I've hit a bit of a brick wall with trying to get it to work with the rift.

I'd be extremely grateful if any of you would be able to help me out. Basically I am trying to recreate the effects of Age Related Macular Degeneration which is a condition in which the centre of your vision becomes distorted and blurry but the peripherals remain as normal. I've followed a tutorial by Eat3D to create the distorted effect and I'm quite happy with how it looks in the normal editor window. However, it doesn't map correctly in VR and the best I can do is get to have an effect in one eye only or just to effect the peripheral of my view.
Decals. UE4: How to Create Your First Decal Material Tutorial. UE4: How to Create Your First Decal Material Tutorial. Category: UE4 March 31, 2016 Do you want to add dirt, stains, leaks, blood splatter, stenciled numbers, posters or graffiti on the wall?

One way is create a new texture variation with added detail baked into the texture itself. So you end up with one clean texture without any detail and second texture with added detail, such as a wall stain leak for example. But, what if you want to have that detail in a different part of the wall? What about having that stain leak detail on totally different texture in another section of the level? That is wasteful.
UE4 Tutorial: Matinee - Animating a Static Mesh. Animation Tools. Creating animated characters in Unreal Engine 4 involves using several different Animation Tools (or Editors), each of which focus on different aspects of animation.
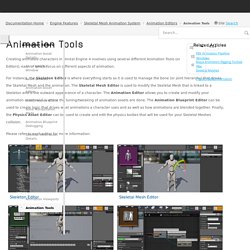
For instance, the Skeleton Editor is where everything starts as it is used to manage the bone (or joint hierarchy) that drives the Skeletal Mesh and the animation. Unreal Engine - Spline Path Animation Tutorial. Creating Swimmable Water - #37 Unreal Engine 4 Beginner Tutorial Seriess. Using thumbstick locomotion with the standard VR template - Unreal Engine 4 Tutorial. C++ Battery Collector: Adding Particles to the Pickup. Unreal Engine 4 - Object rotation Tutorial. Ue4 Tutorial - Moving an Object along a path using a Spline Track. UE4 - Tutorial - Custom Collisions! (Request!) Why is the player start position above the actual actor position on the Vive? UE4 - Motion Controller Interaction (Picking Stuff Up) - Part 1. How to Set Up Inputs in Blueprints. Once you have created Inputs via Project Settings, you can then call those Inputs from within a Blueprint.
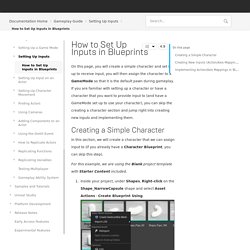
In this section, we will implement those Input settings for the simple character (or your character if you are using your own). Inside your project, open the Character Blueprint (Shape_NarrowCapsule) you want to assign Input to. Inside the Blueprint, Right-click anywhere in the graph and search for Turn then add the Turn Axis Event. Drag off the Axis Value and search for Yaw, then add the Add Controller Yaw Input node. Right-click in the graph and add the LookUp Axis Event. Click image for full size. Events. Using Timers in Blueprints. The steps below will show you how you can create/set a Timer in Blueprints.

For this example, we are using the Blueprint Third Person Template and will be causing fire damage to the player over time. Inside your project, open the ThirdPersonCharacter Blueprint.Right-click in the graph and add two Custom Events called PlayerInFire and PlayerNotInFire. In the MyBlueprint window, add a new Function called FireDamage. This Function will be called over time by the Timer and will apply the damage.Drag off the PlayerInFire Event and add the Set Timer by Function Name node.Drag off the PlayerNotInFire Event and add the Clear Timer by Handle node.For Set Timer by Function Name, set the Function Name to FireDamage.On the Set Timer, set the Time to 0.75 and check the Looping box.Connect the Return Value pin of the Set Timer by Function Name node to the Handle pin of the Clear Timer by Handle node.
Can foliage have collision? Flow Control. Question about using Gate for Physics. A gate works just like an actual gate would work in reality. Something reaches a gate and if it's closed, it wont get through. If it's open, it does get through. Unreal Engine 4 - Planetary Character Part 1: Staying Upright! Mitch's VR Lab. Getting Started with VR in Unreal Engine 4 - Tom Looman. This guide is for anyone who is looking to get into developing for Virtual Reality projects in Unreal Engine 4. Covering Blueprint, C++, performance considerations and how to set up your VR kits for UE4. Setting HMD Location - Unreal Engine Forums. Originally posted by RE-GamesView Post Do you have any suggestions for setting the 0,0,0 point? I would like toework with my vive on a seated game (sitting in a cockpit), but my problem is that my chair isn't in the middle of my play space.
Unreal Engine 4 Tutorial: Artificial Intelligence. Disney's Practical Guide to Path Tracing.