
FREE Lightroom Workshop Series – 6+ Hours of Training Videos. By Gavin Seim: Hey folks.

I’ve decided to share some archives and post all the recordings from my LIVE Lightroom Power workshops. These cover nearly every critical facet of Lightroom, in order, from start to finish. Last year I hosted this online series and it went well, so I figured you would enjoy them. Bear in mind these were live shows, so there’s questions and small interruptions mixed in. If you want faster more structured lessons, check out my studio recorded, LR Ninja Series.
I’m adding all five videos below. This is a total freebie. Want more? The videos – 5 segments, approx 1.5hr each – Follow links to view in HD. Please share this post – View Gavin’s art & projects on his homepage. Bric à Brac Photo - Haddok. Seven (almost) random quickies from Lightroom 4 – Lightroom Solutions – John Beardsworth. As you play with Lightroom 4, there are lots of small features you may have overlooked.
Here’s a brief run through of some of my favourite tweaks: 1. Try dragging any folder into the Collections panel. Lightroom 4 creates a new dumb Collection, and any stacks that were in the folder are repeated in the Collection. 2. Use the mouse wheel to scroll through images on the map. Lightroom pas à pas. Lightroom Secrets (Build 20100115144158) Lightroomers. This is a reprint of my Jan/Feb 2011 feature article in Photoshop User magazine.

A subscription to Photoshop User magazine is benefit of becoming a member of the National Association of Photoshop Professionals. You can join NAPP and get Scott Kelby’s Adobe Photoshop Lightroom 3 Book for Digital Photographers and a Lightroom Killer Tips Preset CD as a signup bonus. Lightroom tutorials, tips and training for Lightroomers! (Build.
How to Remove Sensor Dust With Lightroom. A Post By: Helen Bradley One of the annoyances most photographers encounter from time to time is sensor dust.

This is dust that you get on the camera’s sensor and which shows up in your images as dark marks or flaws on your photos. Most often you’ll see this in the sky but it can appear anywhere in an image and it will appear in the same place in all your images – the tell tale sign that you have problems. Of course, the only way to get rid of the dust is to clean your camera either using its dust removal option or by physically cleaning it. However, chances are that the reason you know you have a dust problem is that you see it on your photos. Stacking images in Lightroom (Build 20100401080539) A Post By: Helen Bradley When you have a lot of similar images from a shoot, you can organizing them using the Lightroom Stacks feature.
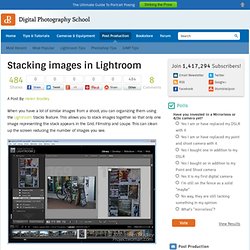
This allows you to stack images together so that only one image representing the stack appears in the Grid, Filmstrip and Loupe. This can clean up the screen reducing the number of images you see. To stack images, in the Library module, select the images to stack, right click and choose Stacking > Group Into Stack. This stacks the images on top of each other. In Grid view you will see a small number in the top corner of the image at the top of the stack showing the number of images in the stack. You can add an image to a stack by dragging and dropping it on top of a stack.
To expand a stack, right click on the number showing the number of images in the stack and choose Expand Stack from the Stacking shortcut menu or click the double line marker either side of the stack. There is some important terminology to know about stacks. 8 Steps to Crafting Images in Lightroom. A Post By: Helen Bradley Lightroom has more tricks up its sleeve than simple photo fixes such as exposure and contrast.
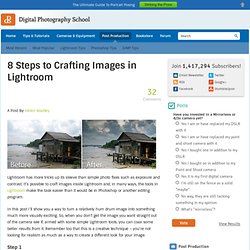
It’s possible to craft images inside Lightroom and, in many ways, the tools in Lightroom make the task easier than it would be in Photoshop or another editing program. In this post I’ll show you a way to turn a relatively hum drum image into something much more visually exciting. So, when you don’t get the image you want straight out of the camera see if, armed with some simple Lightroom tools, you can coax some better results from it. Remember too that this is a creative technique – you’re not looking for realism as much as a way to create a different look for your image. Step 1 Start out with an image that has what I call “good bones”. Step 2 In the Develop module use the adjustments in the Basic panel to apply global adjustments to the image. I will adjust the Recovery slider at least half way to the right and adjust Fill Light to get some detail from shadows. Step 3. Helen Bradley - Photoshop and Lightroom tips and techniques (Bui.
Learning Center – Lightroom 3 Beta. Video-Tutorials zu Adobe Photoshop Lightro. TheLightroomLab. LightStalking. Digital Photo Buzz - Digital Photography reviews and tips. Most of the questions that I get from our readers are relating to Lightroom.

With so many people using Lightroom as their main editing software I have been focusing a lot of time creating tutorials and articles with Lightroom tips for everyone.