Amy Butler. Materials List FOR THE 24" GUM DROP PILLOW / OTTOMAN Allow extra yardage for centering or matching a design on your fabric.
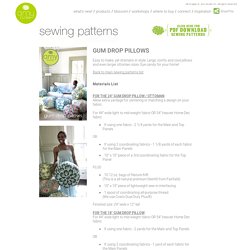
For 44” wide light to mid-weight fabric OR 54” heavier Home Dec fabric If using one fabric - 2 1/4 yards for the Main and Top Panels If using 2 coordinating fabrics - 1 1/8 yards of each fabric for the Main Panels 10” x 10” piece of a 3rd coordinating fabric for the Top Panel 10 12 oz. bags of Nature-fil® (This is a all natural premium fiberfill from Fairfield) 10” x 10” piece of lightweight sew-in interfacing 1 spool of coordinating all-purpose thread (We use Coats Dual Duty Plus®) Finished size: 24” wide x 12” tall FOR THE 18" GUM DROP PILLOW For 44” wide light to mid-weight fabric OR 54” heavier Home Dec fabric If using one fabric - 2 yards for the Main and Top Panels If using 2 coordinating fabrics - 1 yard of each fabric for the Main Panels 8” x 8” piece of a 3rd coordinating fabric for the Top Panel. Puff Daddy - knitted stool.
Puff is the Norwegian word for stool.
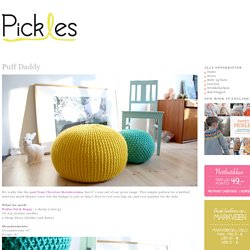
We really liked the pouf from Christien Meinderstsma, but it´s way out of our price range. This simple pattern for a knitted stool has much thinner yarn, but the budget is just as thin;) Nice to rest your legs on, and very popular for the kids. What we used:Eskimo, 18 balls (Or yarn suitable for US #13 needles)Acrylic yarn would probably be a really good alternative, as it´s a piece of furnitureUS #19 circular needles2 cheap duves (feather and down) How we did it:Cast on 35 stitches using three threads.Knit the garter stitch until you´ve knitted all the balls, and there is just enough yarn left to asseble the stool. You now have ONE rectangular piece.Cast off loosely. Assemble the first long side.
Stuff the duves into the stool. Assemble the other end in the same manner as the first. And there you go! DIY Tufted Headboard. I’ve made a couple of diamond-tufted headboards now (Joanna’s was only my second though) and I feel like I have a pretty good sense of the easiest DIY approach now.
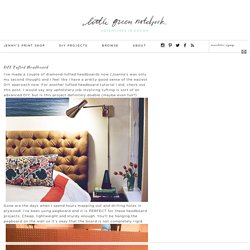
For another tufted headboard tutorial I did, check out this post. I would say any upholstery job involving tufting is sort of an advanced DIY, but is this project definitely doable (maybe even fun?). Gone are the days when I spend hours mapping out and drilling holes in plywood! I’ve been using pegboard and it is PERFECT for these headboard projects. Cheap, lightweight and sturdy enough. I had Home Depot cut down the board for me, so it was just the right size for Alex and Joanna’s queen bed. I had three rows of nine buttons and two rows of eight for a total of 45 tufts. (!) I purchased my 3″ upholstery foam at Joann’s with a 50% off coupon. So, to mark out your foam, lay the pegboard down perfectly on top of foam and use your registration marks and a sharpie. You’ll fly through this step. How to Build a Rustic Wood Headboard. Tutorial: How to make a Fabric Headboard.
In my master bedroom, I wanted an extra large headboard that would make a statement.Here are my instructions on how to make a fabric headboard…not just any fabric headboard...you’ll see.

Step 1: Find fabric that you love! I found this fabric at my favorite fabric store called Home Fabrics and Rugs. It cost 5.99 a yard, and I bought 10 yards. (I still have some left over, but we’ll just play it safe and say it cost me $59.00 for the fabric. One of the main reasons I chose this fabric was because it was neutral in color. Step 2: Measure your space. Go big or go home right!?!? Step 3: Divide your space into squares. Step 4: Buy 2 sheets of thin backer board and cut them PRECISELY the right size. Step 5: Buy some foam and cut it into precisely the right size. Tutorial: How to make a Fabric Headboard. Chevron pattern fan blades. When my husband and I first moved into our house, we were on a tight budget, and a fancy ceiling fan was not in the plan.
The last residents left this fan, and I’ve never liked it. This week, I decided to give my fan an upgrade and share it with everyone. The full project was completed in just a couple hours, and now our fan looks cool while keeping us cool! You can download the chevron pattern I made, but the great thing about this project is that you can customize it yourself to fit your home. You could even use a decorative paper or make up your own original pattern. — Halligan Read the full how-to after the jump! Materials frisket film (available at most art supply stores)computer, printer and paperscissorsspray paintscrew drivermasking tapespray adhesive Instructions 1. 2. 3. 4. DIY – Creating Handsome Headboards.