
Jewelry Dishes I love the vitrines at the Metropolitan Museum of Art that are filled with household artifacts from places long ago and far away. Tightly woven mats and perfectly crafted sandals, hammered metal and braided leather, ancient objects still feel alive with the integrity and vitality of their makers. What sometimes also strikes me is how little our aesthetic values have changed over the thousands of years. Beauty is still a human imperative and careful craftsmanship is still a revered skill. We still respond to simple shapes and beautiful materials, to whimsical embellishments and practical uses. I thought about this a lot as I crocheted these Jewelry Dishes. My trip into antiquity was greatly assisted by the purity and simplicity of Habu's extraordinary fibers. It's not hard to make your own pretty little trays and bowls, just some simple crocheting... like it's always been done! PS Wouldn't these gorgeous brass bracelets be right at home in a museum case? The Materials The Patterns Gauge
Birdie Decoration This is my pattern/tutorial for a hanging Birdie Decoration. A completely useless object of course, but very cute all the same. It's an easy project to make, great for using up odds and ends of yarn and can be used in all sorts of ways to bring a little good cheer. This little birdie is made in four pieces :: a round flat circle for the body, a small triangle for the beak and 2 leafy shapes for the wings. First a little summary of the basic crochet stitches :: sl st :: insert hook, yarn over, pull the loop back through the stitch, then through the loop on your hook. dc :: insert hook, yarn over, pull the loop back through the stitch (two loops on hook), yarn over and pull through both loops on hook (note :: this is equivalent to the US sc stitch) htr :: yarn over, insert hook, yarn over, pull the loop back through the stitch (three loops on hook), yarn over and pull through all three loops on hook (note :: this is equivalent to the US hdc stitch) Now you need to make a TRIANGLE BEAK.
Porch pouf Crochet is perfect when you want to shape the yarn into certain shapes, and here´s a big round pillow dressed up with slip stitches. The pattern can be adjusted to fit any size round pillow. We crocheted the top and sides, and just pulled together in the bottom to avoid crocheting with the pillow inside. (The pouf is open under) It is important that the pillow you use for filling is big enough to stretch the cover properly, if you have a really soft and squishy pillow it has to be much bigger than the cover, or use more than one stacked on top of eachother. YarnPickles Fat&Happy, 500 g DiameterAbout 18" HeightAbout 6" Crochet hookUS 15 Slik gjør duDo a magic loop and work 6 sc in the loop. Round 1: *1 sl s in 1 s, 2 sl s in the next s*Round 2: *1 sl s in each of the next 2 s, 2 sl s in the next s*Round 3: *1 sl s in each of the next 3 s, 2 sl s in the next s* Continue in the same manner with 1 sl s more between the increase s, making a large circle.
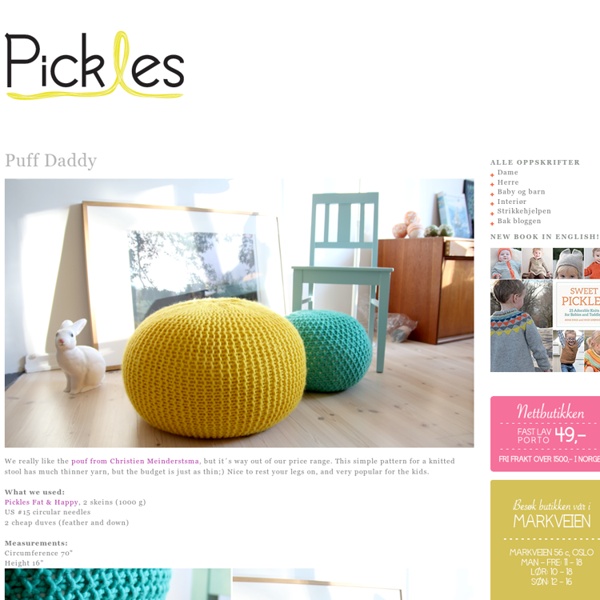
Poufs!! DIY Projects Forget the ottoman, what’s hot in style right now are poufs! Easy to put your feet up on, great as spare seating and frankly, they just look cool… DIY poufs are projects that can add double duty decor to your room, with a good dose of on trend design. I bought one for Steve for last Christmas… let’s just say, I wish I had made it! Our feature project, above and below, is from ‘Pickles’. ‘The Country Chic Cottage’ created this rustic pouf from coffee sacks! Laura at ‘A Beautiful Mess’ has a compete tutorial for you on making this drum floor DIY pouf! From ‘Retropolitan Hip’, this DIY floor pouf was made from $3 Ikea floor mats… It looks cool but casual, and it looks like it will last. This hexagon DIY floor pouf from ‘Shabby Creek Cottage’ is really fun. ‘Design Sponge’ has a full template and tutorial for making a pouf. This DIY pouf is an Ikea hack from ‘Kristy Murphy’. Do you crochet, or want to learn? Susan at ‘Living with Punks‘ created this hack for a Land of Nod floor cushion.
Big Cuddly Bunny My hometown has an agricultural fair every August that I rarely miss. My brother watches the oxen pulls for hours and my mother lingers over the prize vegetables, but I always head straight for the rabbits! I totally love them: their blinky eyes, their fat bellies and their ridiculous ears. And so when it comes to Easter and its wonderful cast of characters, for me, the bunny wins. Our Big Cuddly Bunny gets its shape and inspiration from this winter's Big Snowy Owl. The Materials Main Yarn: 6 skeins of Blue Sky's Bulky, 50% Alpaca and 50% Wool. The Pattern Gauge 2 1/2 stitches = 1 inch in stockinette Finished Size 15 inches from ground to top of head 38 inches in circumference The Bottom With the Main Yarn and the double pointed needles, cast on 8 stitches. Place a stitch marker and join for working in the round, being careful to not twist your stitches. Round 1: Knit into the front and back (kfb) 8 times. (16 stitches) Round 2: Purl. Round 3: *P1, kfb, repeat from * to end of round. (24 stitches)
Calculateur de tricotage | Techniques, trucs et astuces | Atelier www.lainebox.com Laines Fontyfabriquées en France Voir le panier Votre panier est vide Bienvenue sur LaineBox Connexion Fermer Commentaires +4 #41chanel40@aol.com15-05-2014 06:20 merci pour toutes ces infos, je m'inscris et partage sur mon blog ! -1 #42lucienne22-05-2014 10:12 Bien trouvé +22 #43lucienne30-05-2014 06:57 dans la 2eme.case jaune transformer en cm mais à quoi c"a correspond c'est cm ? +5 #44Martha08-07-2014 18:50 Je vais essayer et je reviendrai vous dire le résultat. +29 #45Tiffany16-07-2014 14:33 Bonjour,je me suis lancée dans le tricot tout récemment et je souhaiterais faire une veste pour enfants mais je rencontre quelques difficultés. pourriez vous m'aider? +4 #46danypop30-09-2014 09:47 Bonjour Je découvre ce calculateur ... Rafraîchir la liste des commentairesS’abonner au flux RSS pour les commentaires de cet article. JComments Contactez nous Recherche avancée Tous nos produits Soldes Pelotes de laine par matière Pelotes par Marque Fils Ecologiques Kits Tricot Patrons tricot Bons KDO Newsletter
Du tricot pour mes fesses: un (mini) pouf Histoire de me rajouter un truc sur ma liste d'encours, je me suis mise à chercher sur le net comment faire ces gros poufs au crochet (Dieu seul sait comment cette idée m'est encore venu à l'esprit). Et puis, entre temps, je suis tombée sur ce tuto trop bien, en français, fastoche et tout le tralala, d'un pouf au tricot!! Alors hop hop hop, ni une ni deux (bon en fait si, ça m'a pris un temps certain pour les trouver dans mon bazaar), ni vu ni connu (aucun rapport avec la choucroute), j'ai sorti mes plus grosses aiguilles (000, anglaises je crois qui correspondent apparement à du 10) que j'avais piquées à ma mère ben quoi elle les voulait plus, mon Phil coton 7 bleu qui avait été détricoté moultes fois dans une tentative de snood (je crois que ce fil n'était pas fait pour faire un snood, non, son destin était de se retrouver sous mes fesses). J'avoue, j'ai eu un peu peur à un moment. Et pour finir, c'est troooop bien comme je l'imaginais!! Ça serait vraiment pas sérieux... hein??
Formerly the Pale Blue Atlas Club by ShopCollinGarrity Zippered Hand Warmers Zippers, in this case, dispose of their actual use and embrace the whimsy of their style. Bold and chunky, bright and friendly, these zippers are here for our entertainment only! Wear them on the palm side or the knuckle side; up, down, or half way in between, they'll make you smile! Madeline Tosh's new Tosh Merino DK sets the stage for all of this zipper play. Right in between Tosh Light and Tosh Worsted, the DK weight is the same beautiful single ply superwash merino as its cousins. And most importantly, it comes in the same palette of luminescent hand dyed colors that makes Madeline Tosh some of our very favorite yarn! The Materials Tomato Hand Warmers Luster Hand Warmers The Pattern Gauge 6 stitches = 1 inch in stockinette stitch Finished Size Comfortably stretches to about 8 inches in circumference, to fit most women. 11 1/2 inches in length. Hand Warmer A Cast 43 stitches onto one double pointed needle. Working back and forth with two double pointed needles... Thumb Hole Cut the yarn. Hand
Explications de l'étole fleurie Dimensions : 179 x 50 cm Matériel : Fils à tricoter Rowan, qualité « Felted tweed »- pel. de 50 g. :11 pel. A Seafarer 170 et qualité « Kidsilk Haze » - pel. de 25 g., utilisé en double : 2 pel. Aig. n°3,5 Un carré 10 cm jersey end. jacquard, aig. n°3,5 = 23 m. et 32 rgs Monter 116 m. 1er rg : (end) * l m. env., 1m end. *, répéter de * à * jusqu'à la fin du rg. 2e rg : * l m. end., l m. env. *, répéter de * à * jusqu'à la fin du rg. Ces 2 rgs forment le point de riz. 7e rg : (end) : 4 m. point de riz, 108 m. end., 4 m. point de riz. 8e rg: 4 m. point de riz, 108 m. env., 4m point de. riz. Répéter ces 2 rgs encore 4 fois, en terminant par un rg sur l'env. Cont. en suivant la grille: les 4 premières et 4 dernières m. au point de riz, les 108 m. centrales en jersey end. jacquard. Tric. les 542 rgs de la grille, en terminant par un rg sur l'env. Casser les fils de couleurs et continuer en fil A uniquement. Répéter 5 fs le 7e et le 8e rgs puis 3 fs les rgs 1 et 2. Rab. en tric. les m. au point de riz.
Dentelle aux fuseaux - Technique de base Préparatifs, mouvements, faire un carton et tourner les coins Les préparatifs Explication des fournitures Des fuseauxUn coussin à dentelle (carreau)Du filDes épingles de dentellièreUne carte à épinglerUn poinçon ou un porte-pointe avec pointes Les fuseaux: Un fuseau est une barre de bois avec une tête à une extrémité, où l'on enfile parfois des perles pour le lester. Le coussin à dentelle: C'est la base sur laquelle on fabrique la dentelle. Le fil: Celui utilisé pour faire de la dentelle n'est pas nécessairement très fin. Les épingles: Elles servent à tenir les motifs en forme jusqu'à ce qu'ils soient achevés. La carte à poinçonner: On perfore une carte pour établir le tracé de la dentelle. Le poinçon: Il est utilisé pour perforer la carte. Technique Préparation des fuseaux Le nombre de fuseaux à utiliser dépend de la dentelle à réaliser, mais on prend toujours un nombre pair, sauf dans de rares exceptions. On n'utilise pas tous les fuseaux en même temps. Les mouvements #1 - Tourner Note schéma
Bois Urbain