
LxupsyyKbE1r9zwcno1_400. Ltw8yptbcl1qzsc4ko1_1280. “keys to my heart” February 2, 2011 § Here’s the key to expressing your fondest feelings this Valentine’s Day.

Why not harvest the keys of an old, unwanted keyboard to devise a message filled with warm words for your loved one? This simple project allows you to customize the color as well as create duplicates of keyboard keys. You will need: a. B. C. Paint the keys with two to three coats of spray paint. Lx9btfzdlO1qdk6uqo1_500. Lvd19qnzxV1r17198o1_500. D.I.Y Bow Necklace Tutorial. Wear It On Your Head Wednesday #7. Today’s project is a waterfall braid.

I’ve seen these all over Pinterest and wanted to try it for myself to see if it might work for my daughter, who has the perfect hair for braiding. This wasn’t as hard as I thought it would be. If you can French braid, you can do this. The first things is to catch your subject while she’s on Pinterest. She will stay still that way. I kept braiding all around the back, dropping a piece of hair on the bottom side of the braid each time that side was folded into the braid.
Once I got to the other side of her head, I added in the front section of hair and rubber banded it. Here’s how it looks from the front: A Travel-Fund DIY. Valentine lightbulb. I know a lot of people find valentine’s day to be a commercialized, over-hyped, pressure-cooker of a holiday (um, take it easy with the chocolate aisles, drug stores). in my mind though, valentine’s day is great because such little things can make huge statements on this romantic day. pretty much any act of kindness carries with it a bigger message of love: a note on the counter, an extra long hug, a favorite food in the fridge, etc. so with the “little gifts” concept in mind, i bring you this valentine’s day light bulb. a subtle love note tucked inside a pretty glass bulb, this can hopefully be displayed year round, and have longer lasting power than a dozen roses (not that i’m knocking roses). the other awesome part of this project is that once you’ve hollowed out a light bulb, the possibilities are endless for future projects: mini terrarium?

Check. handmade snow globe? Check.. go crazy! CLICK HERE for the full how-to after the jump! Materials: cost: How To Mix Chalkboard Paint in Any Color. We love using chalkboards as backdrops for displays and parties (like this one here!).

So we were super excited to learn that you can create your own custom colors-and it's really easy! m5fjfrJ6OM1rvcqxro1_500. What To Do With Old Books? Turn Them Into Clocks! - Brit & Co. - Episodes. Books have undergone quite the transformation over the last decade.

Today's generation is downloading more of them than ever before, supplementing their array of hardcovers with new digital titles that they can get on their iPads or Kindles. DIY Faux Terrariums From Please Note. Hi, friends!
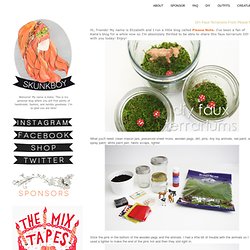
My name is Elizabeth and I run a little blog called Please Note. I've been a fan of Katie's blog for a while now so I'm absolutely thrilled to be able to share this faux terrarium DIY with you today! Enjoy! What you'll need: clean mason jars, preserved sheet moss, wooden pegs, dirt, pins, tiny toy animals, red paint, white spray paint, white paint pen, fabric scraps, lighter Stick the pins in the bottom of the wooden pegs and the animals. Spray paint the pegs white. Fill the jars with a little bit of dirt. Once the pegs are dry, paint the tops red. Once the red paint is dry, use a white paint pen to add the white dots. m46yvglGpG1r0a7vro1_500. DIY projects made from everyday objects. I was inspired to make this DIY tote bag after I took a trip to the farmer's market and realized I needed a comfortable and lightweight bag to carry all my goodies.
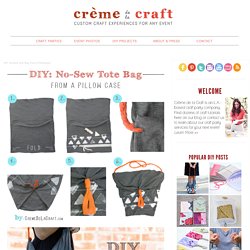
I love the way this DIY project turned out and, more importantly, there was no sewing involved! A pillowcase already has all the stitching you need to create this easy and stylish tote bag. The cross-body shoulder strap also makes it super comfortable to carry around all day. Just grab a pillowcase from your dresser, stamp it, give it a couple snips and you've got a custom carry-all tote for your next trip to the market! Follow the steps below to make your very own. Materials: • King Size Pillowcase (you could also use a standard size, but the bag will be smaller. DIY Fork Ring. 12 Amazing DIY Nail Art Designs Using Scotch Tape. DIY Braided Hex Nut Bracelet. We’re nuts for nuts.

Is there a more versatile and inexpensive DIY component than a hex nut from the hardware store? You can imagine our excitement when we first discovered Philip Crangi’s Giles & Brother Hex Collection. Honestly, nuts braided into jewelry is WTF genius! With a few items that we always seem to have lying around, we tackled the technique and made our own spine-like braided hex nut wrap bracelet.
You’ll need:3 strands of cotton butcher’s twine cut into one yard pieces18 small brass hex nutsa bit of dexterity! Gather the 3 strands of twine and tie a knot at the top, leaving about 2 inches of slack. Keep your thumb at the base of the braid, holding the nut in its place. Repeat the steps, by threading the rest of the nuts to the outer pieces of twine before they are crossed over.
The bracelet should wrap around your wrist at least two or three times. Good luck!! (top image from here, rest of images by Honestly…WTF)