
Raspberry Pi GPIO Explained. The Raspberry Pi is a computer, and from a connections point of view it doesn’t look much different to a normal desktop computer.
It has USB ports for connecting a keyboard and mouse, and a video output port for connecting up a display. Because it is more compact and lower cost than a large desktop PC, it becomes possible to use the Raspberry Pi or other small single board computers (SBCs) as they are known, for many scenarios where a desktop or laptop PC would not be feasible. Often you may want to connect up other ‘things’ to a computer. For example you may wish to use a computer to measure the brightness level and automatically control lights, or to sound an alarm if an intruder is detected. RPi Tutorial Easy GPIO Hardware & Software. Back to the Hub, or the Tutorials page.

GPIO Hardware & Software Tutorials: Warnings While most of these circuits may interface directly to the RPi, the use of a buffered interface (such as the one supplied by the Gertboard) is recommended which will help protect against damage. Alternatively, experiment with one of the #Alternative Test Platforms. The GPIO pins connect directly into the core of the ARM processer, and are static-sensitive, so you should avoid touching the pins wherever possible. Extreme caution should be exercised when interfacing hardware at a low level, you may damage your RPi, your equipment and potentially yourself and others. Aims This tutorial is based on this thread and aims to introduce basic circuits which can be used with the RPi's General Purpose Input/Output (GPIO). It is highly recommended that additional GPIO Protection Circuits are used to protect the delicate GPIO pins if interfacing to RPi hardware. Useful Links/Resources Protection Circuits Basic Circuits.
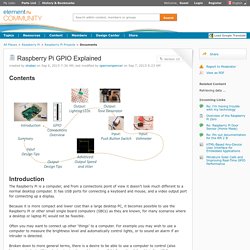
Raspberry Pi GPIO Tutorial. S Raspberry Pi Lesson 4. GPIO Setup. One of the great things about the Raspberry Pi is that it has a GPIO connector to which you can attach external hardware.
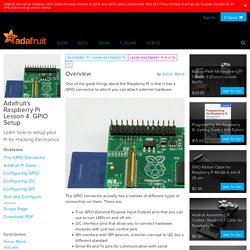
The GPIO connector actually has a number of different types of connection on them. There are: True GPIO (General Purpose Input Output) pins that you can use to turn LEDs on and off etc. I2C interface pins that allow you to connect hardware modules with just two control pins SPI interface with SPI devices, a similar concept to I2C but a different standard Serial Rx and Tx pins for communication with serial peripherals In addition, some of the pins can be used for PWM (pulse Width Modulation) for power control and another type of pulse generation for controlling servo motors called PPM (Pulse Position Modulation).
In this tutorial, you are not actually build anything, but you will learn how to configure your Raspberry Pi and install useful libraries ready to start attaching some external electronics to it. GPIO: Raspberry Pi Models A and B - Raspberry Pi Documentation. The Raspberry Pi Guy. NEW Raspberry Pi Zero – $5 Computer!

Almost 4 years on from initial launch and 7 million boards later, the latest slice of Pi has just been served. Meet the Raspberry Pi Zero. A full computer available to buy for only £4 ($5). It features a 1GHz CPU, 512MB of RAM, mini HDMI and brand new slender form factor. Watch my review for more information and a complete look at this revolutionary new device! Using the GPIO. Introduction au GPIO sur le Raspberry-Pi (1/2) Suite du premier article sur le GPIO, nous allons passer ici à la phase pratique !
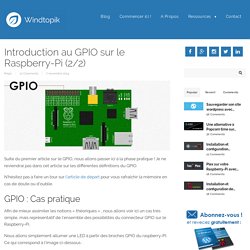
Je ne reviendrai pas dans cet article sur les différentes définitions du GPIO. N’hésitez pas à faire un tour sur l’article de départ pour vous rafraîchir la mémoire en cas de doute ou d’oublie. GPIO : Cas pratique Afin de mieux assimiler les notions « théoriques » , nous allons voir ici un cas très simple, mais représentatif de l’ensemble des possibilités du connecteur GPIO sur le Raspberry-Pi. Nous allons simplement allumer une LED à partir des broches GPIO du raspberry-PI. Schéma « basique » du cas pratique Avant de commencer, voici les éléments qu’il vous faut acquérir si vous souhaitez réaliser ce tutoriel de A à Z . Préparation du Raspberry-Pi Pour commencer ce cas pratique, nous allons préparer le Raspberry-Pi en configurant la partie logicielle. Partie Logiciel Il existe comme nous l’avons vu dans l’article précédent plusieurs méthodes pour modifier l’état d’une broche GPIO : Installation de WritingPi.
Gestion du port GPIO du Raspberry Pi avec Python. Thereafter, we'll go on the assumption that we are developing on the latest model namely a Raspberry Pi B2.
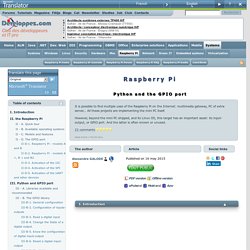
There are many libraries dedicated to the Raspberry Pi. They are stored, for the most part, on Pypi. We will study here is the historical library: RPi.GPIO. To install it, so just a simple install PIP: If you do not yet have pip, you just load get - pip.py, and then run it through the following command. RPi Tutorials. Back to the Hub.
Community Pages: Tutorials - a list of tutorials. Learn by doing. Guides - a list of informative guides. Make something useful. Projects - a list of community projects. Tasks - for advanced users to collaborate on software tasks. Datasheets - a frambozenier.org documentation project. Education - a place to share your group's project and find useful learning sites. Community - links to the community elsewhere on the web.
Games - all kinds of computer games. Introduction.