
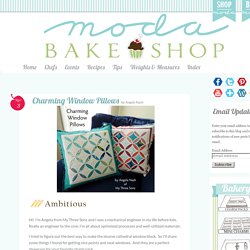
I’m Angela from My Three Sons and I was a mechanical engineer in my life before kids. Really an engineer to the core, I’m all about optimized processes and well-utilized materials. I tried to figure out the best way to make the elusive cathedral window block. So I’ll share some things I found for getting nice points and neat windows. And they are a perfect showcase for your favorite charm pack. We’re going to make two pillows here – most efficient use of materials and all. 1 Just Wing It Charm Pack 1 3/4 Yards Bella Solid Snow 4 Just Wing It Fat Quarters Washable glue stick 2 Square pillow forms – 20″x20″ 2 18-20″ zippers (optional) Pink and Blue Matching thread (optional) Step One: In which you fold fabric and steam it into submission First, from the white yardage cut 5 strips the entire width of the fabric and each 10.5″ wide.
Subcut each of those 5 strips into 10.5″ squares so that you end up with a total of 20 pieces. But you do need to make a perfect 9″ square out of poster board. Design*Sponge & Blog Archive & sewing 101: making a pouf. Add a burst of color to your room with this crafty pouf!

At 17” wide and 10” deep, it’s large enough to serve as floor seating or a foot stool. (And if you have pets, I have a feeling they may want to make this their new favorite spot!) This project is a little challenging to sew, but it’s not too difficult, so if you’re comfortable with the basics of sewing, give it a try. You can make a colorwheel effect with a range of solid colors, or choose a variety of patterned fabrics for a louder patchwork effect. Medium-weight cottons work well for this design (check out quilting shops for great selections of solids and prints).
I love the idea of making a set of these poufs in a range of sizes, for a sculptural stack of cushions that will become a room element in their own right. CLICK HERE for the full how-to after the jump! Finished Dimensions: 17” diameter by 10” tall What You’ll Need ¼ yard each 12 coordinating fabrics (I used quilting cottons) 1 yard muslin 3 pounds fiberfill stuffing iron.
Tutorial: Scrap Buster Fall Pillow. This is my favorite thing to do with my little scraps, and since its Scrap Buster month over at Sew, Mama, Sew, I made a quick tutorial so you can make your own.

This pillow cover is 16" square with an envelope back & the design possibilities are endless! I added some pillows I’ve previously made with this same method at the end of this post. Happy Sewing! You’ll Need: 1. 2. 3. 4. Iron your fabric scraps onto your appliqué material according to the directions on the appliqué material. Now with scissors cut out your trunk and leaf shapes. When you get all your leaves cut out, tear the backing appliqué paper off the leaves and trunk. Then you can arrange them how you want on your pillow front. Once your design is how you like it, press with an iron over each spot for a few seconds making sure not to bump anything out of place. Now you can sew either along the inside edges of your leaves, or you can do a zig zag stitch or blanket stitch around the edges if you prefer.